Required package on RHEL for iSCSI
iscsi-initiator-utils
Multipathing package
device-mapper-multipath
High level process with iSCSI
- Setup iSCSI at the initiator
- Setup Host at the FlashArray level
- Discover the iSCSI targets
- Login to the iSCSI targets
- Create volumes, attach to the hosts, scan them and create the filesystems
1. To set up iSCSI at the host level, install the package iscsi-initiator-utils and start the iscsi service. Make sure to include the multipathing package as well.
|
1 2 3 4 5 6 7 8 9 10 11 12 13 14 15 16 17 18 |
yum install iscsi-initiator-utils yum install device-mapper-multipath systemctl start iscsid </code> <code>[root@oraprod ~]# </code><strong><code>systemctl enable</code> iscsid</strong> <code>Created symlink from /etc/systemd/system/multi-user.target.wants/iscsid.service to /usr/lib/systemd/system/iscsid.service. [root@oraprod ~]# </code><strong><code>systemctl start iscsid</code></strong><code> [root@oraprod ~]# </code><strong><code>systemctl status iscsid</code></strong> <code>● iscsid.service - Open-iSCSI Loaded: loaded (/usr/lib/systemd/system/iscsid.service; enabled; vendor preset: disabled) Active: active (running) since Fri 2018-04-20 15:46:27 PDT; 4s ago Docs: man:iscsid(8) man:iscsiadm(8) Process: 3468 ExecStart=/usr/sbin/iscsid (code=exited, status=0/SUCCESS) Main PID: 3471 (iscsid) CGroup: /system.slice/iscsid.service ├─3470 /usr/sbin/iscsid └─3471 /usr/sbin/iscsid</code> <code>Apr 20 15:46:27 oraprod systemd[1]: Starting Open-iSCSI... Apr 20 15:46:27 oraprod iscsid[3468]: iSCSI logger with pid=3470 started! Apr 20 15:46:27 oraprod systemd[1]: Started Open-iSCSI. Apr 20 15:46:28 oraprod iscsid[3470]: iSCSI daemon with pid=3471 started! |
Implement all the Linux best practices for FlashArray that can be found here.
https://support.purestorage.com/Solutions/Linux/Reference/Linux_Recommended_Settings
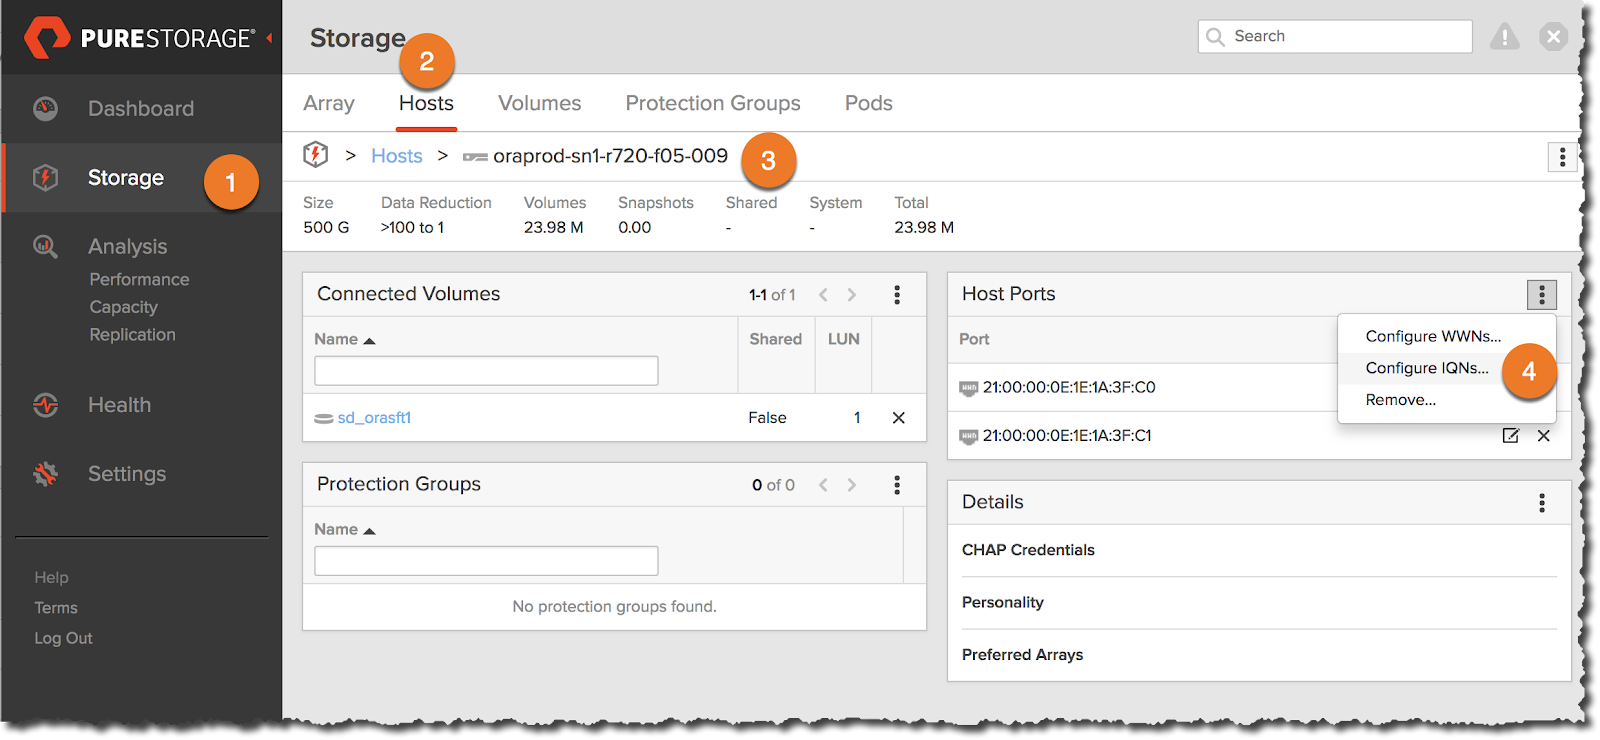
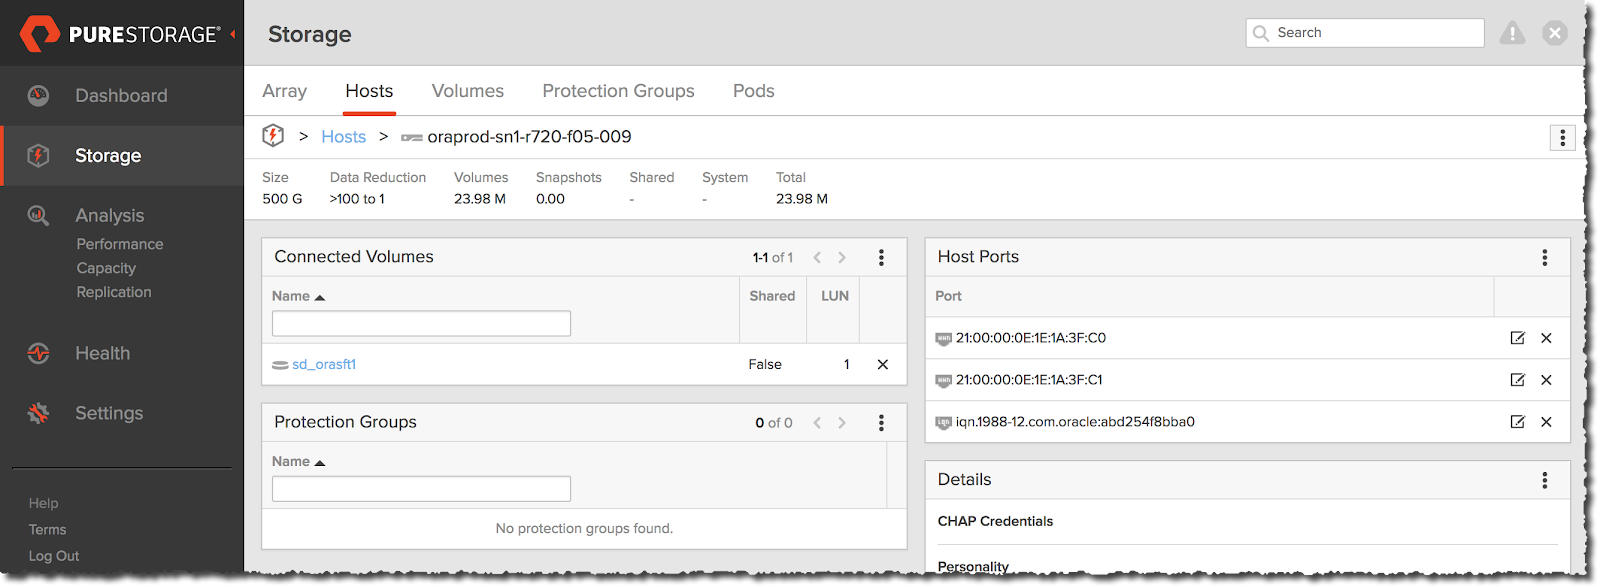
2. Setup the host at the FlashArray level by first getting the initiator’s IQN which can be found at /etc/iscsi/initiatorname.iscsi
Example:
[root@oraprod ~]# cat /etc/iscsi/initiatorname.iscsi

InitiatorName=iqn.1988-12.com.oracle:abd254f8bba0
Go the Pure FlashArray, click Storage on the left frame and select the Hosts tab. Click the + sign on the right side to create a new host. Provide the IQN name you got from the initiator.

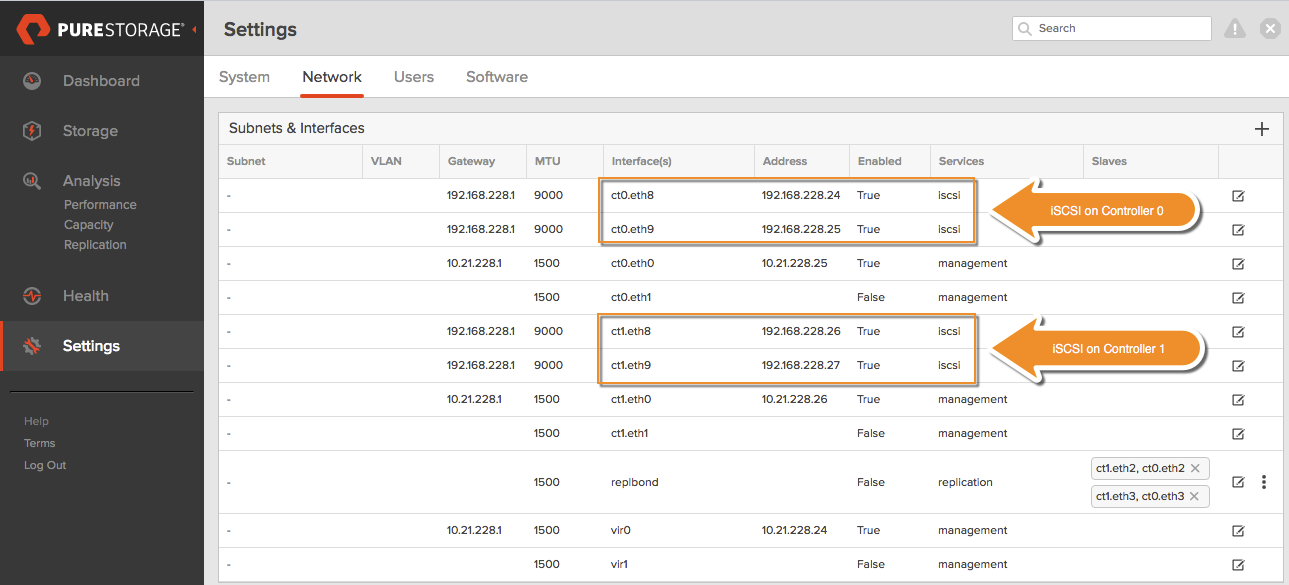
3. On the host, discover the iSCSI targets
$ iscsiadm -m discovery -t st -p <target IP address>
Example:
|
1 2 3 4 5 |
[root@oraprod ~]# iscsiadm -m discovery -t st -p 192.168.228.24 192.168.228.24:3260,1 iqn.2010-06.com.purestorage:flasharray.6fb3576b8af88fd5 192.168.228.25:3260,1 iqn.2010-06.com.purestorage:flasharray.6fb3576b8af88fd5 192.168.228.26:3260,1 iqn.2010-06.com.purestorage:flasharray.6fb3576b8af88fd5 192.168.228.27:3260,1 iqn.2010-06.com.purestorage:flasharray.6fb3576b8af88fd5 |
4. Create a volume on Pure FlashArray and attach to the host. Without a volume/lun attached to the host, trying to login to the target will result in following errors.
iscsiadm -m node –targetname iqn.2010-06.com.purestorage:flasharray.7b87f11aad2d06c8 -p 192.168.154.254 -l
|
1 2 3 |
Logging in to [iface: default, target: iqn.2010-06.com.purestorage:flasharray.7b87f11aad2d06c8, portal: 192.168.154.254,3260] (multiple) iscsiadm: Could not login to [iface: default, target: </code> <code>iqn.2010-06.com.purestorage:flasharray.7b87f11aad2d06c8, portal: 192.168.154.254,3260]. iscsiadm: initiator reported error <strong>(24 - iSCSI login failed due to authorization failure)</strong></code> <code>iscsiadm: Could not log into all portals |
5. Using the IQN information of the target, login to iSCSI target using iscsiadm command.
iscsiadm -m node –targetname <target iqn> -p <target IP address> –login
Example:
|
1 2 3 4 |
[root@oraprod ~]# iscsiadm -m node --targetname iqn.2010-06.com.purestorage:flasharray.6fb3576b8af88fd5 -p 192.168.228.24 --login Logging in to [iface: default, target: iqn.2010-06.com.purestorage:flasharray.6fb3576b8af88fd5, portal: 192.168.228.24,3260] (multiple) Login to [iface: default, target: iqn.2010-06.com.purestorage:flasharray.6fb3576b8af88fd5, portal: 192.168.228.24,3260] successful. [root@oraprod ~]# |
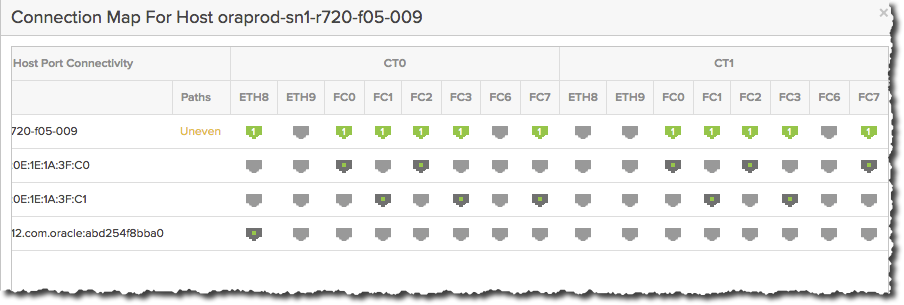
Login on all the iSCSI ports on the target. As of now, we have connected only to the first iSCSI target IP and hence Purity GUI shows Uneven paths. Run the above login command across all available iscsi paths .
To login automatically on the host startup, run the following command to update the config at the host level. Do it on all the available iSCSI target IP addresses.
iscsiadm -m node -T <target iqn> -p <target IP> –op update -n node.startup -v automatic
Example:
|
1 2 3 4 5 |
[root@oraprod ~]# iscsiadm -m node --targetname iqn.2010-06.com.purestorage:flasharray.6fb3576b8af88fd5 -p 192.168.228.27 --op update -n node.startup -v automatic [root@oraprod ~]# iscsiadm -m node --targetname iqn.2010-06.com.purestorage:flasharray.6fb3576b8af88fd5 -p 192.168.228.26 --op update -n node.startup -v automatic [root@oraprod ~]# iscsiadm -m node --targetname iqn.2010-06.com.purestorage:flasharray.6fb3576b8af88fd5 -p 192.168.228.25 --op update -n node.startup -v automatic [root@oraprod ~]# iscsiadm -m node --targetname iqn.2010-06.com.purestorage:flasharray.6fb3576b8af88fd5 -p 192.168.228.24 --op update -n node.startup -v automatic |
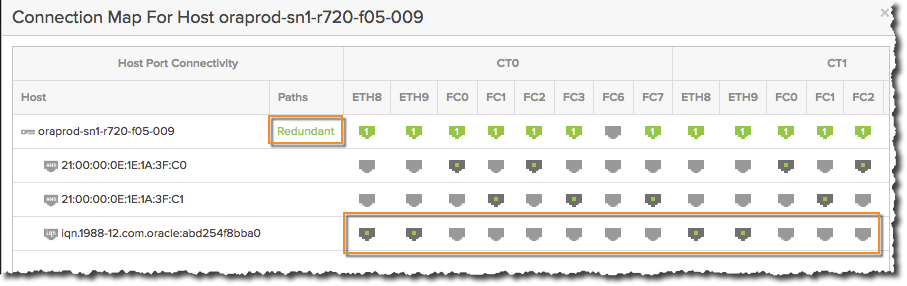
You can verify if the iSCSI setup is successful by checking at the FlashArray GUI. Click Health on the left frame and go to the Connections tab. Look for the Paths against the host you just added. If it shows “Unused Port” and if you don’t see any entries against the host initiator it means the host has not logged into the target.

Clicking on the “Unused Port” shows the connection map of the host ports.
After discovering and logging into the target from all the initiators, we can see that the Paths shows Redundant across all of them.
5. Create the volumes on Pure Flasharray and attach to the host.
6. Update /etc/multipath.conf or udev rules based on your standard operating procedures to create a persistent name for the multipath device.
|
1 2 3 4 5 6 7 8 9 10 11 12 |
multipath { wwid 3624a93706c1d7213605f4920000117ed alias fs_prod_data01 } multipath { wwid 3624a93706c1d7213605f4920000117ee alias fs_prod_data02 } multipath { wwid 3624a93706c1d7213605f4920000117ef alias fs_prod_fra } |
7. Scan for the devices on the host using rescan-scsi-bus.sh (sg3_utils package).
8. The devices should be available for use now.
|
1 2 3 4 |
[root@oraprod ~]# ls -ltr /dev/mapper/fs* lrwxrwxrwx. 1 root root 8 May 1 17:57 /dev/mapper/fs_prod_data02 -> ../dm-11 lrwxrwxrwx. 1 root root 8 May 1 17:57 /dev/mapper/fs_prod_fra -> ../dm-12 lrwxrwxrwx. 1 root root 8 May 1 17:57 /dev/mapper/fs_prod_data01 -> ../dm-13 |
|
1 |
9. Use parted or fdisk to create the partition on the devices. |
[root@oraprod ~]# ls -ltr /dev/mapper/fs*

lrwxrwxrwx. 1 root root 8 May  1 18:06 /dev/mapper/fs_prod_data01p1 -> ../dm-14

lrwxrwxrwx. 1 root root 8 May  1 18:06 /dev/mapper/fs_prod_data01 -> ../dm-13

lrwxrwxrwx. 1 root root 8 May  1 18:06 /dev/mapper/fs_prod_data02p1 -> ../dm-15

lrwxrwxrwx. 1 root root 8 May  1 18:06 /dev/mapper/fs_prod_data02 -> ../dm-11

lrwxrwxrwx. 1 root root 8 May  1 18:06 /dev/mapper/fs_prod_fra1 -> ../dm-16

lrwxrwxrwx. 1 root root 8 May  1 18:06 /dev/mapper/fs_prod_fra -> ../dm-12
10. Create the filesystem on top of the partitions.
|
1 2 3 4 5 6 7 8 9 10 |
[root@oraprod ~]# mkfs -t xfs /dev/mapper/fs_prod_data01p1 meta-data=/dev/mapper/fs_prod_data01p1 isize=256 agcount=4, agsize=67108352 blks = sectsz=512 attr=2, projid32bit=1 = crc=0 finobt=0, sparse=0 data = bsize=4096 blocks=268433408, imaxpct=25 = sunit=0 swidth=0 blks naming =version 2 bsize=4096 ascii-ci=0 ftype=1 log =internal log bsize=4096 blocks=131071, version=2 = sectsz=512 sunit=0 blks, lazy-count=1 realtime =none extsz=4096 blocks=0, rtextents=0 |
11. Mount the filesystem using _netdev option to make sure to inform the kernel that these filesystems should be mounted after all network interfaces are brought up to avoid missing device issues if it comes up earlier.
|
1 2 3 |
/dev/mapper/fs_prod_data01p1 /u02 xfs _netdev,nobarrier,noatime,discard 1 2 /dev/mapper/fs_prod_data02p1 /u03 xfs _netdev,nobarrier,noatime,discard 1 2 /dev/mapper/fs_prod_fra1 /u04 xfs _netdev,nobarrier,noatime,discard 1 2 |