


For a long time, storage has been outclassed when compared to the leaps and bounds compute performance has grown over the last ten years. With the adoption of the NVMe (non-volatile memory express) as a standard for accessing flash storage, this is no longer true. We can now exploit the levels of parallelism available in modern NVMe devices to achieve lower latency and greater performance.
With the launch of DirectFlash™ Fabric earlier in 2019, FlashArray//X™ is now capable of delivering the low latencies and performance gains for shared storage environments. Prior to any implementation of NVM Express over fabrics (NVMe-oF), those wishing to benefit from NVMe storage would need to use direct-attached storage. This is not always ideal as many applications and organizations depend on centralized storage with data services in order to reduce costs and complexity, and increase efficiency.
The purpose of this blog post is to provide the steps required to implement NVMe-oF using RDMA over Converged Ethernet (RoCE) for SUSE Enterprise Linux (SLES) 15 and subsequent releases.
An important item to note is that RoCE requires a lossless network, requiring global pause flow control or PFC to be configured on the network for smooth operation.
All of the below steps are implemented using Mellanox Connect-X4 adapters.
System and software requirements
- SUSE 15 SP1 or higher.
- A Mellanox Connect-X4 or higher adapter installed in the system.
- The Development Tools Module should be added in Extension and Module Selection.
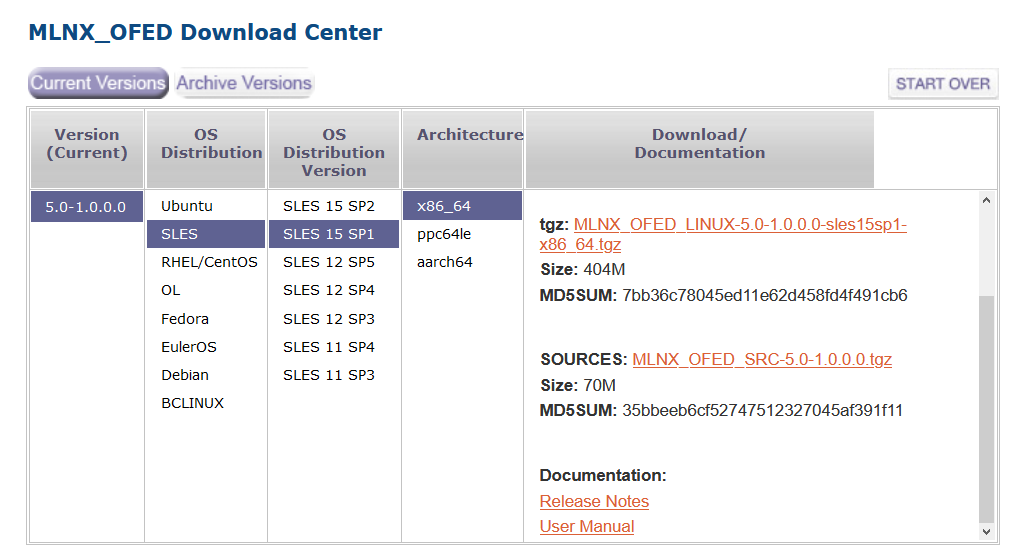
- The latest Mellanox OFED SRC package for SUSE needs to be downloaded and built for the priority flow control(PFC) quality of service (QoS) tools. This was the package used in the below steps. NVMe/RoCE works with the inbox drivers and Mellanox OFED does not need to be installed.
Step 1. Install the following packages using the zypper package manager on the host.
- rpm-build
- nvme-cli
Step 2. Configure multipathing on the host.
- Ensure Native NVMe multipathing is turned off by appending “nvme-core.multipath=N” to the optional kernel parameters in /boot/grub2/grub.cfg (reboot required)
- Add the following device definition to the multipath.conf file :
|
1 2 3 4 5 6 7 8 9 10 11 |
device { vendor "NVME" path_selector "queue-length 0" path_grouping_policy multibus fast_io_fail_tmo 10 user_friendly_names no no_path_retry 10 features 0 dev_loss_tmo 60 polling_interval 10 } |
Step 3. Build the Mallanox OFED package to get access to the QOS tool on the host
- Decompress the downloaded Mellanox OFED package
|
1 |
tar -xvf /<path to package>/MLNX_OFED_SRC-5.0-1.0.0.0.tgz |
- In the decompressed folder install the source rpm
|
1 |
rpm -ivh /<path-to-decompressed-folder>/MLNX_OFED_SRC-5.0-1.0.0.0/SRPMS/mlnx-ofa_kernel-5.0-OFED.5.0.1.0.0.0.1.g34c46d3.src.rpm |
- Build the Mellanox kernel specification to get access to the Mellanox QOS utility
|
1 |
rpmbuild -bp /usr/src/packages/SPECS/mlnx-ofa_kernel.spec |
- Once built use the mlnx_qos tool to set the correct PFC queue and DSCP trust state for each mellanox port used for NVME-oF through RoCE in the system (the ports on our system were named eth6 and eth7)
1234/usr/src/packages/BUILD//mlnx-ofa_kernel-5.0/source/ofed_scripts/utils/mlnx_qos -i eth6 --pfc=0,0,0,1,0,0,0,0/usr/src/packages/BUILD//mlnx-ofa_kernel-5.0/source/ofed_scripts/utils/mlnx_qos -i eth7 --pfc=0,0,0,1,0,0,0,0/usr/src/packages/BUILD//mlnx-ofa_kernel-5.0/source/ofed_scripts/utils/mlnx_qos -i eth6 --trust dscp/usr/src/packages/BUILD//mlnx-ofa_kernel-5.0/source/ofed_scripts/utils/mlnx_qos -i eth7 --trust dscp
Step 4. Set the TOS for RoCE ports
Run the following command loop to set the TOS for all RDMA interfaces to 106:
|
1 2 3 4 5 6 |
for f in `ls /sys/class/infiniband`; do echo "setting TOS for IB interface:" $f mkdir -p /sys/kernel/config/rdma_cm/$f/ports/1 echo 106 > /sys/kernel/config/rdma_cm/$f/ports/1/default_roce_tos done; |
Step 5. Generate and get the NVMe qualified name on the host and then configure and connect some volumes to it in the Pure Storage Web GUI.
Run the following command to generate the NVMe qualified name(NQN) and retrieve it for later use. An NQN serves the same purpose as an internet qualified name (IQN) for iSCSI or world wide name(WWN) for Fiber channel.
|
1 2 |
nvme gen-hostnqn > /etc/nvme/hostnqn cat /etc/nvme/hostnqn |
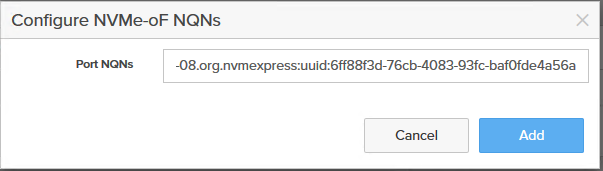
Navigate to the Storage View and in the hosts tab create a host. Once this host is created navigate to its management view and in the hosts ports section select the three vertical ellipses and select “Configure NQNs…”

Using the output from cat /etc /nvme/hostnqn copy this value into the dialog and press Add.
Connect the required volumes to this host.
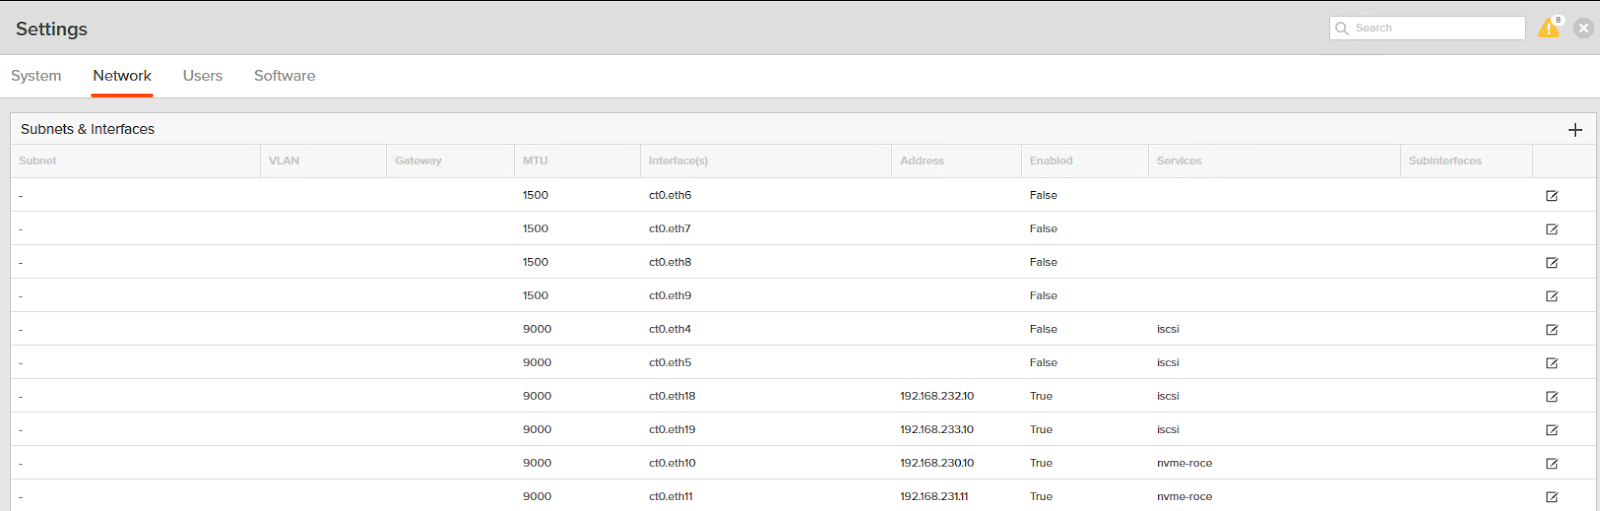
Note the NVMe-roce ports and IP addresses to connect to in the Settings view under the network tab. NVMeoF RoCE support and service configuration on the FlashArray//X needs to be completed by Pure Support.
Step 6. Load the required NVMe kernel modules and connect the FlashArray volumes using RoCE.
First load nvme-core and nvme-rdma :
|
1 2 |
modprobe nvme_core modprobe nvme-rdma |
Then discover the NQN for the NVMeoF target at the NVMe-roce ports noted in the FlashArray GUI.
|
1 |
nvme discover -t rdma -a <IP address of initiator> |
Take note of the subnqn in the returned text as this is used to :
|
1 2 3 4 5 6 7 8 9 10 11 12 13 14 15 16 17 18 19 20 21 22 23 24 25 26 27 |
Discovery Log Number of Records 2, Generation counter 2 =====Discovery Log Entry 0====== trtype: rdma adrfam: ipv4 subtype: nvme subsystem treq: not required portid: 1 trsvcid: 4420 subnqn: nqn.2010-06.com.purestorage:flasharray.2524f325f75f8346 traddr: 192.168.230.10 rdma_prtype: roce-v2 rdma_qptype: connected rdma_cms: rdma-cm rdma_pkey: 0x0000 =====Discovery Log Entry 1====== trtype: rdma adrfam: ipv4 subtype: discovery subsystem treq: not required portid: 1 trsvcid: 4420 subnqn: nqn.2014-08.org.nvmexpress.discovery traddr: 192.168.230.10 rdma_prtype: roce-v2 rdma_qptype: connected rdma_cms: rdma-cm rdma_pkey: 0x0000 |
For each port to connect to on the FlashArray run the following to connect to all volumes for the relevant host via multiple paths:
|
1 |
nvme connect -t rdma -a <IP Address> -s 4420 -n <subnqn value> |
Ensure device-mapper multipath is enabled and check the devices which have been returned to it :
|
1 2 3 4 5 |
systemctl enable multipathd systemctl start multipathd Multipath -ll |
The devices connected will show up as below if configured correctly:
|
1 2 3 4 5 6 |
eui.004236a5adeeca4924a9377e000114de dm-6 NVME,Pure Storage FlashArray size=1.0T features='0' hwhandler='0' wp=rw `-+- policy='queue-length 0' prio=1 status=active |- 0:0:1:70878 nvme0n1 259:0 active ready running |- 1:2:1:70878 nvme1n1 259:2 active ready running `- 2:3:1:70878 nvme2n1 259:4 active ready running |
Step 7. Set the best practice parameters for the NVMe-oF connected devices as set out in thisknowledge base article.
Create the file “/etc/udev/rules.d/90-pure.rules” and add the following lines before saving the file and running “udevadm control –reload-rules” :
|
1 2 3 |
ACTION=="add|change", KERNEL=="dm-*", SUBSYSTEM=="block", ATTR{queue/scheduler}="none" ACTION=="add|change", KERNEL=="nvme*", SUBSYSTEM=="block", ATTR{queue/add_random}="0" ACTION=="add|change", KERNEL=="nvme*", SUBSYSTEM=="block", ATTR{queue/rq_affinity}="2" |
And that is it! Now the devices can be mounted and use the same as any other, with the added benefit of lower latency, comprehensive data services and management tools offered by FlashArray™.
Additional Resources:
FlashArray Product Features – NVMe
SUSE 15 Storage Administration Guide – NVMe-oF
Working with Source RPMs in SUSE
Blog Post : Pure brings hyperscale Architecture to the enterprise