


This article originally appeared on Medium.com and is republished with permission from the author.
As Elasticsearch matures, it is no longer just used to power search boxes. Instead, Elasticsearch is now moving to the core of data-powered systems. Business-critical databases require a serious data protection strategy. This post focuses on how to set up and use snapshots for Elasticsearch clusters running in Kubernetes.
This post builds upon a previous post that covers how to set up either an S3 or NFS snapshot repository in Elastic Cloud Enterprise and FlashBlade’s snapshot/restore performance. I will focus here on how to back up Elasticsearch clusters running using Elastic Cloud for Kubernetes (ECK).
What you should learn from this blog:
- How to configure a snapshot repository on an on-premises S3 object store
- How to set up and use a shared filesystem repository on NFS using a dynamically provisioned ReadWriteMany PersistentVolume
- Techniques to simplify setting up and using Elasticsearch snapshots in Kubernetes
Snapshot repositories enable powerful data protection workflows: recovering from user error and accidental deletion, restoration after infrastructure outages, and finally, cloning indices for dev/test workflows. And because the repositories can be shared amongst disparate clusters, you can restore and share indices across internal and public clouds.
An example possible topology is illustrated below with two distinct Kubernetes clusters, likely in different availability zones. Each cluster uses a local FlashBlade® as primary storage for Elasticsearch clusters, where latency is important, and the other FlashBlade as a primary snapshot repository. As you can see in the diagram, the Elasticsearch cluster in site 2 can restore from the local repository, enabling you to recover indices in a different site if needed. Not shown here is a similar connection from both clusters to the snapshot repository on FlashBlade A.
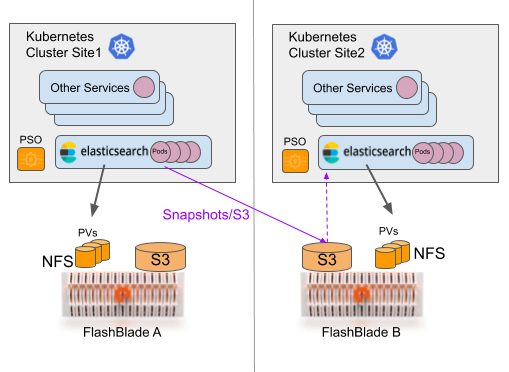
Figure 1: A possible DR architecture for multiple Kubernetes clusters. Site 2 can also use FlashBlade A as a snapshot repository.
With high performance, all-flash storage like FlashBlade, the snapshot and restores consistently achieve multiple GB/s throughput. With this performance, the bottleneck often moves to the Elasticsearch nodes themselves and not the snapshot repository. Storing snapshot repositories on FlashBlade complements the ability to run primary storage for Elasticsearch on PersistentVolumes provided by FlashBlade. As a bonus, when using FlashBlade for the snapshot repository (either S3 or NFS), my use case gets a 40% space reduction due to inline compression.
S3 Snapshot Repository
For an S3 snapshot repository, I programmatically install the necessary plugin on all Elastic nodes using init-containers. This is simpler than the alternative approach of building a custom image with the plugin included.
Add the initContainer spec to your Elasticsearch cluster definition (yaml) for the ECK operator:
initContainers:
- name: install-plugins
command:
- sh
- -c
- |
bin/elasticsearch-plugin remove --batch repository-s3
bin/elasticsearch-plugin install --batch repository-s3
The plugin is first removed to avoid subsequent failure to install if the plugin already exists.
By default, ECK enforces security in Elasticsearch clusters. As a result, we need to take care in providing our S3 access keys via a second init-container. I use a technique inspired by this blog, injecting the keys as environment variables and piping them into the Elasticsearch keystore.
The full pair of initContainers, named “install-plugins” and “add-access-keys,” looks as follows:
initContainers:
- name: install-plugins
command:
- sh
- -c
- |
bin/elasticsearch-plugin remove repository-s3
bin/elasticsearch-plugin install --batch repository-s3
- name: add-access-keys
env:
- name: AWS_ACCESS_KEY_ID
valueFrom:
secretKeyRef:
name: irp210-s3-keys
key: access-key
- name: AWS_SECRET_ACCESS_KEY
valueFrom:
secretKeyRef:
name: irp210-s3-keys <c/ode>
key: secret-key
command:
- sh
- -c
- |
echo $AWS_ACCESS_KEY_ID | bin/elasticsearch-keystore add --stdin --force s3.client.default.access_key
echo $AWS_SECRET_ACCESS_KEY | bin/elasticsearch-keystore add --stdin --force s3.client.default.secret_key
This technique relies upon the access keys being created as secrets with a one-off process, ideally immediately after the keys are created on the FlashBlade.
> kubectl create secret generic my-s3-keys --from-literal=access-key=’XXXXXXX’ --from-literal=secret-key=’YYYYYYY’
By default, Elasticsearch’s snapshot operations are limited to a single thread, which limits maximum possible performance. The maximum size of the thread_pool can be modified on each node at startup time only through a parameter in elasticsearch.yaml. For the ECK operator, add this parameter to the “config” section of each nodeSet:
config:
node.master: true
node.data: true
node.ingest: true
thread_pool.snapshot.max: 8
You can now create a snapshot repository with the following example json configuration.
{
“type”: “s3”,
“settings”: {
“bucket”: “elastic-snapshots”,
“endpoint”: “10.62.64.200”,
“protocol”: “http”,
“max_restore_bytes_per_sec”: “1gb”,
“max_snapshot_bytes_per_sec”: “200mb”
}
}
Replace the endpoint field with a data VIP for your FlashBlade and ensure that the destination bucket has been created already. The bucket can be created through the FlashBlade UI, CLI, or REST API.
The command guide in a later section will demonstrate the specific command to use curl to create the repository.
NFS Snapshot Repository
We can also use a shared filesystem snapshot repository as a backend to store snapshots on NFS without requiring any additional plugin installation. This is useful if a performant S3 object store is not available.
To create a shared filesystem with NFS, I mount a ReadWriteMany (RWX) PersistentVolume on all of the Elasticsearch nodes. This volume is backed by an NFS filesystem automatically provisioned by my Pure Service Orchestrator™ plugin. I could use a statically provisioned filesystem also, which would allow connections from other clusters.
Create a PersistentVolumeClaim (PVC) in ReadWriteMany mode:
kind: PersistentVolumeClaim
apiVersion: v1
metadata:
name: es-snap-repo-claim
spec:
storageClassName: pure-file
accessModes:
- ReadWriteMany
resources:
requests:
storage: 10Ti
This PVC assumes the ‘pure-file’ storageClass is installed and configured via PSO for FlashBlade connectivity. Otherwise, you will need to use the appropriate storageClass.
Then, simply add this volume as a mount to the pod template in your elasticsearch.yaml definition:
nodeSets:
- name: all-nodes
count: 5
podTemplate:
spec:
containers:
- name: elasticsearch
volumeMounts:
- name: es-snap-repo-vol
mountPath: /es-snaps
…
volumes:
- name: es-snap-repo-vol
persistentVolumeClaim:
claimName: es-snap-repo-claim
We also need to set path.repo to this mounted path in the yaml file for the Elasticsearch cluster:
config:
node.master: true
node.data: true
node.ingest: true
thread_pool.snapshot.max: 8
path.repo: [“/es-snaps”]
Once the cluster is configured and running, a shared filesystem snapshot repository is created. The JSON of its configuration is:
{
“type”: “fs”,
“settings”: {
“location”: “/es-snaps”,
“compress”: false,
“max_restore_bytes_per_sec”: “1gb”,
“max_snapshot_bytes_per_sec”: “1gb”
}
}
Since both S3 or NFS work as snapshot repositories, it is important to understand the trade-offs when choosing which to use. You will have noticed subtle differences in installation and configuration of the repository, but the biggest factor that favors S3 is the storage lifetime. A snapshot repository on S3 is not tied to a single Kubernetes cluster as with a dynamically provisioned PersistentVolume. As a result, you can snapshot and restore between entirely different Kubernetes clusters. But you can also achieve the same portability with statically provisioned NFS volumes. My recommendation is to prefer S3 if available.
Snapshot Command Guide
Administering an Elasticsearch cluster means using the REST API as a primary tool for interaction, especially if you want to build automation around your usage. The ubiquitous command line tool curl is a versatile client for any REST API and one I use heavily with Elasticsearch.
Instead of always manually crafting curl commands as needed, I find it very useful to create a workflow that lets me repeat similar tasks more quickly. The first step for that is an environment to run the curl commands and second is a catalog of pre-built commands that can be copy-pasted, reused, and modified easily.
The jump host is a plain pod: a simple container image with curl installed by default. To simplify further commands, I create two important environment variables that simplify connecting to a specific cluster. The first pulls in the Elasticsearch cluster’s password and the second encodes the cluster’s service name. If I have two different Elasticsearch clusters, I can simply make two versions of this pod and use the same exact command strings.
apiVersion: v1
kind: Pod
metadata:
name: es-jump
spec:
containers:
- name: es-jump
image: centos:7
env:
- name: PASSWORD
valueFrom:
secretKeyRef:
name: quickstart-es-elastic-user
key: elastic
- name: ESHOST
value: “https://quickstart-es-http:9200"
command: [“tail”, “-f”, “/dev/null”]
imagePullPolicy: IfNotPresent
restartPolicy: Always
Log in to this jump pod using ‘kubectl exec’ to create a new bash prompt:
> kubectl exec -it pod/es-jump bash
Alternatively, you could manually define the environment variables in any shell that has access to the Elasticsearch cluster. The jump pod is my personal preference.
Quick ES Snapshot Command Cheat Sheet
This cheat sheet is an adaptation of the Elastic API documentation and contains useful commands for manually taking and managing snapshots.
First, perform basic health checks and view indices:
curl -u “elastic:$PASSWORD” -k “$ESHOST/_cat/health?v”
curl -u “elastic:$PASSWORD” -k “$ESHOST/_cat/nodes?v”
curl -u “elastic:$PASSWORD” -k “$ESHOST/_cat/indices?v”
List snapshot repositories:
curl -u “elastic:$PASSWORD” -k “$ESHOST/_snapshot?pretty”
Create a snapshot repository named “my_s3_repository”:
curl -u “elastic:$PASSWORD” -k -X PUT “$ESHOST/_snapshot/my_s3_repository?pretty” -H ‘Content-Type: application/json’ -d’
{
“type”: “s3”,
“settings”: {
“bucket”: “elastic-snapshots”,
“endpoint”: “10.62.64.200”,
“protocol”: “http”,
“max_restore_bytes_per_sec”: “1gb”,
“max_snapshot_bytes_per_sec”: “200mb”
}
}
‘
Delete a snapshot repository:
curl -X DELETE -u “elastic:$PASSWORD” -k “$ESHOST/_snapshot/my_s3_repository?pretty”
Note that if you delete a repository and then recreate it with the same storage backend, the previously taken snapshots are still available. In other words, deleting a snapshot repository definition does not delete the snapshots.
List snapshots in a repository:
curl -u “elastic:$PASSWORD” -k “$ESHOST/_cat/snapshots/my_s3_repository?v”
Start a snapshot of all indices and give the snapshot a date-based name:
curl -u “elastic:$PASSWORD” -k -X PUT $ESHOST/_snapshot/my_s3_repository/test-snapshot-$(date +”%Y-%m-%d-%H-%M”)?pretty
Take a snapshot and wait for completion before returning:
curl -u “elastic:$PASSWORD” -k -X PUT $ESHOST/_snapshot/my_s3_repository/test-snapshot-$(date +”%Y-%m-%d-%H-%M”)?wait_for_completion=true&pretty
Take a snapshot of one specific index:
curl -u “elastic:$PASSWORD” -k -X PUT $ESHOST/_snapshot/my_s3_repository/test-snapshot?wait_for_completion=true -H ‘Content-Type: application/json’ -d’{ “indices”: “nyc_taxis” }’
List info about a specific snapshot:
curl -u “elastic:$PASSWORD” -k “$ESHOST/_snapshot/my_s3_repository/test-snapshot/_status?pretty”
Delete a snapshot:
curl -X DELETE -u “elastic:$PASSWORD” -k “$ESHOST/_snapshot/my_s3_repository/test-snapshot?pretty”
Restore from snapshot into a new index:
curl -u “elastic:$PASSWORD” -k -X POST $ESHOST/_snapshot/my_s3_repository/test-snapshot/_restore?pretty -H ‘Content-Type: application/json’ -d’{ “indices”: “nyc_taxis”, “rename_pattern”: “nyc_taxis”, “rename_replacement”: “restored_taxis” }’
For testing snapshot recovery, it is often useful to delete an index “accidentally”:
curl -X DELETE -u “elastic:$PASSWORD” -k “$ESHOST/restored_taxis?pretty”
Recall that one of the recommendations for snapshot and restore performance was to increase the size of the threadpool at startup time. Confirm these threadpool settings:
curl -u “elastic:$PASSWORD” -k “$ESHOST/_cat/thread_pool/snapshot?h=name,max&v”
When using a shared filesystem repository, the REST API is exactly the same, just specify a different repository name.
Take snapshot with my NFS repository:
curl -u “elastic:$PASSWORD” -k -X PUT $ESHOST/_snapshot/my_nfs_repository/test-snapshot?pretty
List snapshots in NFS repository:
curl -u “elastic:$PASSWORD” -k “$ESHOST/_cat/snapshots/my_nfs_repository?v”
Restore from snapshot in an NFS repository:
curl -u “elastic:$PASSWORD” -k -X POST $ESHOST/_snapshot/my_nfs_repository/test-snapshot/_restore?pretty -H ‘Content-Type: application/json’ -d’{ “indices”: “nyc_taxis”, “rename_pattern”: “nyc_taxis”, “rename_replacement”: “restored_taxis” }’
Snapshot Lifecycle Management
Elasticsearch includes a module, Snapshot Lifecycle Management (SLM), that automates snapshot scheduling and allows you to keep snapshots for a specified amount of time. For newer releases of Elasticsearch (7.4+) that include SLM, this module nicely solves the majority of snapshot use cases.
Verify that SLM is running:
curl -u “elastic:$PASSWORD” -k “$ESHOST/_slm/status?pretty”
View existing snapshot policies:
curl -u “elastic:$PASSWORD” -k “$ESHOST/_slm/policy?pretty”
Create a snapshot policy named ‘daily-snapshots’ that applies to a subset of indices:
curl -X PUT -u “elastic:$PASSWORD” -k “$ESHOST/_slm/policy/daily-snapshots?pretty” -H ‘Content-Type: application/json’ -d’
{
“schedule”: “0 30 1 * * ?”,
“name”: “<daily-snap-{now/d}>”,
“repository”: “my_s3_repository”,
“config”: {
“indices”: [“plsidx-*”, “nyc_taxis”],
“ignore_unavailable”: true,
“include_global_state”: false
},
“retention”: {
“expire_after”: “30d”,
“min_count”: 5,
“max_count”: 50
}
}
‘
For more information about snapshot policy options, see the Elastic documentation.
Check statistics for snapshot and retention operations:
curl -u “elastic:$PASSWORD” -k “$ESHOST/_slm/stats?pretty”
Finally, delete a snapshot policy as follows:
curl -X DELETE -u “elastic:$PASSWORD” -k “$ESHOST/_slm/policy/daily-snapshots?pretty”
Custom Kubernetes CronJob
There will be occasions when SLM does not have the flexibility to do exactly what you need. In those cases, you can manually trigger snapshots with automation like Kubernetes jobs or CronJobs.
One example would be a daily job that pulls audit logs from network devices and sends that data to Elasticsearch. Using a technique like below, you can also automate taking a snapshot immediately after the index has been finished. And perhaps this could be used to make searchable snapshots available once that feature arrives…
An easy way to automate the creation of snapshots utilizes Kubernetes CronJobs. Full yaml for a snapshot CronJob follows:
apiVersion: batch/v1beta1
kind: CronJob
metadata:
name: elasticsearch-snapshotter
spec:
schedule: “@daily”
concurrencyPolicy: Forbid
jobTemplate:
spec:
template:
spec:
containers:
- name: snapshotter
image: centos:7
env:
- name: ESPASSWORD
valueFrom:
secretKeyRef:
name: quickstart-es-elastic-user
key: elastic
command:
- /bin/bash
args:
- -c
- |
curl -s -i -k -u “elastic:$ESPASSWORD” -XPUT “https://quickstart-es-http:9200/_snapshot/my_s3_repository/%3Csnapshot-%7Bnow%2Fd%7D%3E" | tee /dev/stderr | grep “200 OK”
restartPolicy: OnFailure
Combine snapshots with more customized workflows using this simple curl invocation as a building block with no complicated dependencies or configuration required.
Summary
Elasticsearch is more and more a crucial underpinning of data platforms; the need for a data protection strategy arises. Fortunately, configuring and using snapshot repositories is straightforward and flexible. FlashBlade as a data platform serves as both the performant primary storage for Elasticsearch clusters and simultaneously as a snapshot repository for backups and fast restores.
![]()