

In this post, I’ll show how you can run an Oracle 19c single instance database on Kubernetes using NFS persistent storage with Portworx proxy volumes.
For this post, I’ll be using Kubernetes v1.17.
|
1 2 |
[root@master-1 ~]# kubectl version --short | awk -Fv '/Server Version: / {print $3}' 1.17.0 |
Portworx v2.7.0 with Portworx proxy volumes.
|
1 2 |
[root@master-1 ~]# pxctl -v pxctl version 2.7.0.0-ccee71c |
And a Pure Storage® FlashBlade® NFS share to provide persistent NFS storage to an Oracle 19c containerized database.
Create an NFS Share
If you don’t already have an NFS share, you’ll need to create one. Using the FlashBlade UI, I’ve created a 1TB NFSv3 file system called z-k8-pstg within my lab.
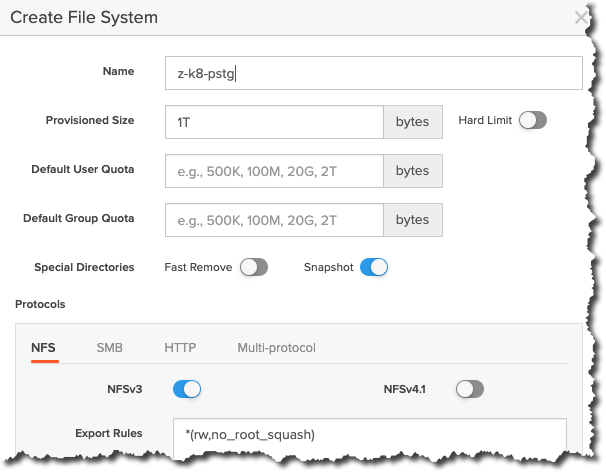
Figure 1: Creating a file system in FlashBlade.
Create the Oracle 19c Database
Kubernetes Deployment
My Kubernetes deployment creates the following:
- Storage class
- Deployment
- Persistent volume claims (PVCs)
- Service
[root@master-1 Oracle-on-Kubernetes]# kubectl apply -f 19c_deployment_PX-NFS.yaml
|
1 2 3 4 5 6 |
storageclass.storage.k8s.io/px-ora-sc-nfs created deployment.apps/oracle19c-nfs created persistentvolumeclaim/ora-data193-nfs created persistentvolumeclaim/ora-setup193-nfs created persistentvolumeclaim/ora-startup193-nfs created service/oracle19c-nfs created |
Please note: I’ve reused the Kubernetes Namespace, Secret, and ConfigMap from my Oracle 19c Statefulset post, so you may need to review that post first.
Before we try to access our database, let’s take a look at the Kubernetes deployment.
Kubernetes Storage Class
I’ve created a storage class using a Portworx® provisioner with the following parameters:
- Proxy_endpoint: The endpoint of the FlashBlade NFS share
- Proxy_nfs_exportpath: The FlashBlade NFS export name
- Mount_options: The NFS mount options for my container
|
1 2 3 4 5 6 7 8 9 10 |
kind: StorageClass apiVersion: storage.k8s.io/v1 metadata: name: px-ora-sc-nfs provisioner: kubernetes.io/portworx-volume parameters: proxy_endpoint: "nfs://10.225.113.166" proxy_nfs_exportpath: "/z-k8-pstg" mount_options: "rw,bg,hard,nointr,tcp,vers=3,timeo=600,actimeo=0" allowVolumeExpansion: true |
Kubernetes Persistent Volume Claims
The Portworx proxy volume supports accessing a specific sub-part within an NFS share. I’ve used this to provide the three volumes from a single NFS share for use by the Oracle container.
|
1 2 3 4 5 |
[root@master-1 Oracle-on-Kubernetes]# kubectl get pvc NAME STATUS VOLUME CAPACITY ACCESS MODES STORAGECLASS AGE ora-data193-nfs Bound pvc-fcb2adc5-89fa-4c19-b303-8bed4ebbabb2 100Gi RWX px-ora-sc-nfs 27m ora-setup193-nfs Bound pvc-6de8599b-b4b6-4f99-8db1-37526f899876 1Gi RWX px-ora-sc-nfs 27m ora-startup193-nfs Bound pvc-6ca7d0d1-18e5-4412-b951-b1c893aadf57 1Gi RWX px-ora-sc-nfs 27m |
If you want to confirm your PVC details, you can use kubectl get pvc/<pvc name> -o YAML or -o JSON, for example.
[root@master-1 ~]# kubectl get pvc/ora-data193-nfs -o YAML
|
1 2 3 4 5 6 7 8 9 10 11 12 13 14 15 16 17 18 19 20 21 22 23 24 25 26 27 28 29 30 31 32 33 34 35 36 37 38 39 |
apiVersion: v1 kind: PersistentVolumeClaim metadata: annotations: kubectl.kubernetes.io/last-applied-configuration: | {"apiVersion":"v1","kind":"PersistentVolumeClaim","metadata":{"annotations": {"px/proxy-nfs-subpath":"/oradata"},"labels":{"app":"database","version":"19.3.0.1"}, "name":"ora-data193-nfs","namespace":"oracle-namespace"},"spec":{"accessModes":["ReadWriteMany"], "resources":{"requests":{"storage":"100Gi"}},"storageClassName":"px-ora-sc-nfs","volumeMode":"Filesystem"}} pv.kubernetes.io/bind-completed: "yes" pv.kubernetes.io/bound-by-controller: "yes" px/proxy-nfs-subpath: /oradata volume.beta.kubernetes.io/storage-provisioner: kubernetes.io/portworx-volume creationTimestamp: "2021-05-21T12:18:18Z" finalizers: - kubernetes.io/pvc-protection labels: app: database version: 19.3.0.1 name: ora-data193-nfs namespace: oracle-namespace resourceVersion: "4310310" selfLink: /api/v1/namespaces/oracle-namespace/persistentvolumeclaims/ora-data193-nfs uid: fcb2adc5-89fa-4c19-b303-8bed4ebbabb2 spec: accessModes: - ReadWriteMany resources: requests: storage: 100Gi storageClassName: px-ora-sc-nfs volumeMode: Filesystem volumeName: pvc-fcb2adc5-89fa-4c19-b303-8bed4ebbabb2 status: accessModes: - ReadWriteMany capacity: storage: 100Gi phase: Bound |
Alternatively, you can use kubectl describe pvc/<pvc name>.
|
1 2 3 4 5 6 7 8 9 10 11 12 13 14 15 16 17 18 19 20 21 |
[root@master-1 Oracle-on-Kubernetes]# kubectl describe pvc/ora-data193-nfs Name: ora-data193-nfs Namespace: oracle-namespace StorageClass: px-ora-sc-nfs Status: Bound Volume: pvc-fcb2adc5-89fa-4c19-b303-8bed4ebbabb2 Labels: app=database version=19.3.0.1 Annotations: kubectl.kubernetes.io/last-applied-configuration: {"apiVersion":"v1","kind":"PersistentVolumeClaim","metadata":{"annotations":{ "px/proxy-nfs-subpath":"/oradata"},"labels":{"app":"database"... pv.kubernetes.io/bind-completed: yes pv.kubernetes.io/bound-by-controller: yes px/proxy-nfs-subpath: /oradata volume.beta.kubernetes.io/storage-provisioner: kubernetes.io/portworx-volume Finalizers: [kubernetes.io/pvc-protection] Capacity: 100Gi Access Modes: RWX VolumeMode: Filesystem Mounted By: oracle19c-nfs-68bd675554-9bmlj Events: |
In the example above, you can see the Access Modes line and the pod name on the Mounted By line.
Access Modes
Before we move on, you may have noticed that the Access Mode is RWX. This is possible because I’m using NFS, which can provide a shared file system. There are three types of access modes:
- ReadWriteOnce (RWO): The volume can be mounted as read-write by a single node.
- ReadOnlyMany (ROX): The volume can be mounted read-only by many nodes.
- ReadWriteMany (RWX): The volume can be mounted as read-write by many nodes.
A PersistentVolume can be mounted on a host in any way supported by the resource provider.
Kubernetes Pod
Let’s confirm the pod name with kubectl get pod.
|
1 2 3 |
[root@master-1 Oracle-on-Kubernetes]# kubectl get pods NAME READY STATUS RESTARTS AGE oracle19c-nfs-68bd675554-9bmlj 1/1 Running 0 22m |
Kubernetes Log
Now that you know the pod name, you can watch the database creation with kubectl logs <pod> –follow, for example.
|
1 2 3 4 5 6 7 8 9 10 11 12 13 14 15 16 17 18 19 20 21 22 23 24 25 26 27 28 29 30 31 32 33 34 35 36 37 38 |
[root@master-1 Oracle-on-Kubernetes]# kubectl logs pods/oracle19c-nfs-68bd675554-9bmlj --follow [2021:05:21 12:18:21]: Acquiring lock on /opt/oracle/oradata/.ORCL.create_lck [2021:05:21 12:18:21]: Lock acquired on /opt/oracle/oradata/.ORCL.create_lck [2021:05:21 12:18:21]: Holding on to the lock using /tmp/.ORCL.create_lck ORACLE EDITION: ENTERPRISE ORACLE PASSWORD FOR SYS, SYSTEM AND PDBADMIN: Kube#2020 LSNRCTL for Linux: Version 19.0.0.0.0 - Production on 21-MAY-2021 12:18:22 Copyright (c) 1991, 2019, Oracle. All rights reserved. Starting /opt/oracle/product/19c/dbhome_1/bin/tnslsnr: please wait... TNSLSNR for Linux: Version 19.0.0.0.0 - Production System parameter file is /opt/oracle/product/19c/dbhome_1/network/admin/listener.ora Log messages written to /opt/oracle/diag/tnslsnr/oracle19c-nfs-68bd675554-9bmlj/listener/alert/log.xml Listening on: (DESCRIPTION=(ADDRESS=(PROTOCOL=ipc)(KEY=EXTPROC1))) Listening on: (DESCRIPTION=(ADDRESS=(PROTOCOL=tcp)(HOST=0.0.0.0)(PORT=1521))) Connecting to (DESCRIPTION=(ADDRESS=(PROTOCOL=IPC)(KEY=EXTPROC1))) STATUS of the LISTENER ------------------------ Alias LISTENER Version TNSLSNR for Linux: Version 19.0.0.0.0 - Production Start Date 21-MAY-2021 12:18:22 Uptime 0 days 0 hr. 0 min. 0 sec Trace Level off Security ON: Local OS Authentication SNMP OFF Listener Parameter File /opt/oracle/product/19c/dbhome_1/network/admin/listener.ora Listener Log File /opt/oracle/diag/tnslsnr/oracle19c-nfs-68bd675554-9bmlj/listener/alert/log.xml Listening Endpoints Summary... (DESCRIPTION=(ADDRESS=(PROTOCOL=ipc)(KEY=EXTPROC1))) (DESCRIPTION=(ADDRESS=(PROTOCOL=tcp)(HOST=0.0.0.0)(PORT=1521))) The listener supports no services The command completed successfully Prepare for db operation 8% complete ... The Oracle base remains unchanged with value /opt/oracle ######################### DATABASE IS READY TO USE #########################! |
Kubernetes Service
Use kubectl get svc or service to expose the Oracle listener port.
|
1 2 3 |
[root@master-1 Oracle-on-Kubernetes]# kubectl get svc NAME TYPE CLUSTER-IP EXTERNAL-IP PORT(S) AGE oracle19c-nfs NodePort 10.96.1.196 <none> 1521:30637/TCP,5500:30645/TCP 16m |
Database Test
Now that the Oracle 19c database is running within a container, let’s try to access it.
|
1 2 3 4 5 6 7 8 9 10 11 12 13 14 15 16 17 18 19 20 |
% sqlplus system/Kube#2020@//master-1:30637/ORCL @database_details SQL*Plus: Release 19.0.0.0.0 - Production on Fri May 21 15:17:59 2021 Version 19.3.0.0.0 Copyright (c) 1982, 2019, Oracle. All rights reserved. Last Successful login time: Fri May 21 2021 15:17:36 +01:00 Connected to: Oracle Database 19c Enterprise Edition Release 19.0.0.0.0 - Production Version 19.3.0.0.0 Current Time : 21/05/21 14:18:00 Database Details =============================================== Hostname : oracle19c-nfs-68bd675554-9bmlj Database Name : ORCL Date Created : 21/05/21 13:51:31 Date Started : 21/05/21 14:08:35 Resetlogs Date : 21/05/21 13:51:35 DB Status : OPEN Space Allocated: 1.70 GB Space Used : 1.68 GB |
Summary
In this post, I’ve shared how you can use Portworx proxy volumes to present external NFS storage to a Kubernetes cluster to provide persistent storage to an Oracle 19c database.
Interested in testing out proxy volumes? Try Portworx for free or get the Forever Free edition of Portworx Essentials.
Finally, if you’d like to try this out for yourself, you can find the Kubernetes manifests in my GitHub repository.
![]()