


This is the first part of a two-part series on how to deploy and configure for the VM Analytics feature in Pure1.
VM Analytics is a key feature offered through Pure1®. It provides a full-stack view from the array all the way to a vDisk of a VMware environment in a concise but informative manner. Furthermore, VM Analytics provides a list of metrics options to help a user monitor the usage across the entire stack. This feature has been continuously proven to be extremely helpful, especially when troubleshooting performance issues. If all those reasons aren’t enough, this feature comes with Pure1 for free!
So, how can you start using this feature? First, you’ll need to deploy the VM Analytics Collector (also known as the collector) with the help of the Pure Storage® Virtual Appliance (also known as the OVA).
Understanding the Prerequisites
Because the collector is installed onto the OVA as an application, it’s important to understand the prerequisites before deploying the OVA. The prerequisites are:
- vSphere version newer than 6.7U3
- 4 vCPUs and 8GB memory
- 3.8GB datastore space thin provisioned / 40GB datastore space thick provisioned
- Deployment on VMFS or vVols datastores
- Single static IP address on management network (or DHCP scope)
With these requirements in mind, let’s get the OVA deployed.
Locate the Link to Retrieve the OVA
- After logging in to Pure1, navigate to FLEET > Virtual Machines page. If VM Analytics has not been configured yet, a “Get Started with VM Topology” prompt shows up.

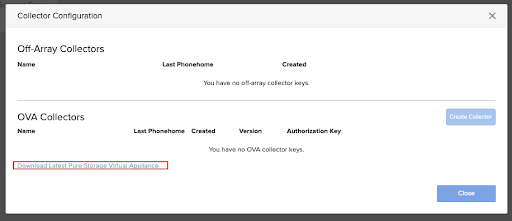
- Click the gear icon on the page; it opens the Collector Configuration modal. On the bottom, there’s a link to download the Pure Storage Virtual Appliance.
Deploy the OVA
Note: Screenshots in this section are taken from vSphere 7.0. Your environment may look slightly different depending on the vSphere version you have.
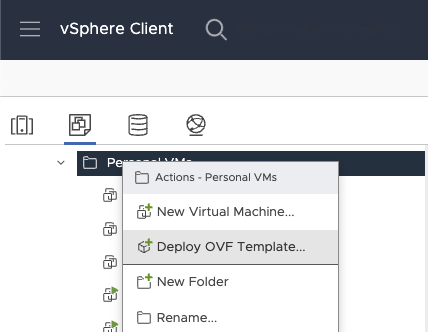
- After logging in to the vCenter where the OVA is going to be deployed, choose the destination, right-click, and then click Deploy OVF Template. Here, I’m going to deploy the OVA to the “Personal VMs” folder.
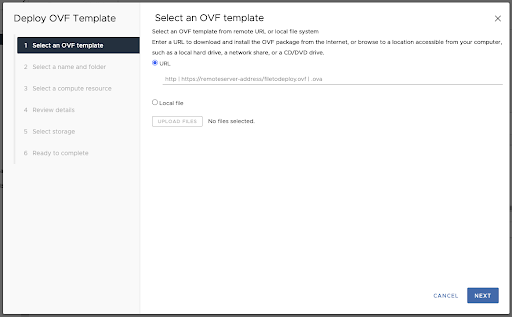
- Enter the URL grabbed from Pure1 into the Select an OVF template section. You can also upload from your local file system if you choose to download the OVA from Pure1 from the section above.
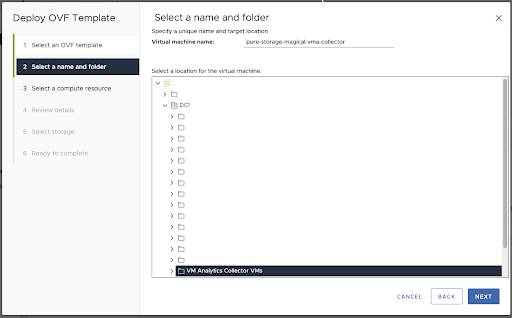
- Don’t forget to put the OVA in your favorite folder, and name it.
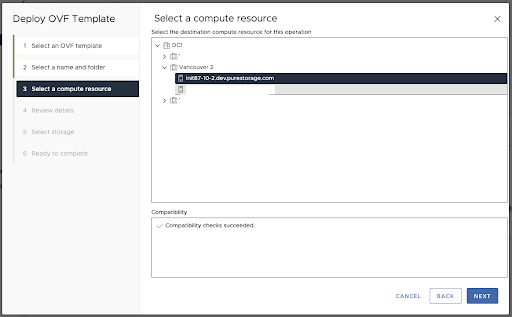
- Choose a compute resource for the OVA on the next screen. As a reminder, the OVA requires 4 vCPUs and 8G RAM.
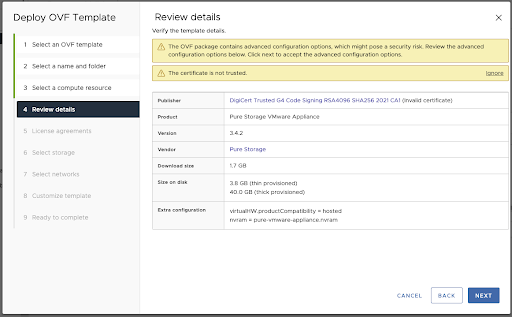
- On the next screen, you’ll review the OVA details. You may see an invalid certificate warning like the one shown below. Don’t worry, that’s a known issue that happens only on vSphere version 7.0U2+. Basically, the certificate of the OVA (provided by DigiCert) is not in vCenter’s Trust Root Cert. It’s safe to ignore this warning.
- On the next screen, you’ll review and accept the license agreement.
- Then, you’ll select the storage. Reminder, you need to provide at least 40GB if selecting thick provisioning.

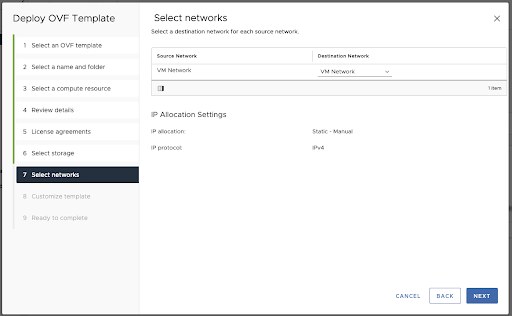
- Time to configure the network! There are some important notes to mention here:
- The OVA only works with IPv4 as of the time this blog post was written.
- Since the OVA needs to install the collector as a Debian package and the collector needs to send data to Pure Storage, we ask you to allow traffic to the following entries (details can be found here):
- *.cloud-support.purestorage.com
- The IP addresses returned from command nslookup deb.cloud-support.purestorage.com
- Since the collector needs to access the internet to send data to Pure Storage, dark site customers, unfortunately, probably cannot enjoy this feature.
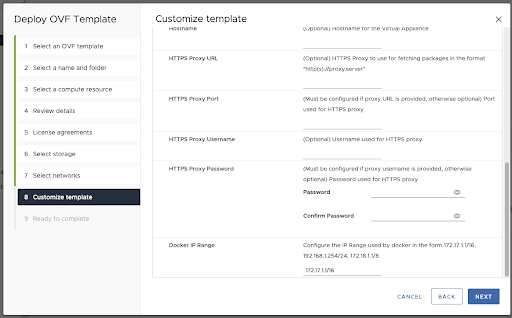
- Now, we’re ready to deploy the collector. The collector shows up in the next screen, along with many customizable fields to the OVA.
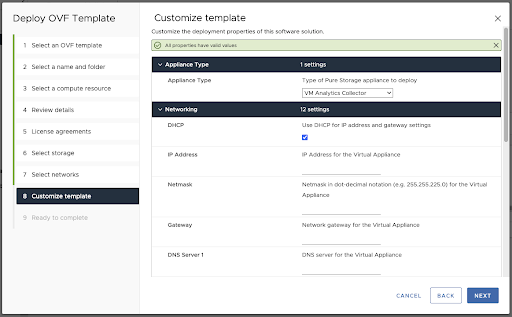
- Make sure to select “VM Analytics Collector” as the application. vSphere Remote Client Plugin is another great product Pure Storage offers, but we aren’t covering it in this post.
- You’ve probably noticed that there are more networking configurations available.
- The OVA can be configured to either DHCP or a single static IP address on a management network.
- If choosing a static IP address, please specify IP address, Netmask, Gateway, and DNS server.
- You can add another DNS server and customize the hostname.
- You can also apply proxy servers if you wish to use any.
- The last field is to specify Docker IP Range. The collector application runs as a Docker container. If you aren’t already aware of it, Docker has its own bridge network configuration, with default being 172.17.0.1/16 subnet and 172.17.0.1 as Gateway. If your network happens to overlap with this setting, you must change the Docker bridge network via this field so that the collector works properly.
- On the last screen, you have another chance to review everything you just set. If everything looks good, click the Finish button to deploy the OVA.
- Wait for the deployment to finish, and it’s the time to power on the OVA.
It may look complicated from the detailed breakdown of deployment steps, but the process is self-explanatory and easy to follow.
Validate the Success of the Deployment
- Once the VM has booted, you should see a screen like the one below:

- Only one user is available to the OVA: pureuser. The default password for the first login is also pureuser, and you must change it to proceed.
- Note: Please make sure to keep track of the new password. If you lose it, there’s no way to retrieve it and you’ll need it to redeploy.

- Note: Please make sure to keep track of the new password. If you lose it, there’s no way to retrieve it and you’ll need it to redeploy.
- If everything works smoothly, you should see the following welcome message:

- I have heard of some people getting the error shown below. This is mostly due to networking configuration on the OVA. The causes vary, including but not limited to network traffic not properly allowed to Pure Storage’s Debian repository, networking setup on the OVA is slower than startup steps when powering on the OVA for the first time, etc. Thus, when it happens, make sure to allow traffic as described above, then running the puresetup command will install the collector.

- I have heard of some people getting the error shown below. This is mostly due to networking configuration on the OVA. The causes vary, including but not limited to network traffic not properly allowed to Pure Storage’s Debian repository, networking setup on the OVA is slower than startup steps when powering on the OVA for the first time, etc. Thus, when it happens, make sure to allow traffic as described above, then running the puresetup command will install the collector.
- If you want more peace of mind, you can perform more steps, in addition to the welcome message, to confirm that the collector is successfully installed.
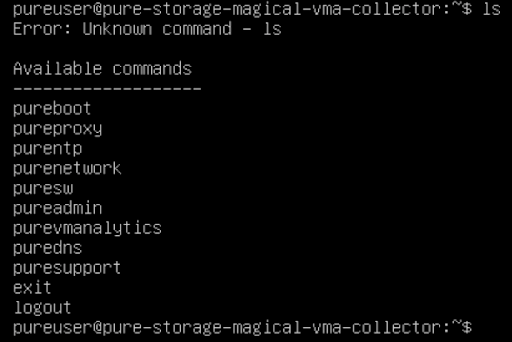
- On a successful install, the purevmanalytics command should be in the available command list.
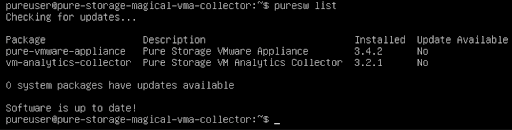
- On a successful install, the puresw list command should show the collector and its version.
- On a successful install, the purevmanalytics command should be in the available command list.
There you go! You’ve now successfully deployed the VM Analytics Collector (the collector) on the Pure Storage Virtual Appliance (the OVA). In the next post, we’ll discuss how to configure the collector so that it starts collecting topology and metrics information you can view on Pure1.

Written By: