
Summary
NFS is a widely used protocol that makes it easier for administrators to centrally manage, share, and back up data. This article shows the steps for running an Oracle 19c database on Oracle Linux 8 using NFSv3 from a FlashArray system.


As a long-time supporter of running Oracle on NFS (Network File System), I’ve deployed many Oracle E-Business Suite single instance and RAC databases on NFS over the years.
However, for many Oracle DBAs, NFS is still something of an unknown entity. In this post, I hope to demystify Oracle on NFS.
What Is NFS (Network File System)?
NFS is a distributed file system protocol that provides clients access to shared resources like files and directories in file systems located on a server. Clients can remotely read files and write to files on the server without downloading the files locally. NFS enables clients and applications to share data and makes it easier for administrators to centrally manage, share, and back up data.
NFS continues to be a widely used protocol. There are several versions of NFS; however, the most commonly used versions today are NFSv3 and NFSv4.1.
Pure Storage FlashArray Files
With Pure Storage Purity 6.1, we saw the arrival of file support to the Pure Storage family of FlashArray™ systems.
In this blog post, I’ll share how we can run an Oracle 19c database on Oracle Linux 8 using NFSv3 from a Pure Storage® FlashArray.

Uncomplicate Oracle Data Storage
Getting Started
Log on to the FlashArray, click Storage from the left-hand panel, and select File Systems.
Create File System
Navigate to the File Systems panel and click +.
Provide File System Name, for example, oracle.
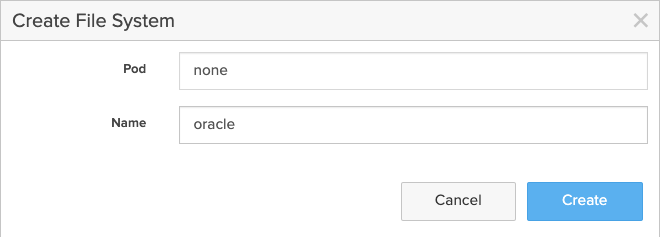 Figure 1: Creating the file system.
Create Directory
Click on the newly created file system oracle.
Navigate to the Directories panel and click +.
Provide Directory Name and Path, for example, cdb2-u02 and /cdb2-u02.
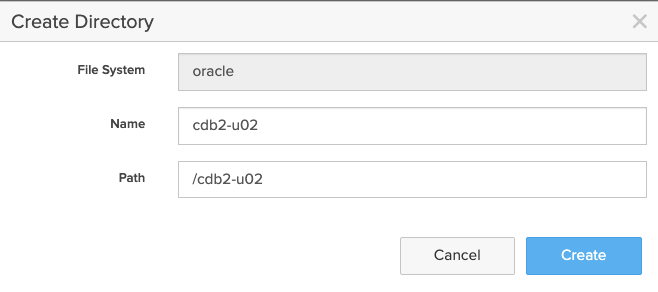 Figure 2: Creating the directory.
And repeat for any other required file systems, for example, cdb2-u03.
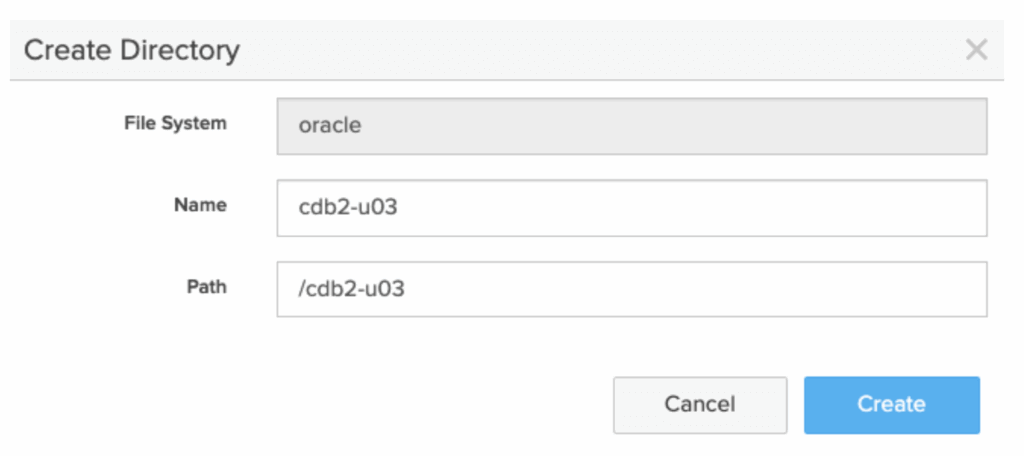
Figure 3: Creating another directory.
Add Export Policies
I have pre-created a policy called nfs-no-root-squash with the following settings:
- Rules
- Clients: Only the Oracle Database nodes should be added as clients
- Access: no-root-squash
- Permission: rw
- Version: NFSv3
- Details
- Type: NFS
- Enabled: True
- User mapping: false
- Version: NFSv3
Select the newly created Directory, and from the Policies panel, click the three vertical pips and select Add Export Policies.
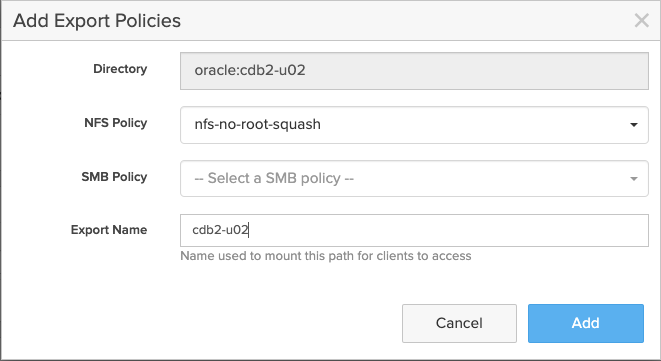 Figure 4: Adding export policies.
The FlashArray is now complete. Next, it’s over to the Oracle database server.
Oracle Optimal Flexible Architecture (OFA)
With Oracle ASM being the de facto way of deploying Oracle databases, it’s easy to forget about the reasons and benefits of using the Oracle Optimal Flexible Architecture (OFA).
OFA is a set of configuration guidelines created to ensure well-organised Oracle installations, which ultimately simplifies administration, support, and maintenance. If you want to learn more about OFA, check out the Oracle Database Installation Guide for Linux.
Below is an example OFA-compliant layout, which I’ll be using for this blog post:
| Description | Example |
| Oracle Base | /u01/app/oracle |
| Oracle Home | $ORACLE_BASE/product/19.0.0/dbhome_1 |
| Oracle Data Files Directories | /u02/app/oracle/oradata |
| Oracle Recovery Files | /u03/app/oracle/fast_recovery_area/ |
OFA Layout
Database Server Operating System
The sunrpc.tcp_slot_table_entries Kernel parameter sets the number of (TCP) RPC entries to pre-allocate for in-flight RPC requests (essentially the minimum).
As the root user, check the value of sunrpc.tcp_slot_table_entries and increase it to 128 if required.
[root@z-rac2 ~]# sysctl -a | grep tcp.*.slot_table
sunrpc.tcp_max_slot_table_entries = 65536
sunrpc.tcp_slot_table_entries = 2
To have the system immediately apply the updated value in /etc/sysctl.conf file, run sysctl -p:
[root@z-rac2 ~]# echo "sunrpc.tcp_max_slot_table_entries = 128" >> /etc/sysctl.conf
[root@z-rac2 ~]# sysctl -p
fs.file-max = 6815744
kernel.sem = 250 32000 100 128
kernel.shmmni = 4096
kernel.shmall = 1073741824
kernel.shmmax = 4398046511104
kernel.panic_on_oops = 1
net.core.rmem_default = 262144
net.core.rmem_max = 4194304
net.core.wmem_default = 262144
net.core.wmem_max = 1048576
net.ipv4.conf.all.rp_filter = 2
net.ipv4.conf.default.rp_filter = 2
fs.aio-max-nr = 1048576
net.ipv4.ip_local_port_range = 9000 65500
sunrpc.tcp_max_slot_table_entries = 128
To make the sunrpc.tcp_max_slot_table_entries persistent, update the /etc/modprobe.d/sunrpc.conf file to include:
options sunrpc tcp_max_slot_table_entries=128
After a reboot, check the value using the following:
[root@z-rac2 ~]# cat /proc/sys/sunrpc/tcp_max_slot_table_entries
128
Now, create any required mount points, for example, /u02 and /u03. Update the /etc/fstab file with the new mounts and mount the file systems.
Extract from my /etc/fstab file:
#x70
z-x70-a-fastfile:/cdb2-u02 /u02 nfs rw,bg,hard,nointr,tcp,actimeo=0,vers=3,timeo=600 0 0
z-x70-a-fastfile:/cdb2-u03 /u03 nfs rw,bg,hard,nointr,tcp,actimeo=0,vers=3,timeo=600 0 0
We can review and confirm the mount options using mount -t nfs. From the following, we can see the FlashArray files support a read and write transfer size of 1MB.
[root@z-rac2 ~]# mount -t nfs | grep /u02; mount -t nfs | grep /u03
z-x70-a-fastfile:/cdb2-u02 on /u02 type nfs (rw,relatime,vers=3,rsize=1048576,wsize=1048576,namlen=255,acregmin=0,acregmax=0,acdirmin=0,acdirmax=0,hard,proto=tcp,timeo=600,retrans=2,sec=sys,mountaddr=192.168.90.40,mountvers=3,mountport=2049,mountproto=tcp,local_lock=none,addr=192.168.90.40)
z-x70-a-fastfile:/cdb2-u03 on /u03 type nfs (rw,relatime,vers=3,rsize=1048576,wsize=1048576,namlen=255,acregmin=0,acregmax=0,acdirmin=0,acdirmax=0,hard,proto=tcp,timeo=600,retrans=2,sec=sys,mountaddr=192.168.90.40,mountvers=3,mountport=2049,mountproto=tcp,local_lock=none,addr=192.168.90.40)
We can now create any required directories. For example:
[root@z-rac2 ~]# mkdir -p /u02/app/oracle/oradata/
[root@z-rac2 ~]# chown -R oracle:oinstall /u02
[root@z-rac2 ~]# mkdir -p /u03/app/oracle/fast_recovery_area/
[root@z-rac2 ~]# chown -R oracle:oinstall /u03
For the latest recommended OS-specific Oracle NFS mount options, consult Mount Options for Oracle files for RAC databases and Clusterware when used with NFS on NAS devices (Doc ID 359515.1)

BUYER’S GUIDE, 14 PAGES
A Buyer’s Guide to Modern Virtualization
Oracle Database Creation
Now that we have our NFS exports mounted, we’re ready to create a new database. For this blog post, I’ll use the Oracle Database Configuration Assistant (DBCA) tool in silent mode.
dbca -silent -createDatabase \
-templateName General_Purpose.dbc \
-gdbname cdb2 -sid cdb2 -responseFile NO_VALUE \
-characterSet AL32UTF8 \
-sysPassword OraPasswd1 \
-systemPassword OraPasswd1 \
-createAsContainerDatabase true \
-numberOfPDBs 1 \
-pdbName pdb2 \
-pdbAdminPassword OraPasswd1 \
-databaseType MULTIPURPOSE \
-memoryMgmtType auto_sga \
-totalMemory 4096 \
-storageType FS \
-datafileDestination "/u02/app/oracle/oradata/" \
-recoveryAreaDestination "/u03/app/oracle/fast_recovery_area/" \
-recoveryAreaSize 300000 \
-enableArchive true \
-useOMF true \
-redoLogFileSize 4096 \
-emConfiguration NONE \
-ignorePreReqs
Oracle File System Options
For Oracle Database on NFS, I generally recommend setting filesystemio_options to setall.
The Oracle Database filesystemio_options parameter has no effect in Oracle dNFS and ASM environments. The use of dNFS or ASM automatically results in the use of both asynchronous and direct I/O.
However, since we can always fall back to the OS NFS client in case of misconfiguration, it’s good practice to set filesystemio_options to setall, as a precaution, even if we don’t plan to use NFS.
alter system set filesystemio_options=SETALL scope=spfile;
Note: filesystemio_options is not a dynamic parameter so a database bounce is required for it to take effect.
Oracle dNFS
If your Oracle Home has been previously linked with dNFS, you may be surprised to see you’re already using Oracle dNFS. Use the v$dnfs_servers view to check that dNFS is in use. For example:
SQL> select svrname, dirname, mntport, nfsport, wtmax, rtmax FROM v$dnfs_servers;
no rows selected
Calibrate IO
Introduced in Oracle 11g, the Oracle-provided DBMS_RESOURCE_MANAGER.CALIBRATE_IO procedure can be used to provide an indication of the storage subsystem performance.
Calibration is extremely disruptive to the database performance. It is strongly recommended to run calibration only when database users can tolerate severe deterioration to database performance. For optimal calibration results, no other database workloads should be running.
SET LINESIZE 200
SET SERVEROUTPUT ON
DECLARE
lat INTEGER;
iops INTEGER;
mbps INTEGER;
BEGIN
-- DBMS_RESOURCE_MANAGER.CALIBRATE_IO (<DISKS>, <MAX_LATENCY>, iops, mbps, lat);
DBMS_RESOURCE_MANAGER.CALIBRATE_IO (1000, 10, iops, mbps, lat);
DBMS_OUTPUT.PUT_LINE ('max_iops = ' || iops);
DBMS_OUTPUT.PUT_LINE ('latency = ' || lat);
DBMS_OUTPUT.PUT_LINE ('max_mbps = ' || mbps);
end;
/
Confirm timed_statistics are enabled and run the example SQL above.
SELECT NAME,VALUE FROM V$PARAMETER WHERE NAME='timed_statistics'
For example,
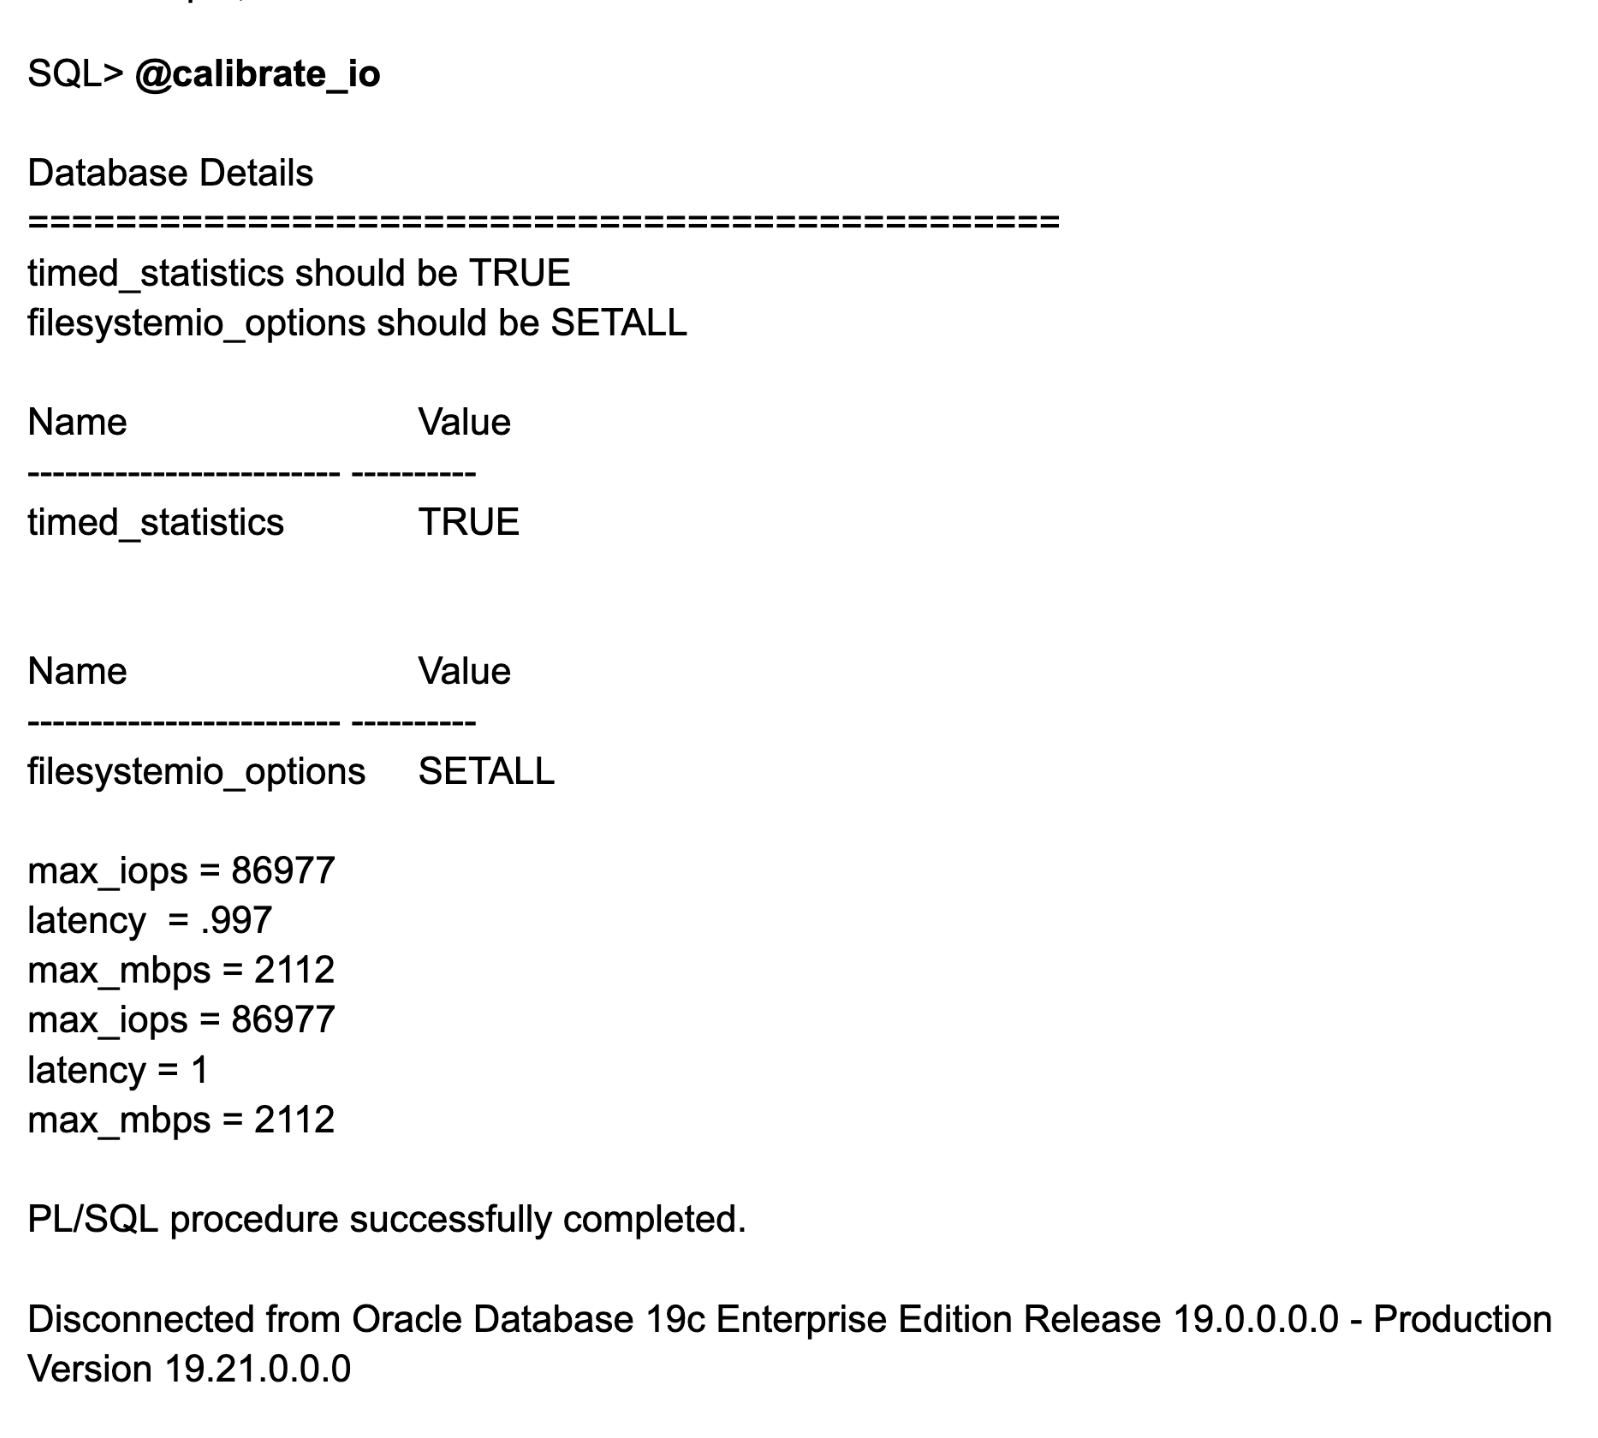
Linux nconnect
The Linux nconnect mount option allows you to specify the number of connections (network flows) that should be established between the NFS client and NFS endpoint up to a limit of 16.
Traditionally, an NFS client uses a single connection between itself and the endpoint. By increasing the number of network flows, the upper limits of I/O and throughput are increased significantly.
So let’s update the /etc/fstab to include the nconnect=16:
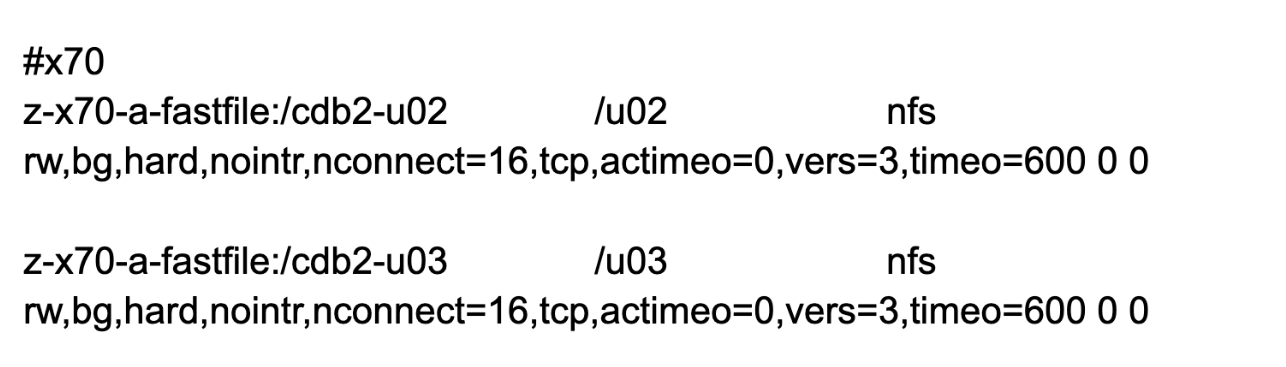
After remounting the NFS exports, we can now see the nconnect option:
[root@z-rac2 ~]# mount -t nfs | grep /u02; mount -t nfs | grep /u03
z-x70-a-fastfile:/cdb2-u02 on /u02 type nfs (rw,relatime,vers=3,rsize=1048576,wsize=1048576,namlen=255,acregmin=0,acregmax=0,acdirmin=0,acdirmax=0,hard,proto=tcp,nconnect=16,timeo=600,retrans=2,sec=sys,mountaddr=192.168.90.40,mountvers=3,mountport=2049,mountproto=tcp,local_lock=none,addr=192.168.90.40)
z-x70-a-fastfile:/cdb2-u03 on /u03 type nfs (rw,relatime,vers=3,rsize=1048576,wsize=1048576,namlen=255,acregmin=0,acregmax=0,acdirmin=0,acdirmax=0,hard,proto=tcp,nconnect=16,timeo=600,retrans=2,sec=sys,mountaddr=192.168.90.40,mountvers=3,mountport=2049,mountproto=tcp,local_lock=none,addr=192.168.90.40)
nconnect feature is supported on Linux clients with a Kernel version higher than 5.3.
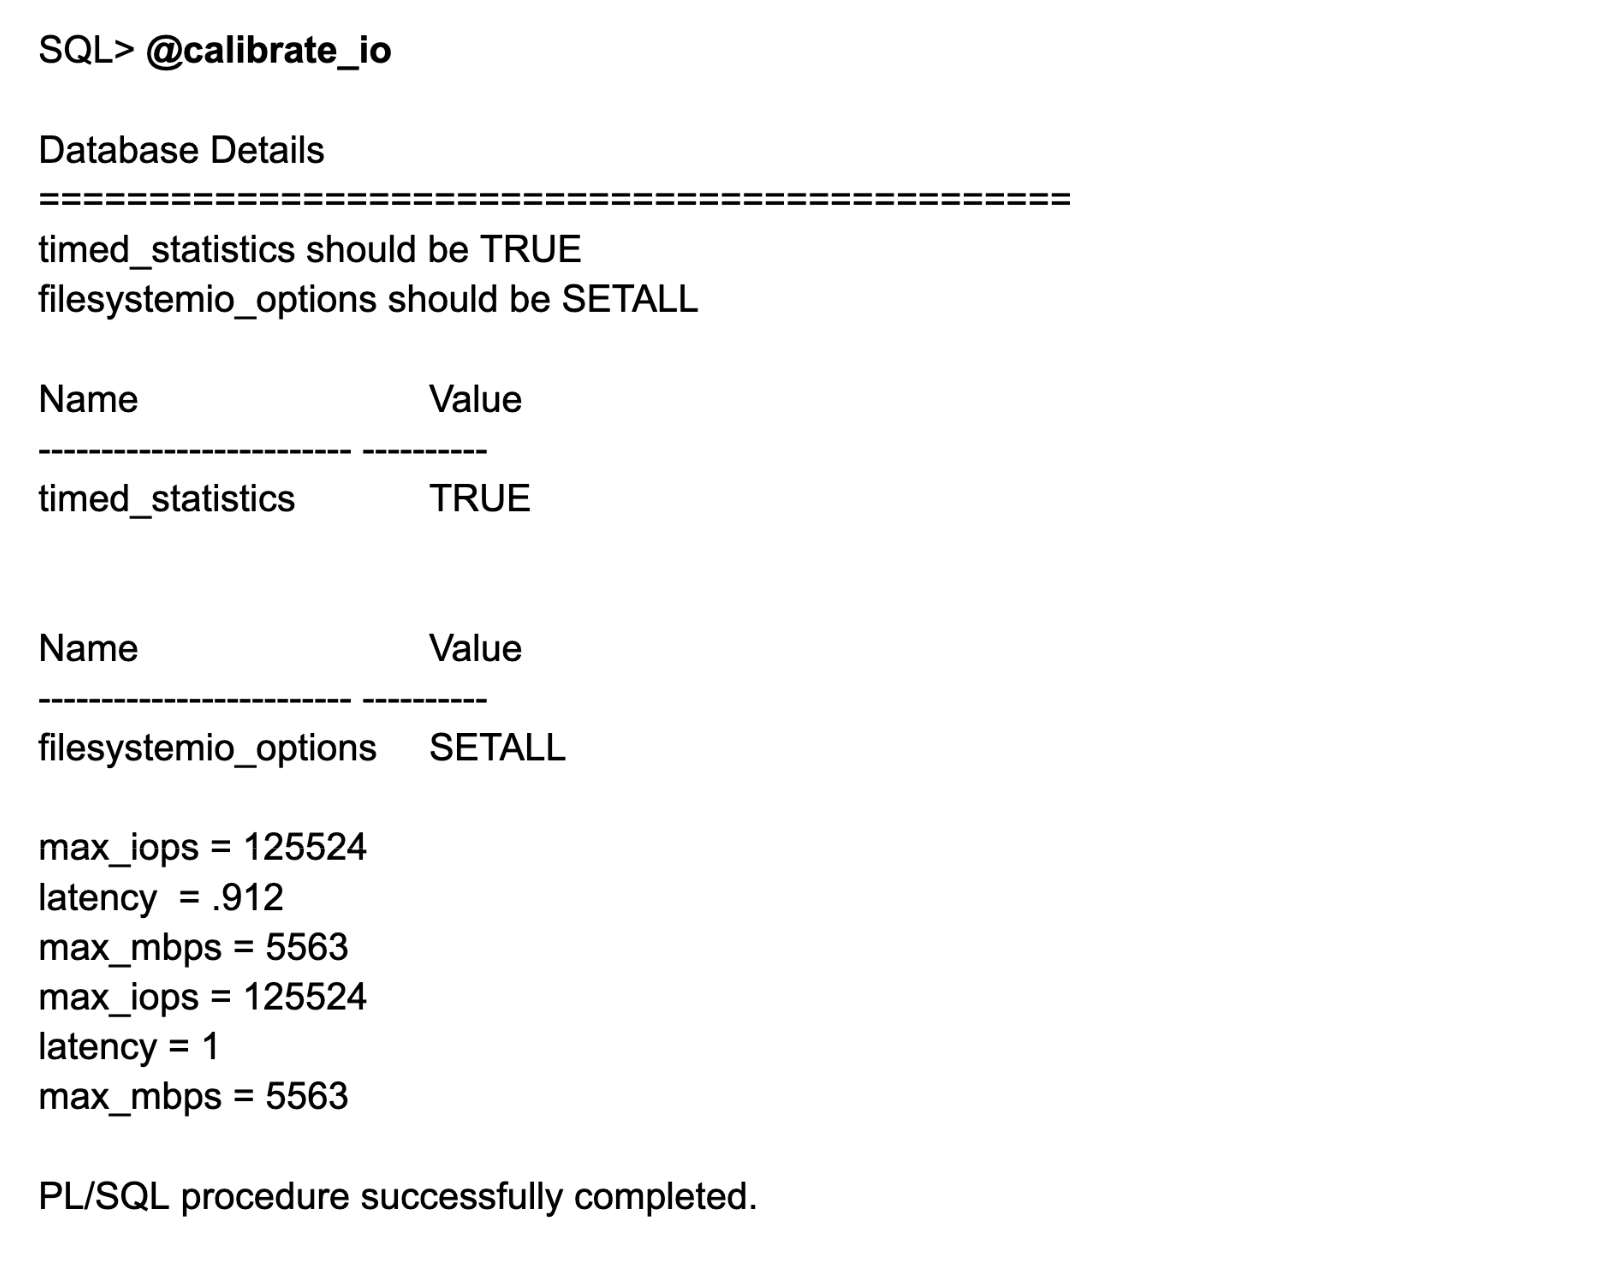
During my testing, I did not experience any issues or see any errors reported in the Oracle alert log file.
In my lab, nconnect=16 provided the most significant improvements in throughput. As always, I would suggest you perform your own testing to validate the results.
Note: I have yet to see any guidance from Oracle on the use of nconnect with Oracle 19c or 23c databases, so it may be something for just the lab at the moment.
Summary
If you’re familiar with running Oracle on NFS and love the simplicity of working with NFS storage, then FlashArray file NFSv3 could be an interesting option to consider.
In my next post, I’ll share some of the benefits and detail how to implement and test Oracle Direct NFS (dNFS).

Written By: