There has been lot of talks about VVols and how the storage vendors are implementing it. I am not a VMware vExpert and this blog post is not intended to give a deep dive of VVols. My colleague Cody Hosterman has done a wonderful job of explaining it in detail here. This blog post is to provide an overview of VVols from a DBA’s perspective and walk through an use case of cloning Oracle database using VVols on Pure FlashArray.
VVols addresses the key challenges with the traditional storage setup in virtualized environment of not able to perform native array based data services like snapshots, clones, replication, encryption or set storage policies at VMDK or VM level. The current implementation is at the VMFS level which leads to all or nothing behavior.
Traditional Setup
In the traditional setup, a volume/LUN is provisioned out of Pure FlashArray on which a VMFS datastore is created at the VMware level. Disks (vmdk) required by guest VMs are then provisioned out of that datastore which is visible across all the ESX hosts in the cluster. Hence the datastore can have disks from more than VM at any time.
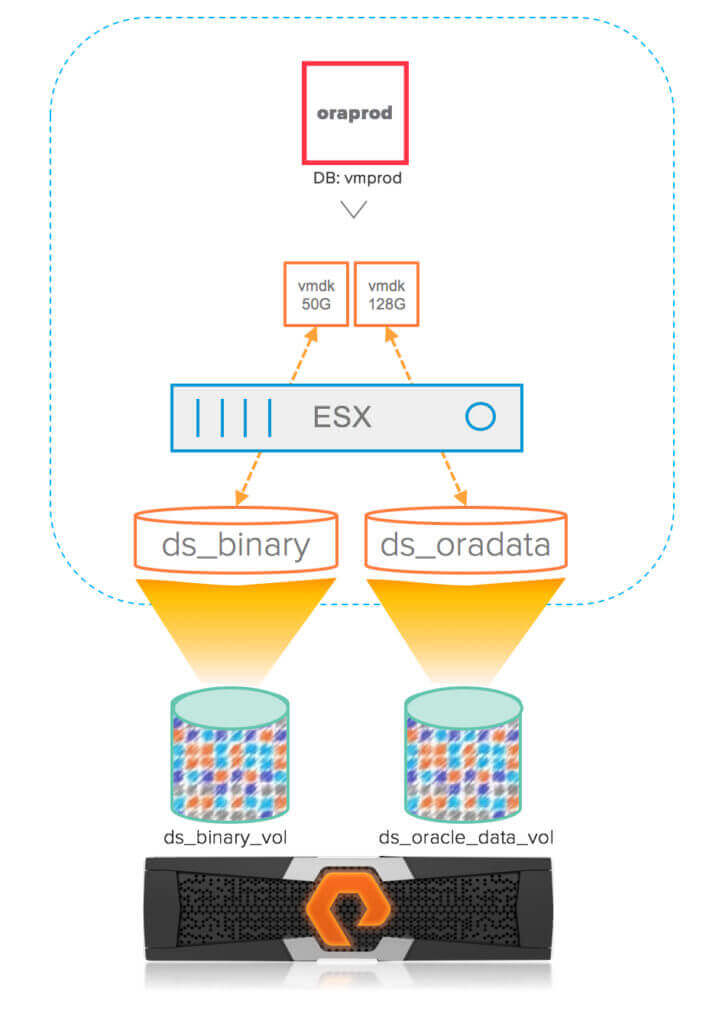
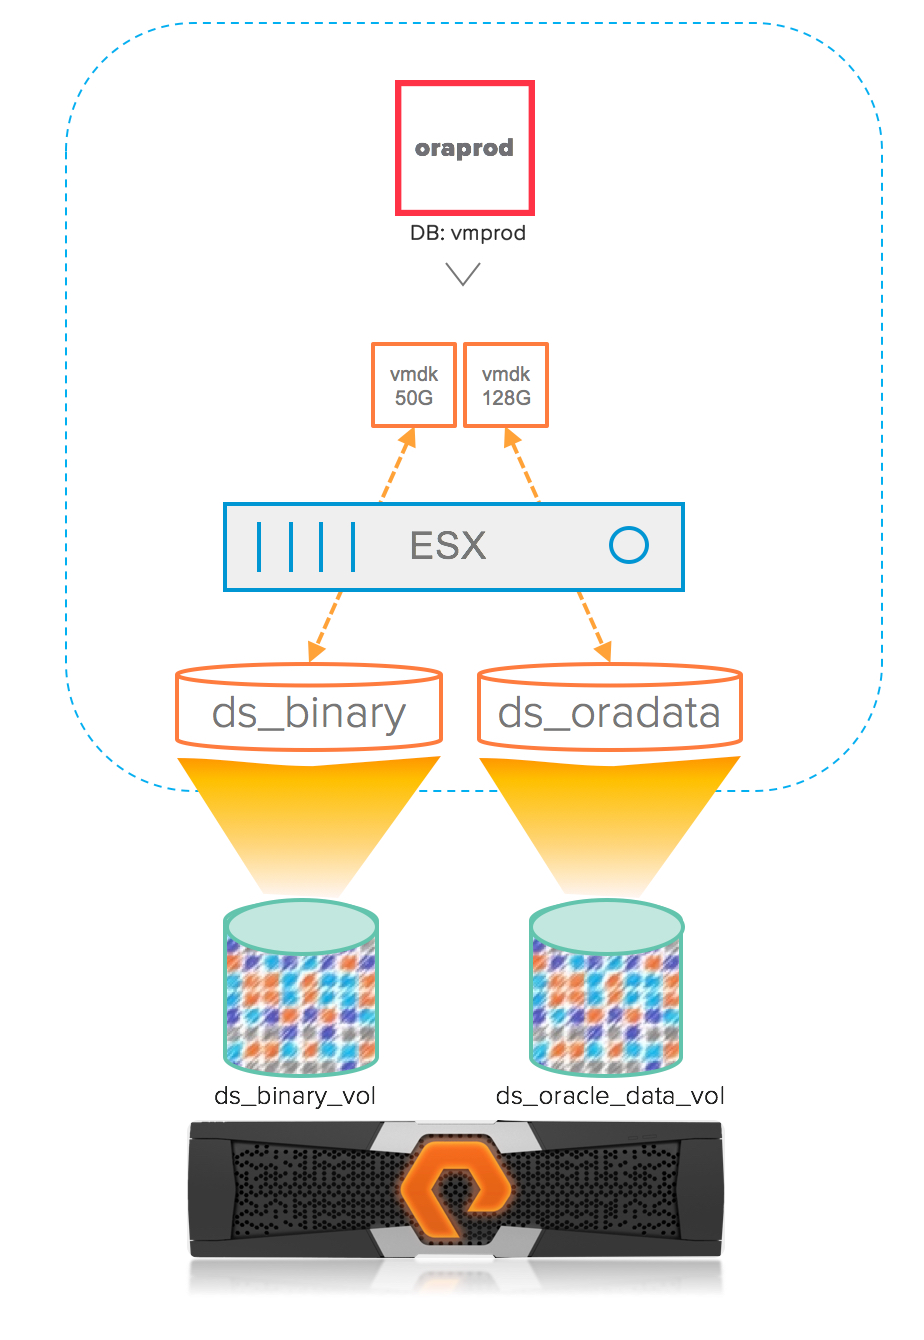
The following diagram illustrates an example of a Linux VM (oraprod) with 2 virtual disks (VMDKs), one hosting the boot that contains Linux OS and Oracle binary and the other disk hosting an Oracle database (vmprod). For ease of understanding, let us assume the database resides on a single disk on the datastore ds_oradata. The boot disk was carved out of the datastore ds_binary which was provisioned on the Pure volume ds_binary_vol while the oracle data disk was carved out of the datastore ds_oradata that was provisioned out of the Pure volume ds_oracle_data_vol.
In this setup, if we wanted to create a clone of the database vmprod using storage level snapshots, the ideal setup would be to take snapshot of the disk that hosts the oracle database. Unfortunately, in the traditional setup, the storage level snapshot can only be performed at the LUN level which means, we have to take the snapshot of ds_oracle_data_vol that hosts the datastore ds_oradata which contains the oracle database disk (and can contain disks from other VMs).
Here is the high level sequence of steps to perform a clone of the oracle database using storage level snapshots.
- Take a storage level snapshot (through GUI or CLI/API) of the LUN (ds_oracle_data_vol) that corresponds to the datastore (ds_oradata) that hosts the Oracle database
- Instantiate the snapshot to a volume (ds_oradata_clone_vol)
- Attach the cloned volume to the ESX host (or to the host group if it is an ESX cluster)
- Perform storage rescan
- Create a new VMFS datastore (ds_clone) from the cloned LUN (ds_oradata_clone_vol)
- Assign a new signature to the datastore to avoid the duplication of volume UUIDs
- In the target VM (oraqa), select “Existing Hard Disk” option to add the disk from the new datastore (ds_clone)
- Follow the standard Oracle DB cloning procedures to create the new database out of the VMDK from the cloned datastore. This is similar to the procedure listed here except the database has to be recreated using create controlfile command and performing media recovery.
 As you can imagine, this process is not simple rather tedious and certainly is not efficient in using the resources. What if our database was placed on multiple datastores or what if the datastore contains disks from multiple VMs (which is very common). It can quickly become operationally inefficient and complicated in identifying disks for cloning across different data stores that resides on physical volumes. In comparison, using a physical RDM is lot more easier for database cloning than the virtual disks out of VMFS.
VVols Setup
Before going over the process of database cloning in VVols, little bit of background on the implementation of VVols. In VVols world, there are different types of virtual volumes and of which the three main VVols are Data, Config and Swap. For every VM, there would be a corresponding Config VVol which holds the metadata information like configs, VMX etc and will always be 4GB in size under Pure FlashArray.
The physical connectivity between the ESX and the storage is through Protocol Endpoint (PE) which is like a proxy LUN that is discoverable and will have multiple paths from the SAN. Also the PE exposes a storage container (which is logical in nature) and all virtual volumes are contained within this storage container in VMware.
For every VMDK within the VM in the traditional setup there would be a corresponding Data VVol. Also for every VM that is powered on will have a Swap VVol.
These virtual volumes are natively created on the Pure FlashArray which means, they are full fledged volumes that can take advantage of all the data services like snapshots, cloning, replication at the VMDK level. For database cloning, we are interested only on the data VVol as the config VVol and swap VVol will always be unique to the VM.
Let us see how the setup would be in VVols for the same example discussed above. The VM (oraprod) now has three virtual volumes, one is the config VVol that will hold the metadata information, second is the data VVol that corresponds to the boot volume and the third is another data VVol that hosts the database (vmprod). There would be a fourth VVol for swap when the VM is powered on but for ease of understanding, it is not included in the diagram.

Here is the process for cloning the database in the virtual volumes setup.
- Take snapshot of the source VM (oraprod) through vCenter (Snapshots->Take Snapshots) and exclude the VM memory by deselecting the option “Snapshot the virtual machine’s memory”. At this time in the first release of Pure’s integration on VVol, this will take snapshot of all data volumes including the boot volume. In the later releases, there will be an option to select the specific data volume to be snapshotted. Alternatively, we can take unmanaged snapshot (outside VMware’s knowledge) through Purity CLI/REST based APIs or Pure GUI.

- On the target VM (oraqa), navigate to the “FlashArray” tab in the vCenter which would show the disks that are attached to the VM. Select the disk that corresponds to the database (the second disk of size 128G in our example) and click “Overwrite Disk”. (For data integrity reasons, unmount the target disk that will be overwritten with that of source)
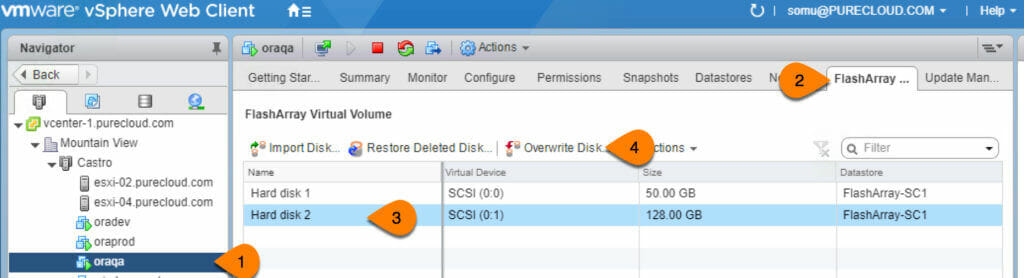
- This will bring up a window with all available snapshots across all VMs. Select the disk that corresponds to the oracle database on the source VM (oraprod) and select the snapshot that was taken on step 1. Click Replace to overwrite the target disk with that of the snapshot.

- Follow the standard Oracle DB cloning procedures to create the database out of the VMDK from the refreshed data volume on the target VM.


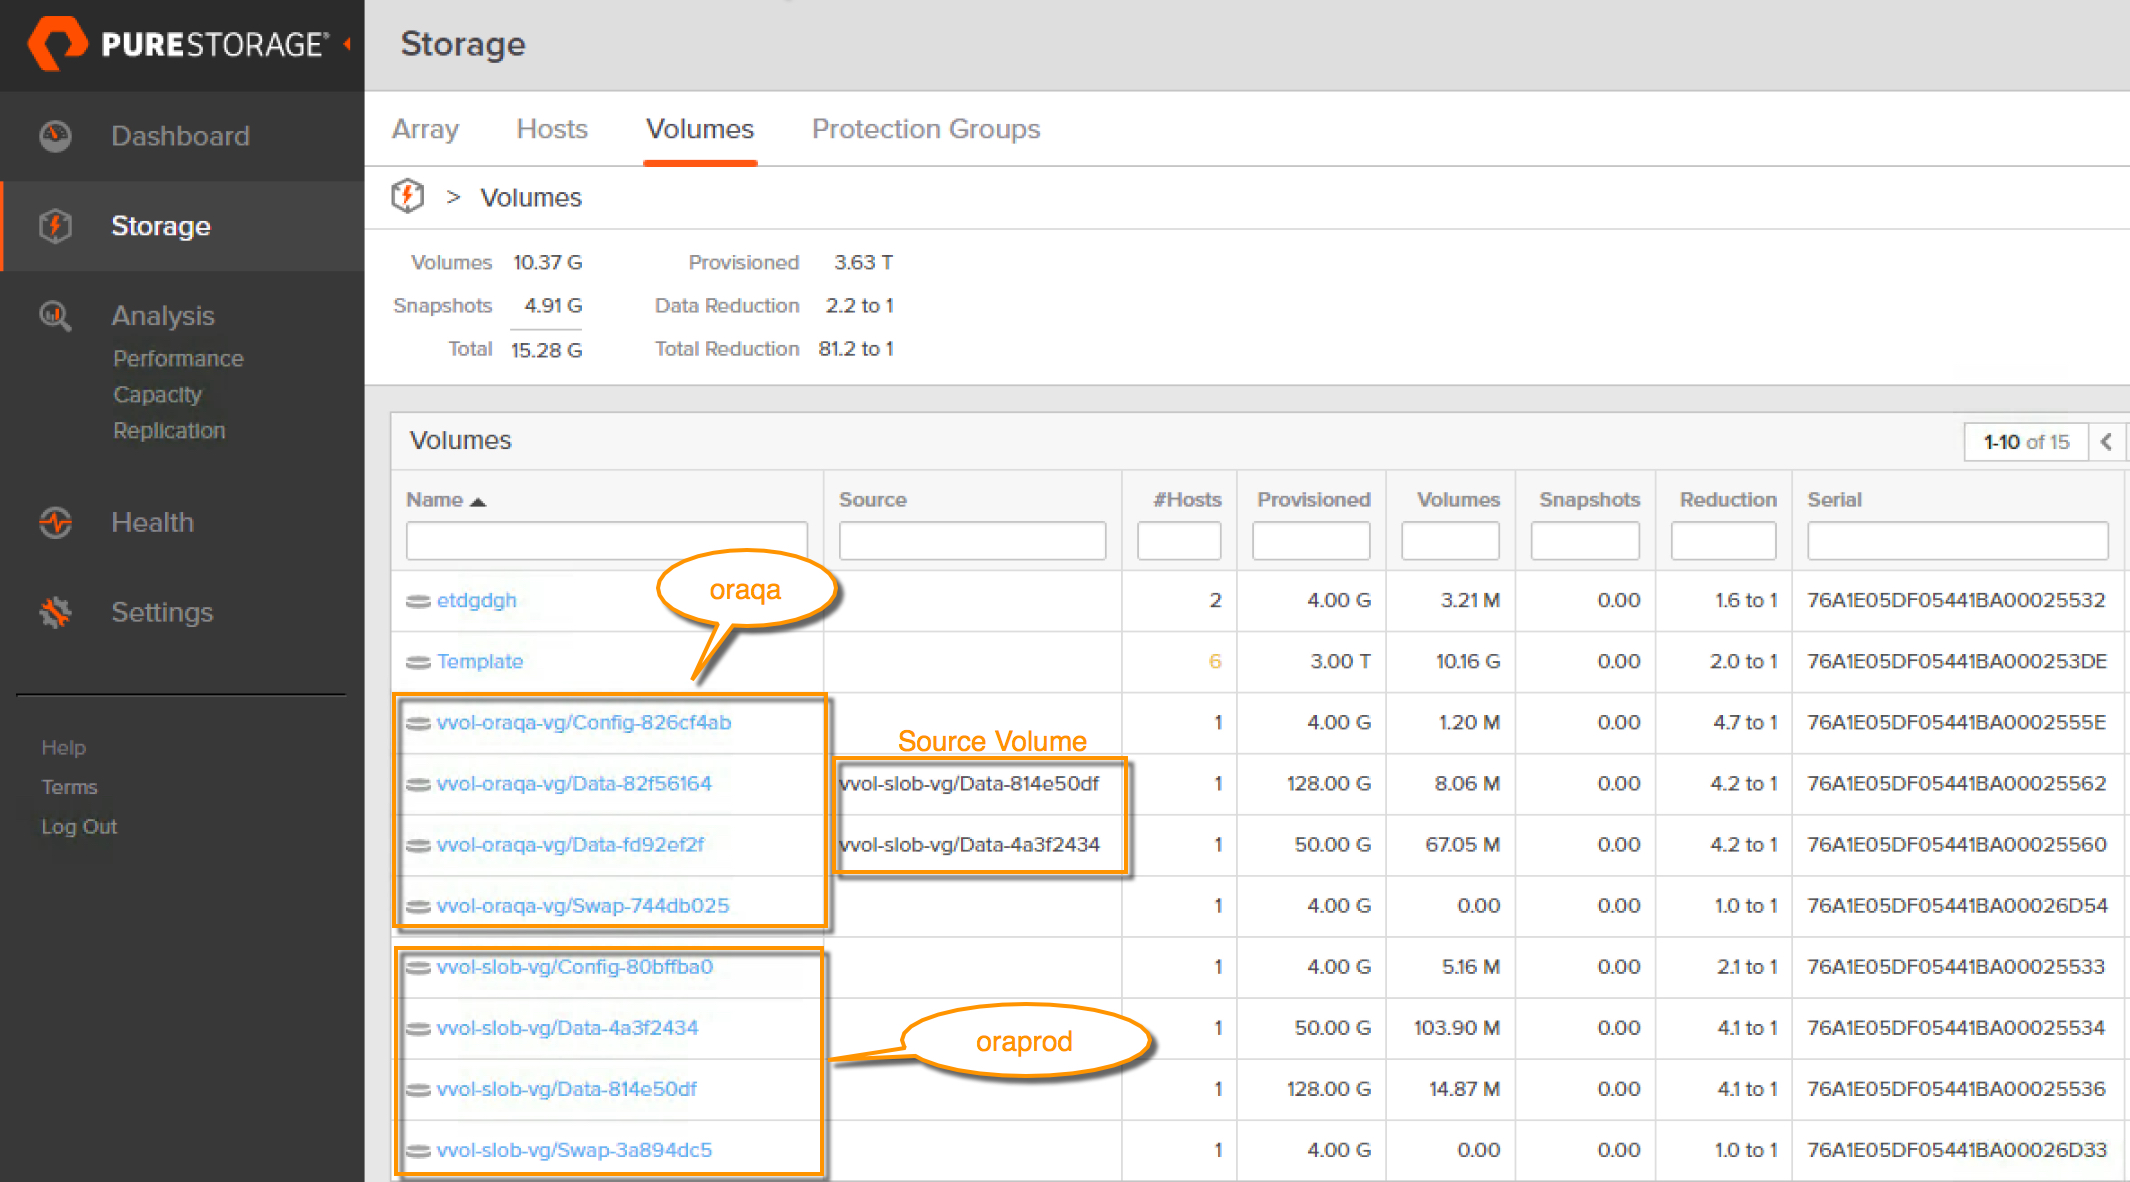
Here is how the volumes looks like in Pure GUI.
Note: If you are wondering why the VM oraprod’s volume names are called as “slob” and not “oraprod”, it is because the initial VM was created with name “slob” and it was later renamed. The underlying virtual volumes were not renamed.
As you can see, based on the implementation of virtual volumes, database cloning at the disk level is simple and straightforward. Also the number of options opens up considerably with the implementation of virtual volumes along with the integration of Pure Storage like cloning the VM is almost instantaneous where the data volumes are cloned along with new config and swap volumes.