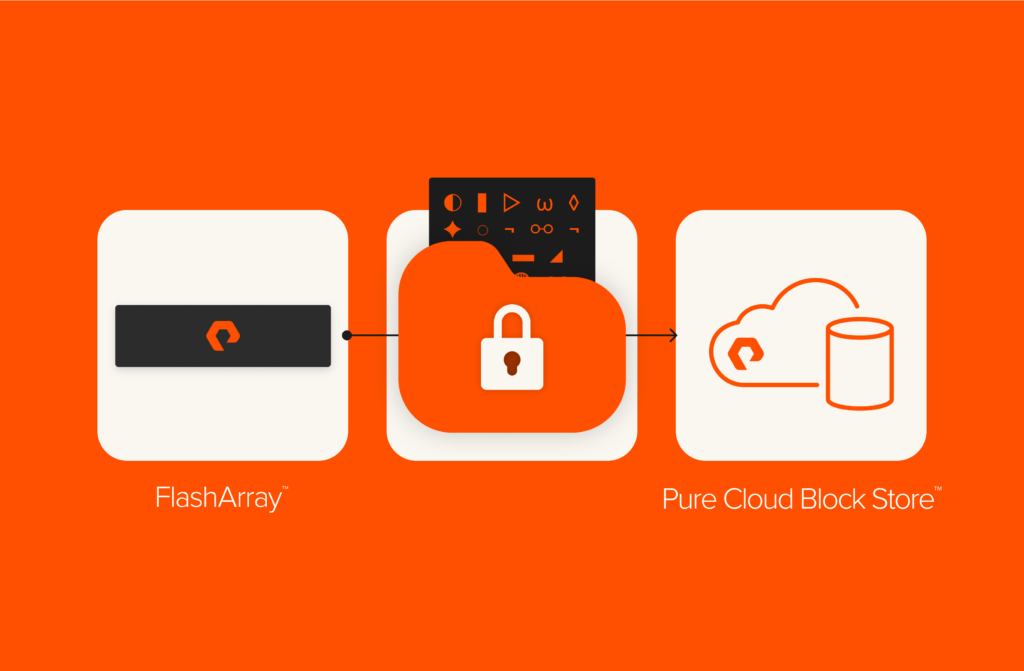


Cloud Block Store™ is Pure Storage’s block store offering in the cloud that enables organizations to run their mission-critical applications in the public cloud. Customers can move their data and applications running on the on-premise FlashArray™ seamlessly to Cloud Block Store.
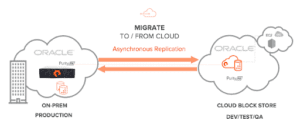
One of the biggest advantages of implementing hybrid architectures is the agility it provides to keep up with the changing needs of the business. One such need, in the context of Oracle database, is spinning up a new instance for dev, test, QA, and more. In this blog post, I’m going to show you how quick and easy it is to create a clone of an Oracle database running on-premise in Pure Storage’s Cloud Block Store running in AWS.
This blog post assumes that Cloud Block Store is already deployed. To set up Cloud Block Store, detailed instructions are in the Cloud Block Store Deployment and Configuration Guide for AWS.
Environment Setup
This is what the demo environment looks like. We have a production database running on-premises called VISPROD. We’ll create a development copy VISDEV on Cloud Block Store running on AWS.
| On-premise | Cloud Block Store | |
| Database Name | VISPROD | VISDEV |
| Host IP address | 10.21.121.126 | 10.0.3.105 |
| Flash Array IP address | 10.21.121.102 | 10.0.3.136 |
Prepare Environment in AWS
On AWS, we need to set up the database host before we can start to create database copies. I’ll briefly list the steps here:
(For more details on setting up a host for Oracle installation, refer to Installing Oracle Database 18c on FlashArray.)
- Create an AWS instance with an OS and version that is the same as the source database running on-premises. Apply any OS patches that have been applied on the source database host.
- Add this instance as a Host object in the FlashArray by going to Storage -> Hosts.
- Create new volumes for VISDEV that correspond to the volumes in the source database (VISPROD) Protection Group snapshot. Their sizes should exactly be the same.
- Connect these new volumes to the Host object created above.
- Run rescan-scsi-bus.sh on the host to rescan the scsi bus. Verify using lsscsi that these volumes are visible to the host.
- Create aliases in multipath.conf for each volume so that it is easier to reference them.
- Run service multipathd restart to restart the multipath service
- Verify using multipath -ll that the device is showing up with the right name and size.
- Ensure that recommendations provided in Oracle Database Recommended Settings for FlashArray have been implemented.
- Install the same version of Oracle Database on the AWS instance as installed on the source database host on-premises. OS user and group IDs should be created in the AWS instance should match those on-premises. If it is an ASM database, Grid Infrastructure needs to be installed as well.
This completes the host setup.
Now create an init.ora file for VISDEV. The easiest way to do this is to copy the init.ora for VISPROD and make the necessary changes.
On-premises FlashArray Setup
We’ll do one-time setups using the GUI, and script the tasks that need to be performed regularly so the entire process can be automated.
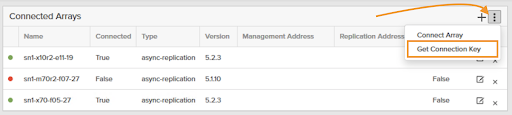
- Connect Cloud Block Store on AWS to the on-premises Flash Array as an asynchronous replication target.
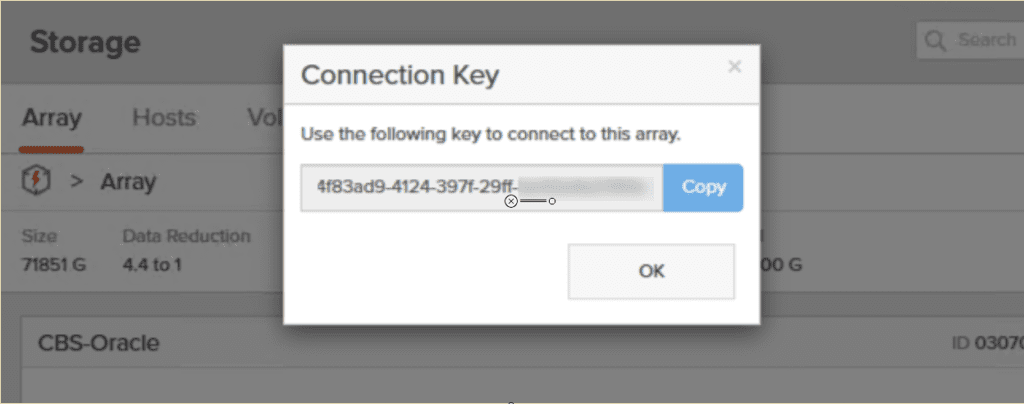
Login to Cloud Block Store, and get the Connection Key
Copy the Connection Key
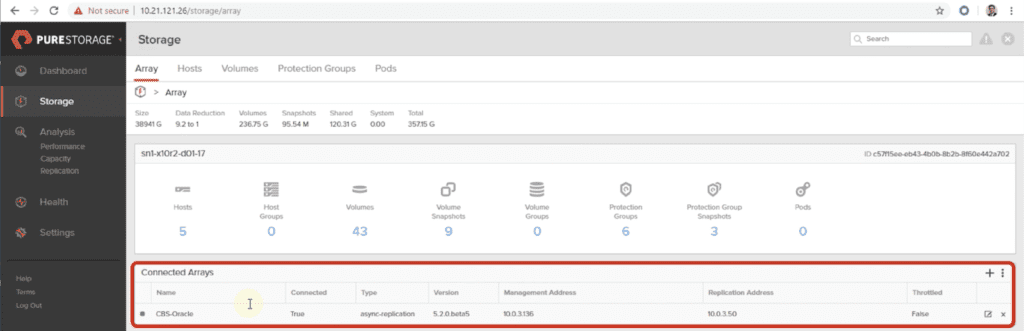
On the on-premise FlashArray, go to Storage -> Array and in the Connected Arrays section click on the Add icon.
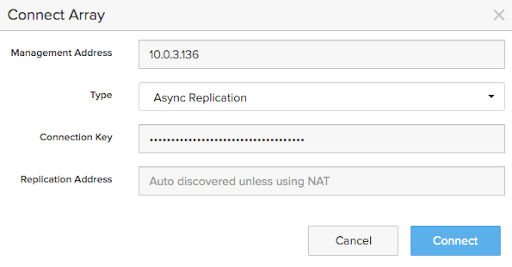
Once connected, the Cloud Block Store should show up in the Connected Arrays list.
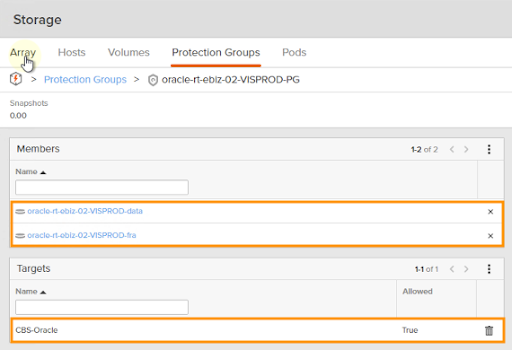
2. Create a protection group on the source Flash Array that includes all the database files of the Oracle database. Also, add Cloud Block Store as a replication target.
3. Take a snapshot of the Protection Group with the replicate to target option. We can use either Pure’s CLI or Python REST API to do this.

This will take a crash consistent snapshot of all the volumes of the database and would allow us to restore the database at point.
If there’s a need to restore the database as of a later point in time, the database should be put in Hot Backup mode before the above command is executed. This can be done by executing the “ALTER DATABASE BEGIN BACKUP.”
- After the snapshot is created, the database should be taken off the Hot Backup mode by executing the “ALTER DATABASE END BACKUP” command.
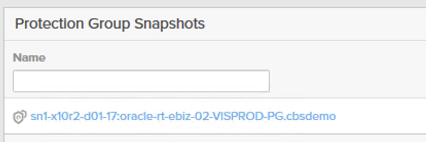
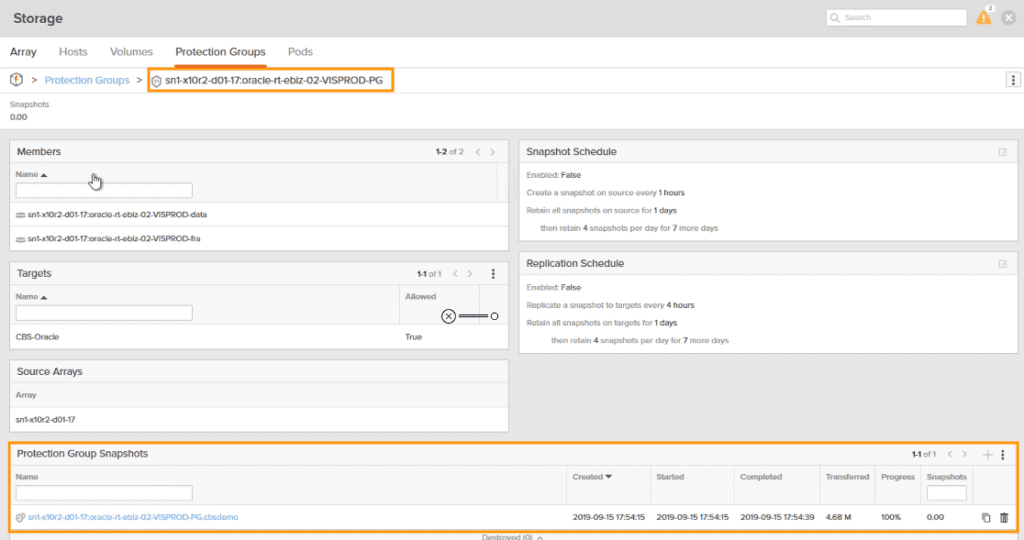
- To verify that the snapshot was replicated, on Cloud Block Store go to Storage -> Protection Groups.
- Find the Protection Group replicated from the on-premises FlashArray. It will have the format – <FlashArray Name>:<Protection Group Name>
- Click on it to go to the details page.
Under Protection Group Snapshots, we can see our snapshot. It will have the format – <FlashArray Name>:<Protection Group Name>.<suffix>. The table provides the status of replication in terms of bytes transferred as well as time consumed.
Once the Protection Group snapshot has been completely transferred, we can begin the process of creating the VISDEV database.
Creating VISDEV Database
- If VISDEV already exists, for example – when doing a refresh, first shut it down.
- Unmount the File Systems hosting the database. In case of ASM, unmount the ASM DISK GROUPS.
- Copy the volumes from the VISPROD Protection Group snapshot to corresponding volumes on Cloud Block Store. As we have pre-created the VISDEV volumes in an earlier step, we need to use the overwrite option while doing the volume copy.
- Mount the file systems. If using ASM, mount the ASM disk groups.
- Rename the directories to match VISDEV naming convention.
- Startup nomount the instance
- Create the controlfile for VISDEV
- Recover database using backup controlfile until cancel.
- Open the database with RESETLOGS option.
This may seem like a lot of steps, but they can easily be automated. I have created a demo video that automates the database refresh of three non-production copies running in Cloud Block Store.
The following is an example of how simple it is to use Pure Storage’s Python REST API. This script copies the volumes from the protection group snapshot replicated from on-premise to Cloud Block Store’s volumes.
|
1 2 3 4 5 6 7 8 9 10 11 12 13 14 15 16 17 18 19 20 21 22 23 24 25 26 27 28 29 30 31 32 33 34 35 36 37 38 39 40 41 42 43 44 45 46 47 48 49 50 51 |
def get_pgroup_snaps(array,pg_name,suffix): pgrp_snaps = array.get_pgroup(pg[‘name’],snap=True) for snap in array.get_pgroup(pg[‘name’],snap=True): if snap[‘name’] == pg_name+‘.’+suffix: return snap; def get_vol_for_pg_snap(cbs_array,pgrp_snap): tgt_volumes = cbs_array.list_volumes(pending=False,snap=True,pgrouplist=pgrp_snap[‘name’]) for tgtvol in tgt_volumes: tgt_vol_name = tgtvol.get(‘name’); return tgt_volumes if __name__ == “__main__”: parser = argparse.ArgumentParser(description=‘Oracle Database Snapshot & Replicate script’) parser.add_argument(‘–prem-array-name’, help=‘FlashArray Hostname or IP address’, required=True) parser.add_argument(‘–cbs-array’, help=‘FlashArray Hostname or IP address’, required=True) parser.add_argument(‘–user’, help=‘Username to connect to the FlashArray’, default=“pureuser”) parser.add_argument(‘–password’,help=‘Password to connect to the FlashArray’, action=“store”, default=“pureuser”) parser.add_argument(‘–src-name-pattern’,help=”, required=True,action=‘store’) parser.add_argument(‘–tgt-name-pattern’,help=”, required=True,action=‘store’) parser.add_argument(‘–srcPG’,help=‘Protection Group that makes up source DB’, required=True,action=‘store’) parser.add_argument(‘–suffix’, help=‘Optional suffix for Volume snapshot’, default=“%Y%m%d-%H-%M-%S”) args = vars(parser.parse_args()) # Connect to CBS Array try: cbs_array = purestorage.FlashArray(args[‘cbs_array’],args[‘user’],args[‘password’]) cbs_array_info = cbs_array.get() except ValueError: print(“Error in connecting to the Array. Check credentials or the REST version !!”) sys.exit(–1) except Exception as err: print(“Error in connecting to the Array!! “) sys.exit(–1) # Extract Source Volumes try: for pg in cbs_array.list_pgroups(pending=True, filter=“name='{}:{}'”.format(args[‘prem_array_name’],args[‘srcPG’])): pgrp_snap = get_pgroup_snaps(cbs_array,pg[‘name’],args[‘suffix’]) vol_in_pg_snap_list = get_vol_for_pg_snap(cbs_array,pgrp_snap) # for each volume in snapshot, copy it with overwrite option for vol in vol_in_pg_snap_list: local_vol_name = vol[‘name’].split(‘.’)[2].replace(args[‘src_name_pattern’],args[‘tgt_name_pattern’]) cbs_array.copy_volume(vol[‘name’],local_vol_name,overwrite=True) except Exception as err: print(“Source Protection Group Error !!”) sys.exit(–1) |
Cloud Block Store runs the same Purity operating environment as an on-premise FlashArray, and provides the same management GUI, same API, and same data services like space-efficient snapshots, always-on encryption, and data reduction. In this blog post, we have seen how simple it is to clone an Oracle Database from on-premises to Cloud Block Store running on AWS. So head over to the AWS marketplace and check out the Cloud Block Store product page.

Free Test Drive
Try FlashArray
Explore our unified block and file storage platform.