In our previous blog about Azure VMware Solution (AVS) and Pure Cloud Block Store™, we covered how to initialize the integration between an AVS private cloud cluster and Pure Cloud Block Store array. This blog focuses on the integration lifecycle management of AVS hosts, by leveraging Azure native resources to continuously monitor and automate the configured state of the storage provisioned.
Key to any AVS deployment is the lifecycle management of ESXi hosts, involving replacement, addition, or removal of ESXi hosts. The following are a couple of scenarios where AVS lifecycle management is triggered:
- AVS host gets replaced automatically if it encounters a hardware failure or undergoes a planned ESXi version upgrade.
- AVS host gets added (scale up) or removed (scale down) manually to an existing cluster.
- AVS cluster with a number of hosts gets created to an existing AVS private cloud instance.
Once the AVS host population is updated for any of the reasons above, the “Build-PCBSCluster” run command needs to be executed against the AVS cluster to enable the software iSCSI adapter, and the Pure Cloud Block Store array can be updated with the appropriate host IQNs. Therefore, it was required to automate this process in order to prevent unpredictable updates, leading to storage configuration mismatch.

Modern Hybrid Cloud Solutions
Seamless Cloud Mobility
Unify cloud and on-premises infrastructure with a modern data platform.
Introducing Deploy-PCBSMonitor Command
AVS host lifecycle management can be completely automated by leveraging the “Deploy-PCBSMonitor” PowerShell command. This command utilizes native Azure components to poll a specific AVS cluster (or a set of clusters inside the same AVS private cloud instance). When a host-level change is detected, adding; removing; and/or replacing a failed host, it will automatically kick off the “Build-PCBSCluster” command to update AVS and Pure Cloud Block Store to the latest configuration.
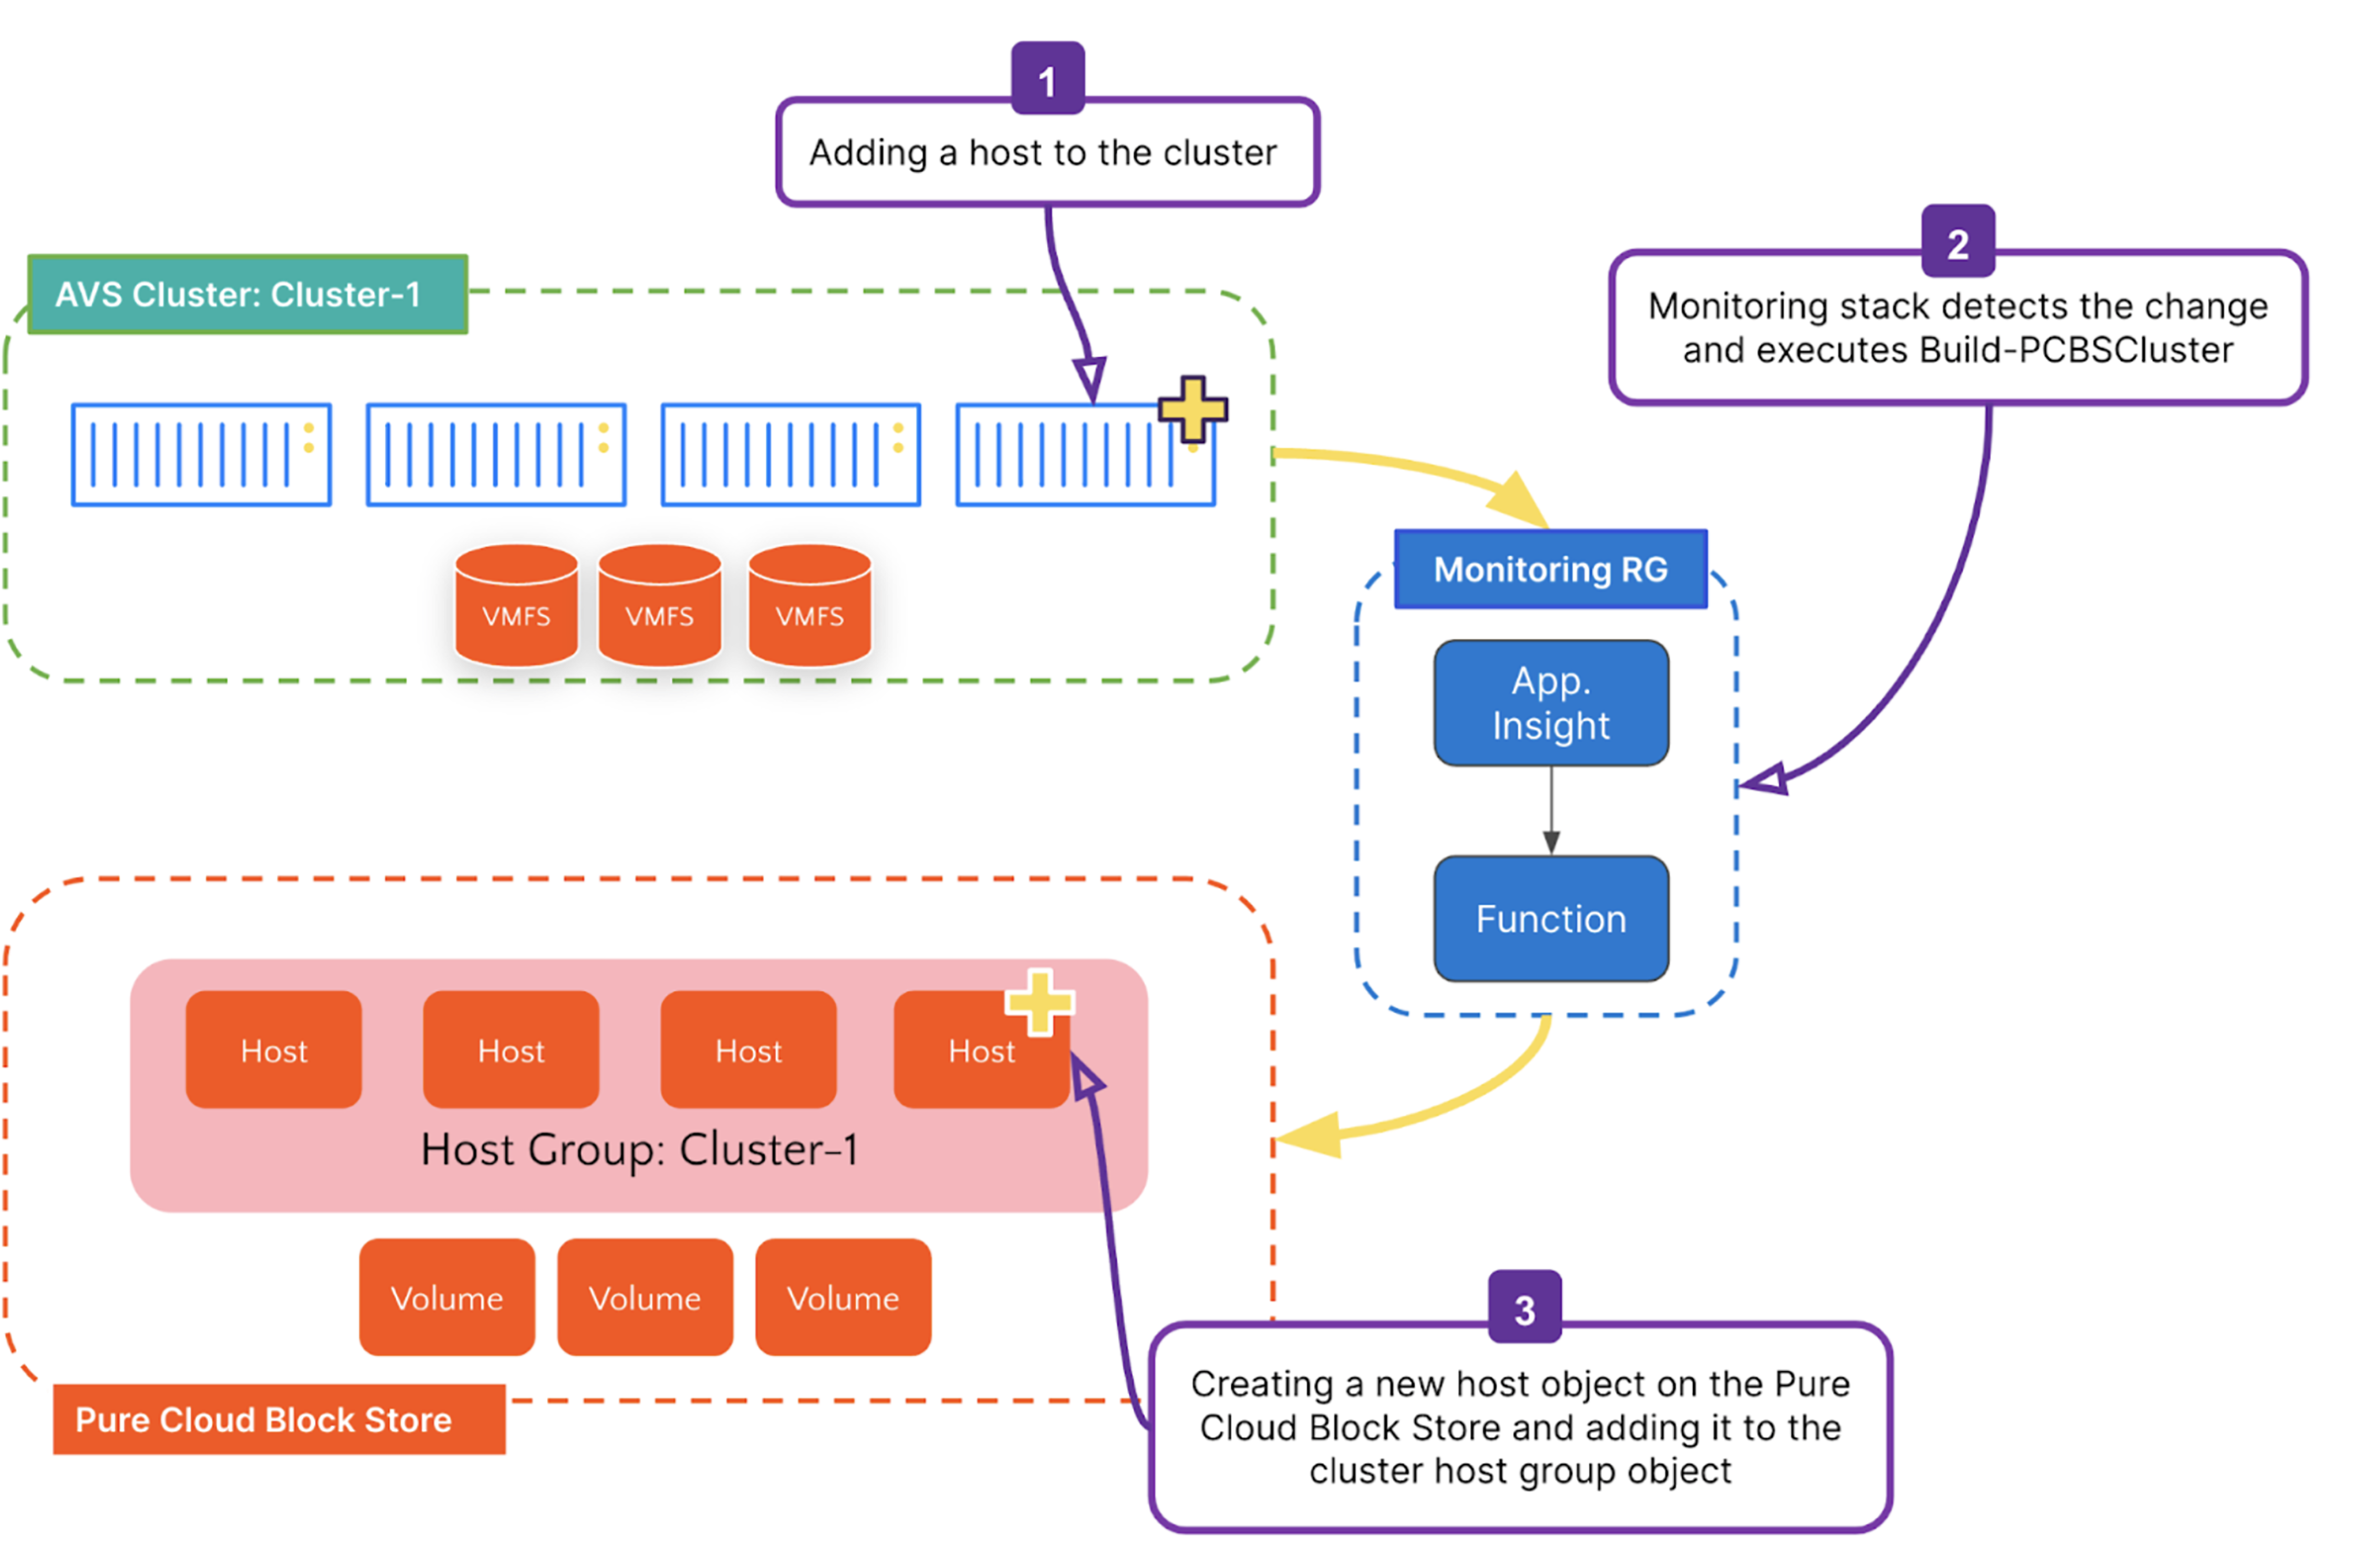
Figure 1: Visualization of the VMFS datastore lifecycle management for manually adding a host to a cluster.
Deploy-PCBSMonitor Command Example
Executing the “Deploy-PCBSMonitor” command comes next in the list of commands after initializing the cluster using the “Build-PCBSCluster” command. It is invoked per AVS SDDC instance and will poll for updates from all the AVS clusters inside that AVS instance as long as the cluster has been initialized. Here is an example of the command syntax:
|
1 |
PS Deploy–PCBSAVSMonitor –AVSCloudName “my-avs” –AVSResourceGroup “avs-resourcegroup” –MonitorResourceGroup “NewResourceGroup” –MonitorResourceGroupRegion “westus2” –vNetName “avs-vnet” –VNetResourceGroup “vnet-resourcegroup” –vNEtSubnetAddress “192.168.10.0/29” –PureCloudBlockStoreEndpoint “192.168.1.10” –PureCloudBlockStoreCredential (Get–Credential) |

Figure 2: Deploy-PCBSMonitor example command with parameters specified below.
The below arguments were passed to the above command:
- The –AVSCloudName refers to the name you gave your AVS instance when it was created.
- The -AVSResourceGroup parameter corresponds to the Azure Resource Group (RG) in which your AVS instance is located.
- The -MonitorResourceGroup refers to the RG where the AVS monitoring infrastructure will be deployed into. The function will check first if the RG exists. If it does not exist, a new RG will be created.
- The -MonitorResourceGroupRegion specifies the region that the Azure Monitor Resource Group and its components will be deployed into. It is recommended that this region is the same region where your AVS instance resides.
- The -vNETName, vNETResourceGroup refers to the Azure vNET where Pure Cloud Block Store is deployed and has AVS connected using the ExpressRoute Gateway connection.
- The -vNETSubnetAddress accepts CIDR block input, and it is created within the same Pure Cloud Block Store vNET. Azure monitoring infrastructure will utilize this subnet to connect to both Pure Cloud Block Store and AVS, and it requires few IP addresses; therefore, the /29 subnet should satisfy the network requirement.
- Another optional value is the -MonitorIntervalInMinute, which specifies how often the Azure Function polls AVS for ESXi host cluster changes. The default value is 10 minutes, and allowable values are 10-60.
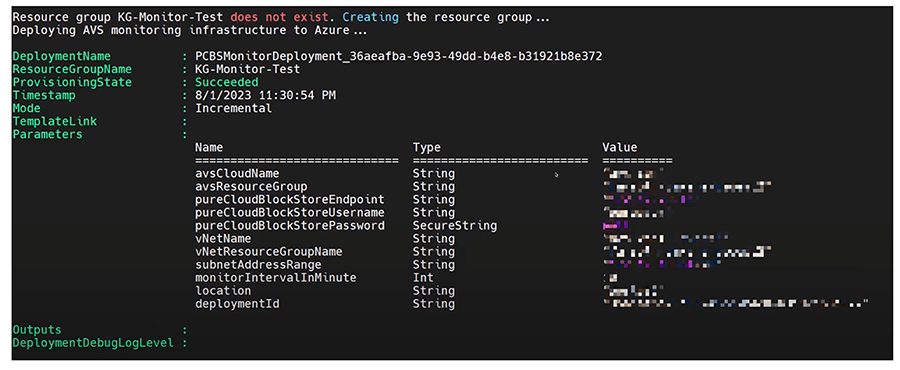
Figure 3: Sample output of a successful execution of Deploy-PCBSMonitor.
Upon the completion of the AVS monitoring infrastructure deployment, you should see the output as shown in Figure 3. One way to check the resources deployed is to navigate to the Azure console and search for the Azure resource group name (Figure 4 below). The resource group contains a couple of native Azure resources, App Service, Application Insight, Key Vault, and more. The core resource is the Azure Function App, which the “Build-PCBSCluster” PowerShell function will be invoked against AVS instance clusters with ESXi host changes detected using the Application Insight. To learn more about the rest of the components, check out the Implementation Guide.
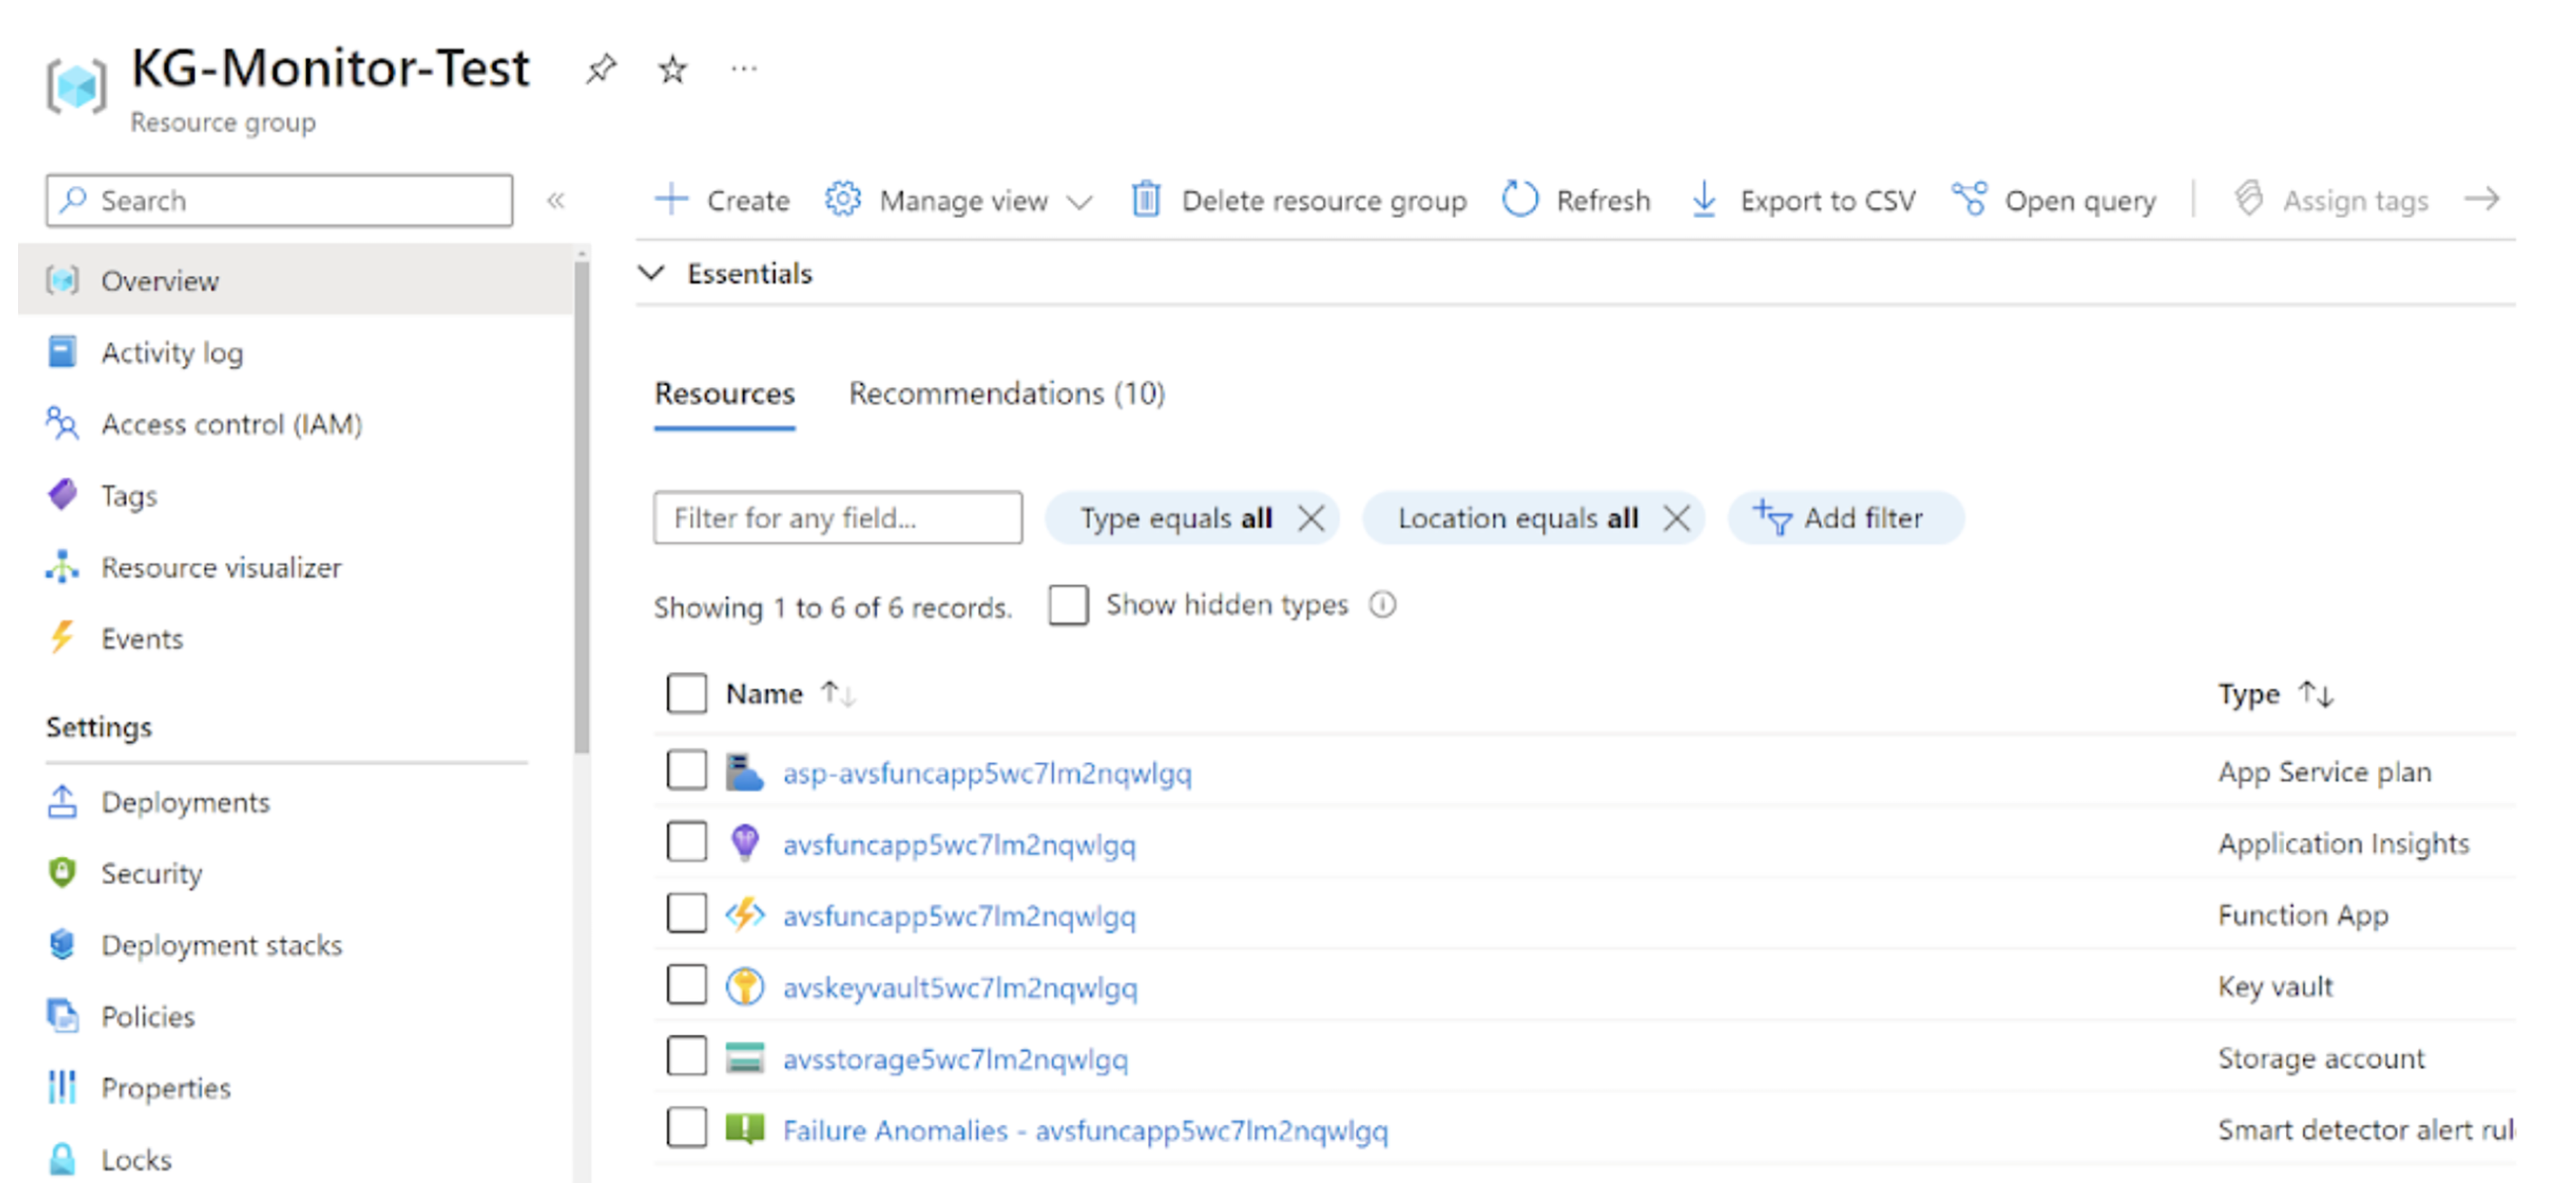 Figure 4: Azure resource group where the AVS monitoring infrastructure is deployed.
By navigating into the Azure Function, you can check the number of times the function got triggered. Furthermore, if you want to validate the workflow without waiting for AVS to perform maintenance on the cluster and replace a failed host, follow these steps:
- Add a new host to the cluster.
- Monitor and follow up on the following:
- AVS adding the new host to the cluster.
- If Azure Function gets triggered, check execution count and invocation traces.
- The newly added host will be configured with iSCSI best practices. Check the iSCSI software adapter getting enabled.
- Pure Cloud Block Store adding the new host and joining it to the cluster host group.
For a visual walkthrough of manually scaling up a cluster and then scaling it down, refer to the video below:
Additional AVS Monitoring Commands
At this stage, both AVS instance clusters and the single Pure Cloud Block Store storage configuration are under continuous monitoring, automatically responding to any detected host changes. If you’ve set up datastores from multiple arrays to the same AVS instance, you can include them by using the “Add-PCBSAVSMonitorArray“ command.
|
1 |
PS Add–PCBSAVSMonitorArray –MonitorResourceGroup “myMonitorGroup” –PureCloudBlockStoreEndpoint “myArray” –PureCloudBlockStoreCredential (Get–Credential) |
Alternatively, you can list the Pure Cloud Block Store arrays that are registered against an AVS Cluster by polling infrastructure with “Get-PCBSAVSMonitorArray”:
|
1 |
PS Get–PCBSAVSMonitorArray –MonitorResourceGroup “myMonitor” |
Or, if you would like to stop AVS polling infrastructure from updating changes against an array, then you can remove that array using ”Remove-PCBSAVSMonitorArray”:
|
1 |
PS Remove–PCBSAVSMonitorArray –MonitorResourceGroup “myMonitorGroup” –PureCloudBlockStoreEndpoint “myArray” |
The last AVS monitoring command to cover is “Remove-PCBSAVSMonitor.” This command is called when it is required to remove the monitoring resource group, including all of the resources within it.
|
1 |
PS Remove–PCBSAVSMonitor –MonitorResourceGroup “myAVSMonitorResourceGroup” |
In this blog, we showcased how the integration of AVS and Pure Storage utilizes Azure Functions with PowerShell, along with other native Azure monitoring services. This setup enables continuous monitoring and polling of AVS infrastructure to detect any changes in hosts. The outcome not only ensures the prevention of storage configuration drift but also streamlines the entire solution, thereby reducing operational overhead.
Upcoming blogs in the AVS and Pure Cloud Block Store series will cover additional PowerShell Run Command functions. This includes how to provision a new datastore, remove a datastore, set the capacity, and restore the datastore from local and replication snapshots. Stay tuned!
Written By:
Learn More
See the library of available AVS Run Commands.

