
Summary
This article provides a how-to on migrating data from an Azure VM’s managed disk to another Azure VM using Cirrus Migrate Cloud and Pure Cloud Block Store.


Cloud adoption is no longer a trend; it’s become almost a necessity. As businesses strive for scalability, flexibility, and cost efficiency, the topic of data migration and cloud storage technologies has become a critical initiative. However, it all comes with its own set of challenges, from minimizing downtime to ensuring data integrity. A well-executed data migration strategy not only accelerates cloud adoption but also unlocks the full potential of specialized cloud-based storage solutions.
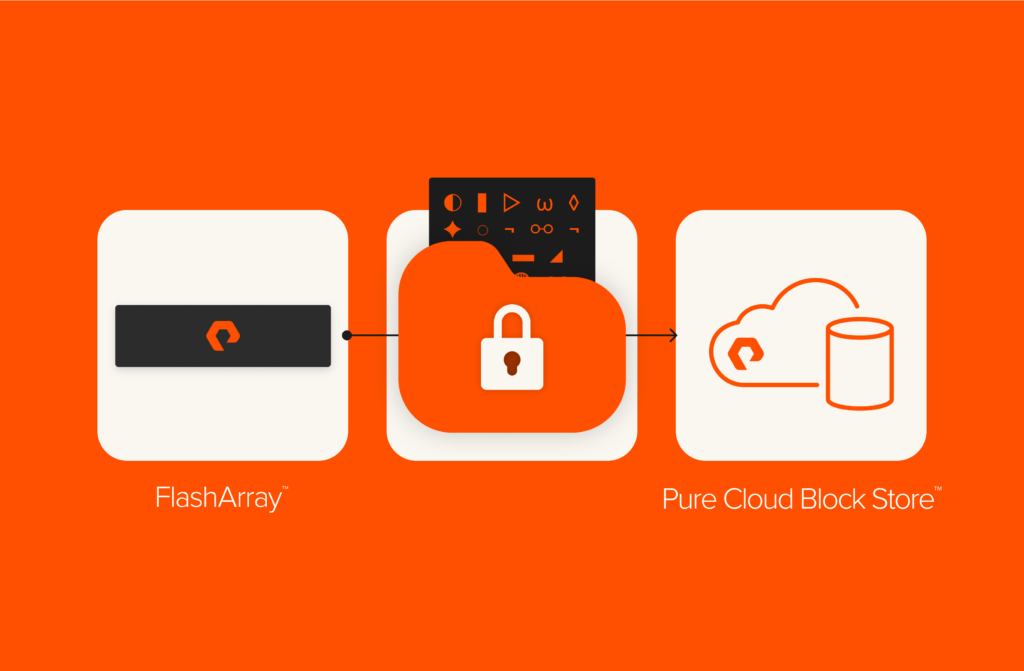
In this three-part series, we will look at a couple of ways of leveraging the Cirrus Data Cloud migration platform, more specifically Cirrus Migrate Cloud (CMC), to move data to Pure Cloud Block Store™. First, we’ll look at replacing an Azure managed disk with a Pure Cloud Block Store volume within the same Azure VM and at how to migrate data from one Azure VM’s managed disk to another Azure VM with a Pure Cloud Block Store volume. The second blog in the series will focus on migrating data from an on-premises data center to an Azure VM with a Pure Cloud Block Store volume. The third blog in our series will cover migrating a VM from Oracle Cloud Infrastructure (OCI) to an Azure VM with a Pure Cloud Block Store volume.
But before we dive into how-tos and step-by-steps, let’s take a look at a couple of reasons why this combination of technologies, CMC with Pure Cloud Block Store, makes sense.
- Seamless live migration with zero downtime: Traditional migration methods often require downtime, disrupting critical applications. CMC eliminates this challenge by enabling live data migration, allowing applications to remain fully operational throughout the process. Using cMotion technology, data is continuously synchronized between the source and target storage, ensuring the latest changes are always reflected in Pure Cloud Block Store. The final cutover takes only seconds, preventing major performance degradation or lengthy service interruptions.
- Automated, scalable migrations with MigrateOps: CMC streamlines large-scale migrations using MigrateOps, an automation framework that follows infrastructure-as-code principles. Administrators can define migration workflows in YAML, enabling repeatable, version-controlled operations across hybrid and multicloud environments. The system also performs pre-migration readiness checks, automatically resolving compatibility issues such as driver installations or network configurations. By reducing manual intervention, MigrateOps accelerates migration timelines while minimizing human error.
- Flexible, vendor-agnostic storage migration: CMC allows organizations to migrate data from almost any block storage system to Pure Cloud Block Store, regardless of vendor or protocol. This flexibility is particularly valuable for enterprises running heterogeneous storage environments, as it enables seamless transitions. Additionally, CMC supports multicloud strategies, integrating natively with platforms like AWS, Azure, and OCI to ensure consistent data mobility and management across environments.
- Enhanced security and data integrity: CMC employs AES-256 encryption for data in transit and at rest, ensuring compliance with stringent security standards. Built-in checksum verification guarantees data accuracy by detecting and correcting discrepancies in real time.
- Cost optimization and operational efficiency: By leveraging data reduction technologies, CMC significantly reduces storage costs and cloud egress fees and minimizes the overall storage footprint. This is further enhanced by the data reduction capabilities of Pure Cloud Block Store.
Let’s sum all of this up before we roll up our sleeves and do some hands-on work. Cirrus Migrate Cloud elevates block storage migration by providing a near-zero-downtime, automated, and secure pathway to Pure Cloud Block Store. Its cMotion and MigrateOps technologies ensure smooth, scalable data transfers while optimizing cost and security. And as companies continue adopting hybrid and multicloud architectures while looking for more effective and efficient ways of storing their data in the cloud, solutions like CMC and Pure Cloud Block Store will play a crucial role in enabling seamless, efficient, and future-proof data mobility.
To get more information about the Cirrus Migrate Cloud platform, visit the website.
To get more information on Pure Cloud Block Store, visit the website or documentation.
The rest of this blog will serve as a step-by-step guide for the above-mentioned use case. Let’s start by logging into the Cirrus Data Cloud environment.
First Steps with Cirrus Data Cloud
To get started with Cirrus Migrate Cloud, we’ll use the web-based interface, which you can access here. Before logging in, you will need to create an account by clicking the Sign Up link. Additionally, you must obtain a license to begin migrations. If you don’t have one, a free trial is available, offering 1TB of migration capacity: Try Cirrus Migrate Cloud free. Of course, you can also procure the license.
After signing up and obtaining a license, log in using your email and password. You will be prompted to enter a security code sent to your email for verification. Once logged in, you will land at the console homepage, where all your projects are managed.
Since no projects exist initially, click the CREATE NEW PROJECT button on the right-hand side. Enter the required details (such as project name and description), and then click CREATE PROJECT to proceed.
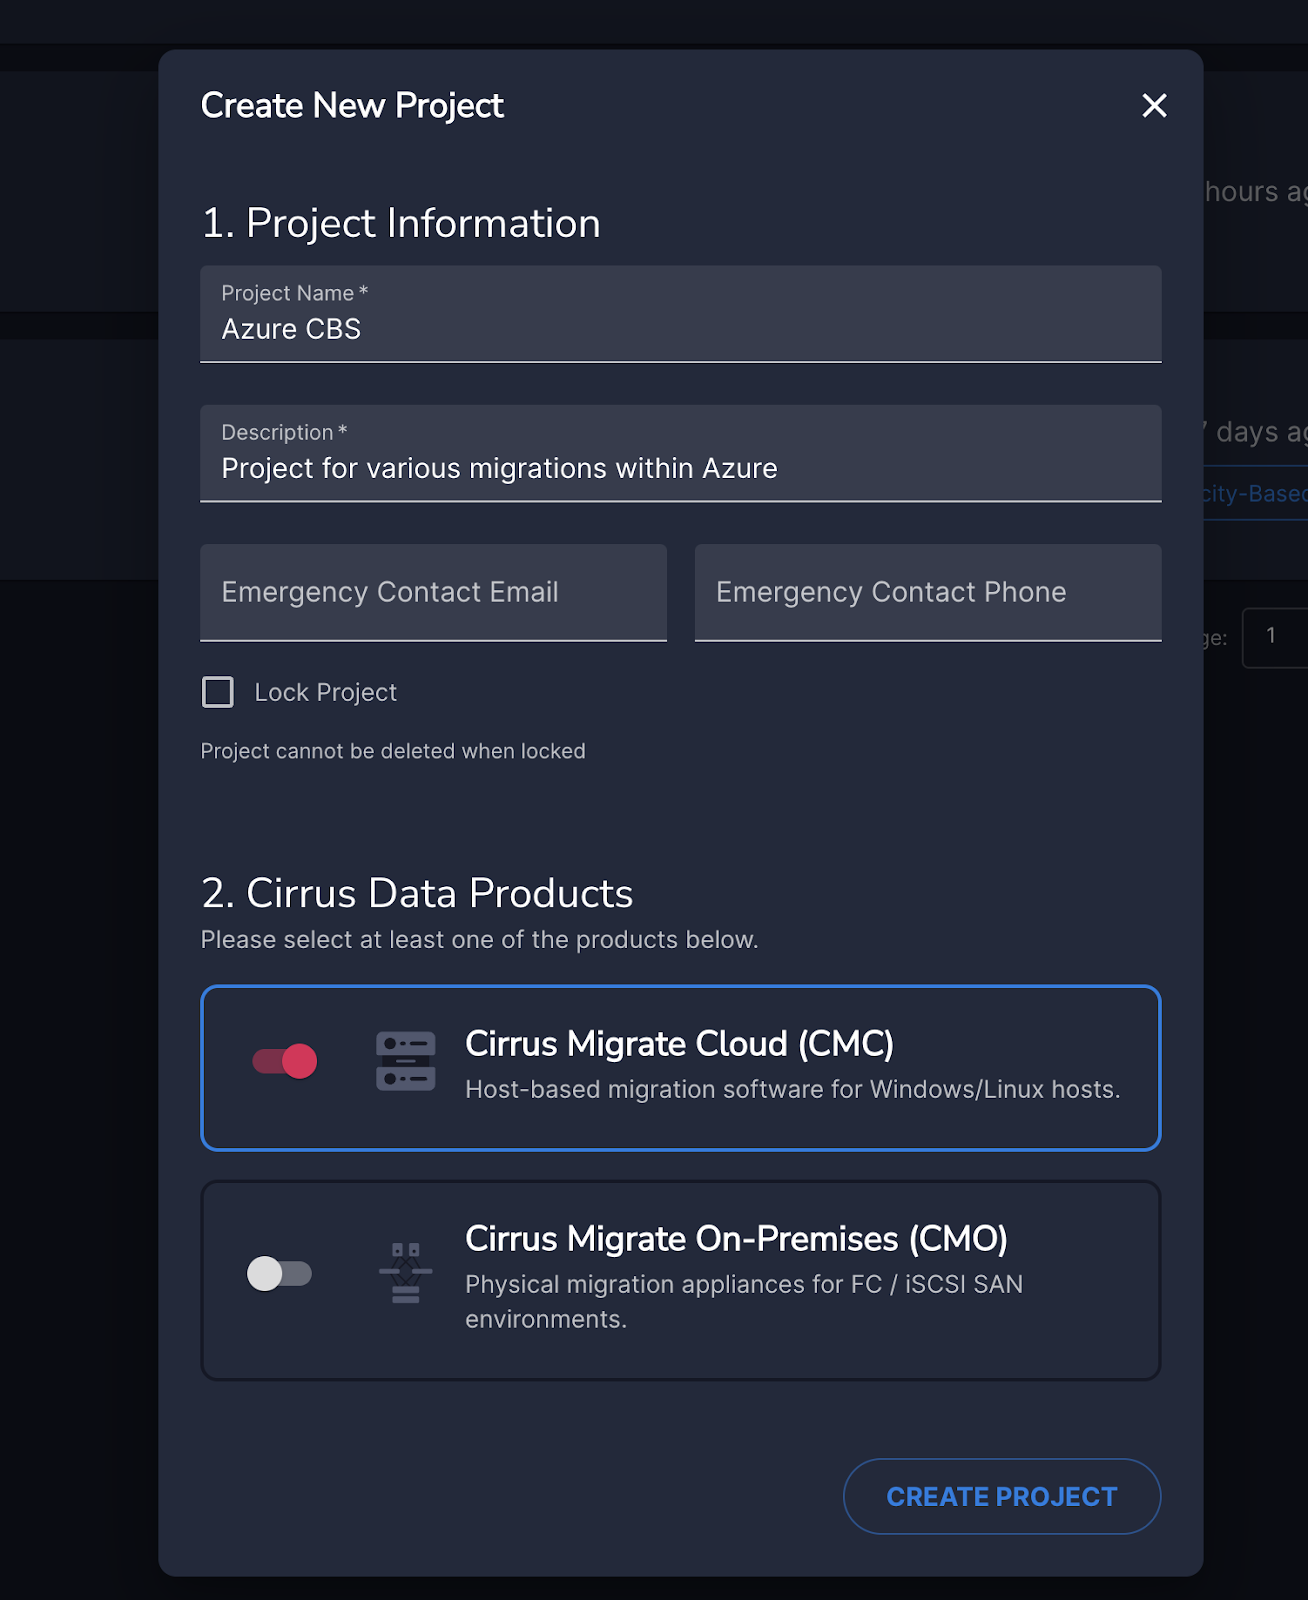
Figure 1: Fill out mandatory fields and select Cirrus Migrate Cloud as the product.
Once created, the project will appear on your homepage dashboard. Click the project name to access the project dashboard, where you can find:
- Details entered during project creation
- A timeline of key actions (e.g., project creation, host registration, migrations)
- Licensing information
At first, the project will not have an assigned license. Click TRANSFER LICENSE to allocate a portion of your migration capacity to this project. For example, if you signed up for the 1TB trial, you can allocate between 1GB and 1TB to the project.
Use the left-hand navigation pane to explore the available project features. Once the setup is complete, we can move on to preparing our migration environment by:
- Registering a host VM, whose managed disk will be migrated to a Pure Cloud Block Store volume
- Creating an integration with a Pure Cloud Block Store instance
Registering the Host VM
For this use case, we’ll go through the process of registering an Azure VM with Cirrus Migrate Cloud and installing the required agent. Our example setup includes an Azure VM (standard E2s V3) running Windows with a 4GB standard SSD managed disk. Before we begin migrating data, we need to ensure that the VM is registered within the Cirrus Migrate Cloud platform.
To start, navigate to the Registered Host section in the left-hand navigation pane. Since no hosts have been registered yet, you will see a message indicating that no hosts are found, along with a DEPLOY CIRRUS MIGRATE CLOUD button in the center of the screen.
Click this button to open a configuration table. Here, you can choose to install or uninstall the Cirrus agent and select the target operating system—Linux or Windows. In this case, we are installing the agent on a Windows VM.
After selecting the appropriate options, the system generates a PowerShell command for installing the Cirrus agent. Run this command in the PowerShell terminal of your VM. Once the installation completes successfully, your VM will be registered with Cirrus Migrate Cloud.
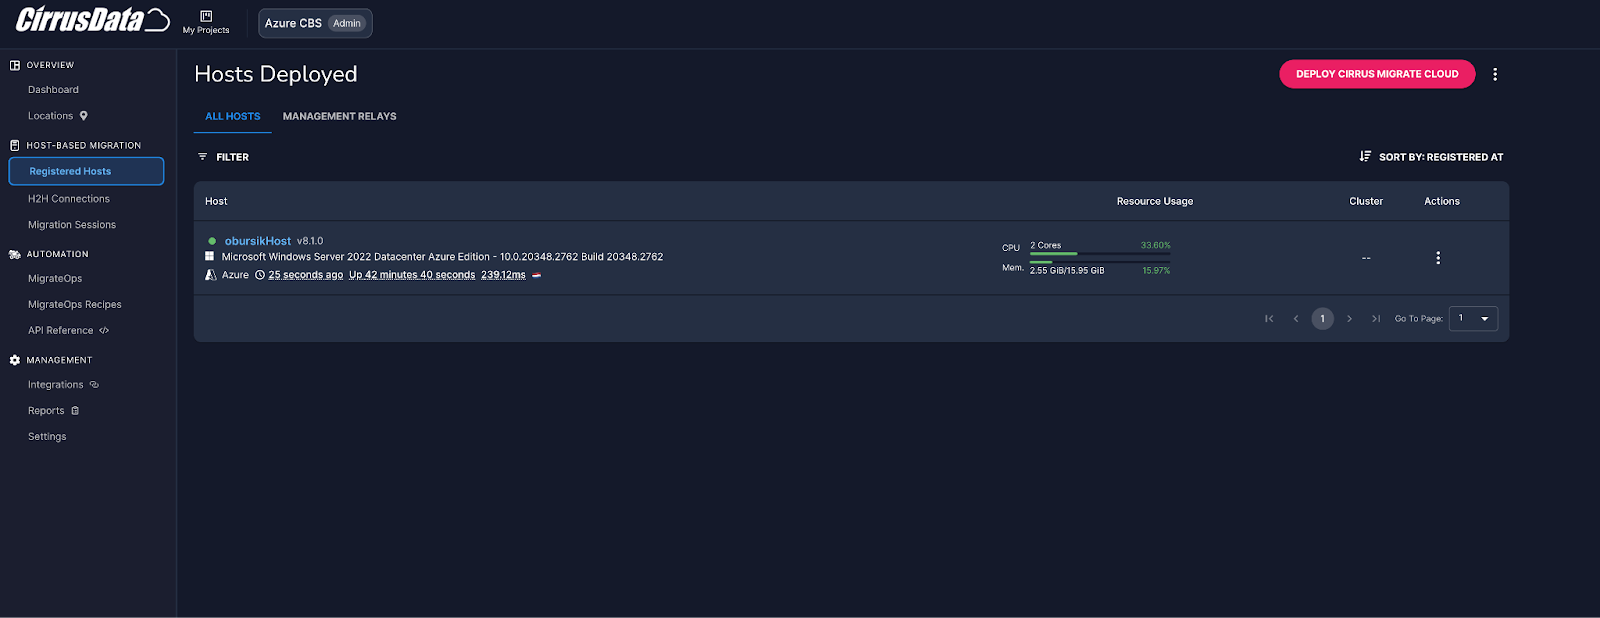
Figure 2: Registered Hosts section will allow you to inspect hosts registered with Cirrus Migrate Cloud.
This registration step is essential, as it allows Cirrus Migrate Cloud to detect and manage your VM for migration. With the host successfully registered, we can now proceed to setting up our migration environment, preparing for a seamless data transition to a Pure Cloud Block Store volume.
The first step of that will be establishing integration with Pure Cloud Block Store.
Pure Cloud Block Store Integration
Cirrus Migration Cloud offers a wide selection of integration points you can choose from. In our case, we will use the one for Pure Storage® FlashArray™/Pure Cloud Block Store. In the Project, select Integrations in the Management section of the left-hand side navigation menu, and then click the ADD INTEGRATION button on the Pure FlashArray/Cloud Block Store tile.
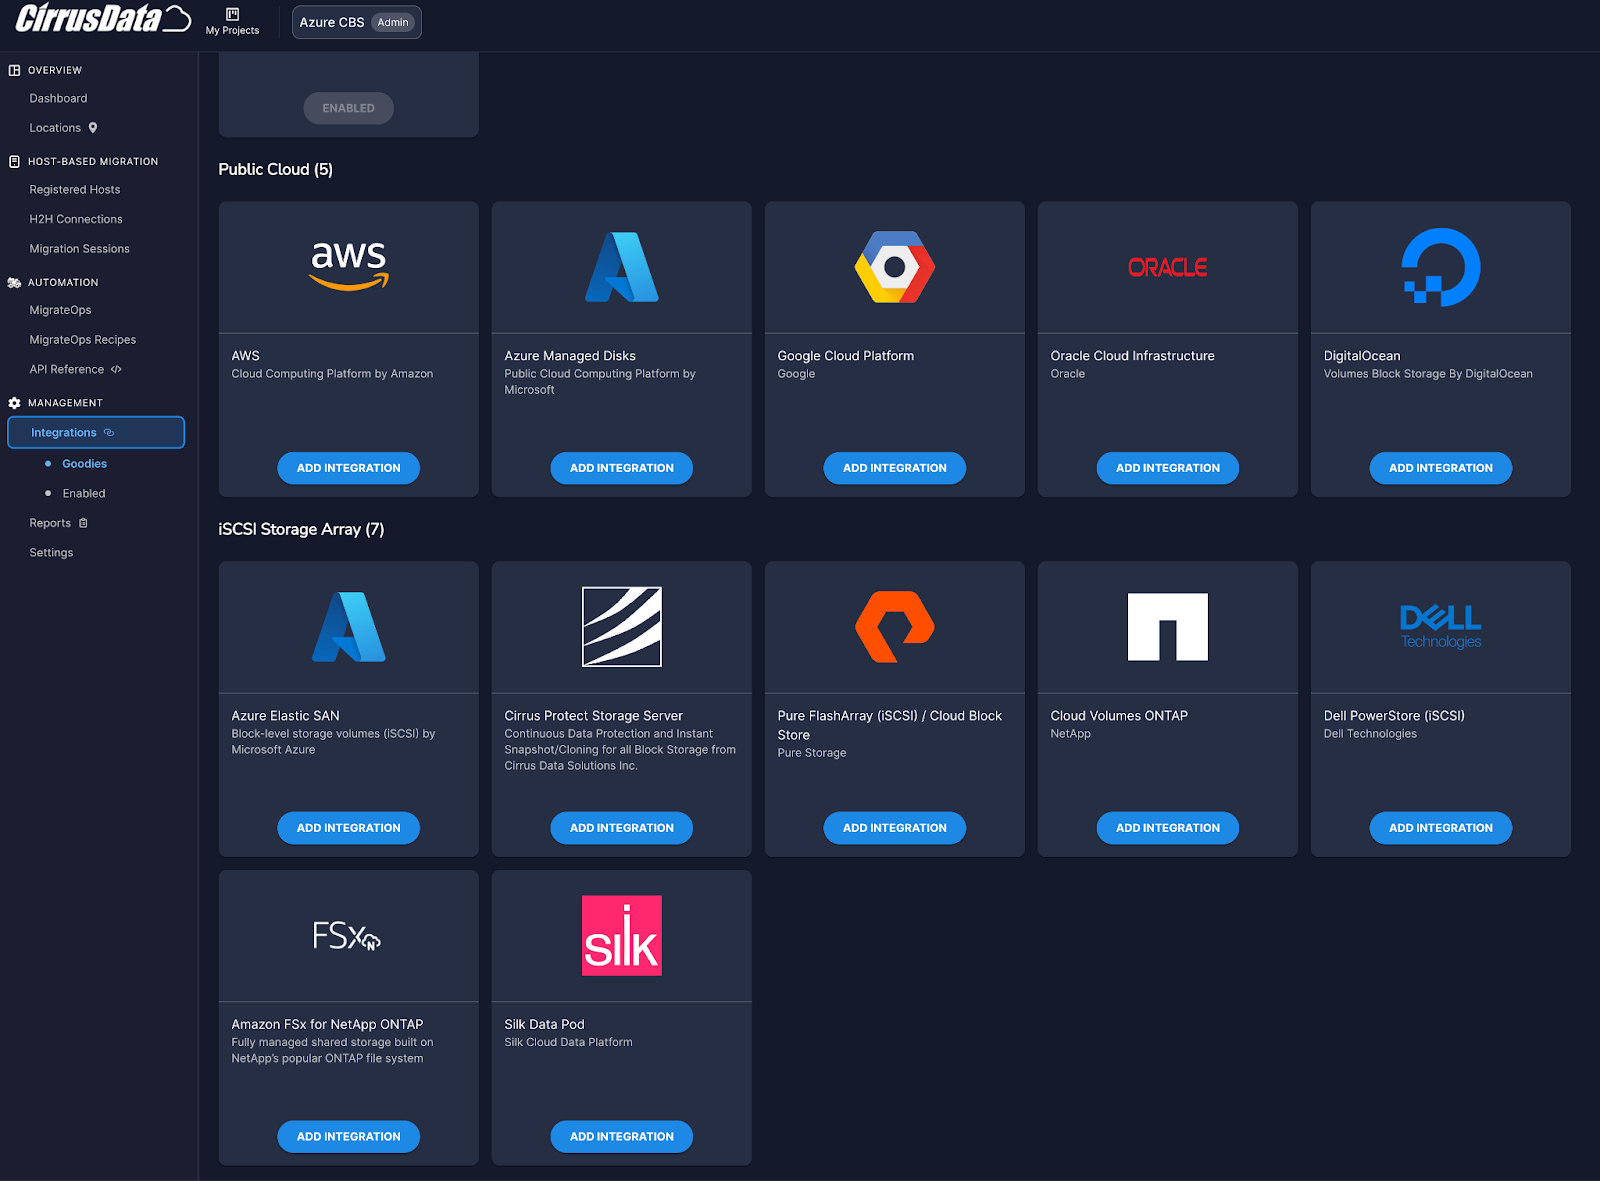
Figure 3: A wide selection of available integrations can be reviewed in the Integrations section.
Relatively few details are required to create the integration. These include:
- Name of the integration
- Management address of the Pure Cloud Block Store array and user API token
- Optional verification of the connection from our previously registered host
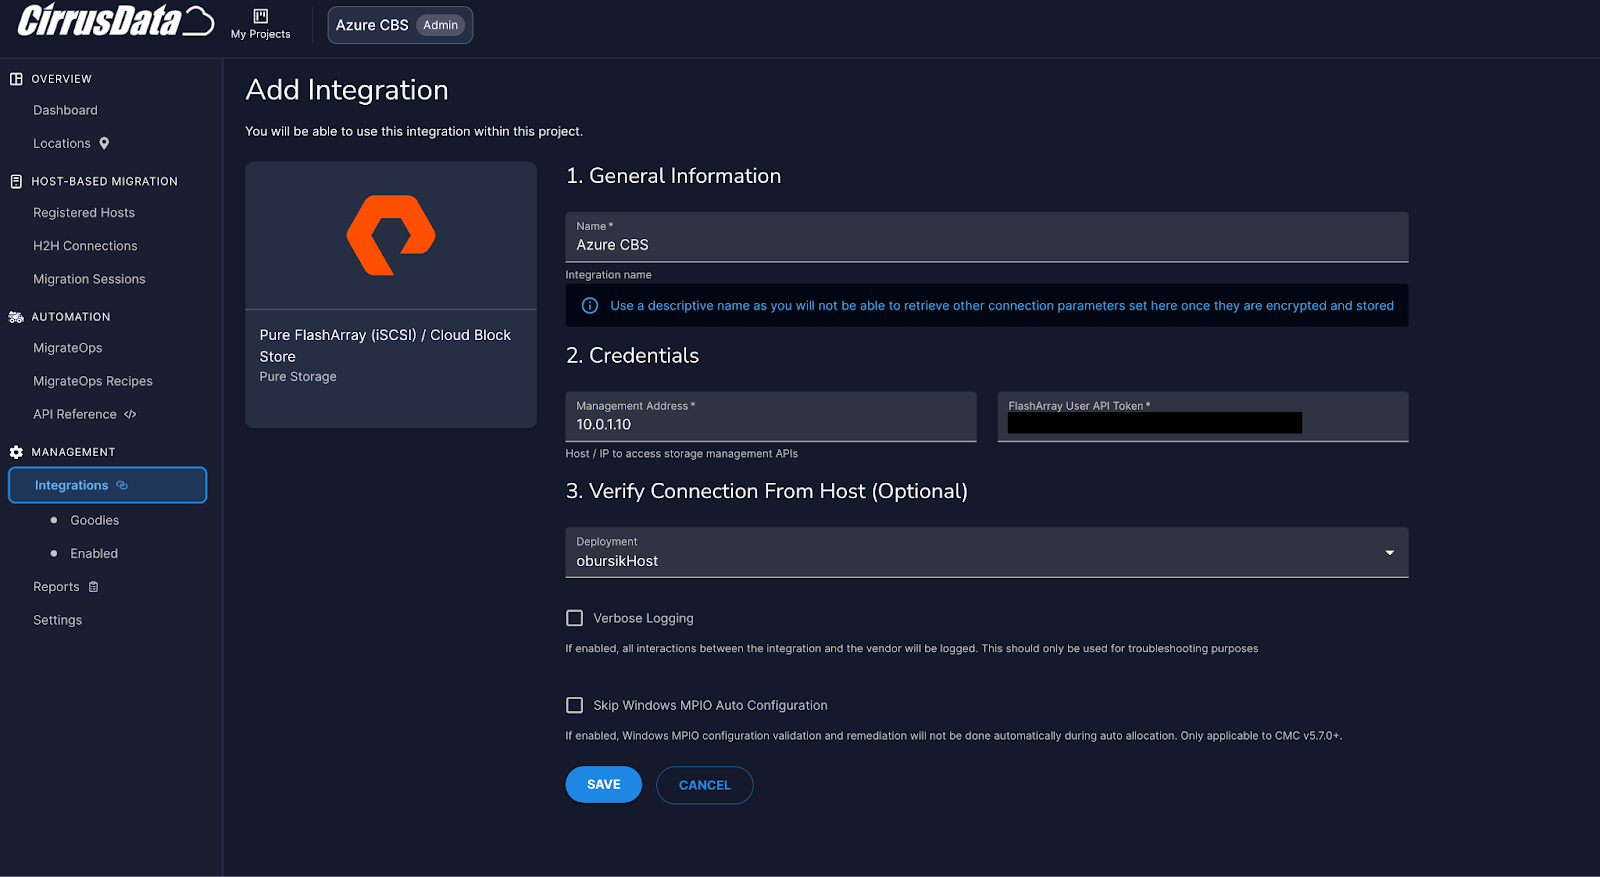
Figure 4: Adding Integration for Pure Cloud Block Store.
If everything goes smoothly, including the optional verification of the connection from our host, we should be able to see our newly integrated array under Enabled Integrations in the navigation pane. Optionally, it is possible to run the connection test from the Pure Cloud Block Store tile once the integration has been created.
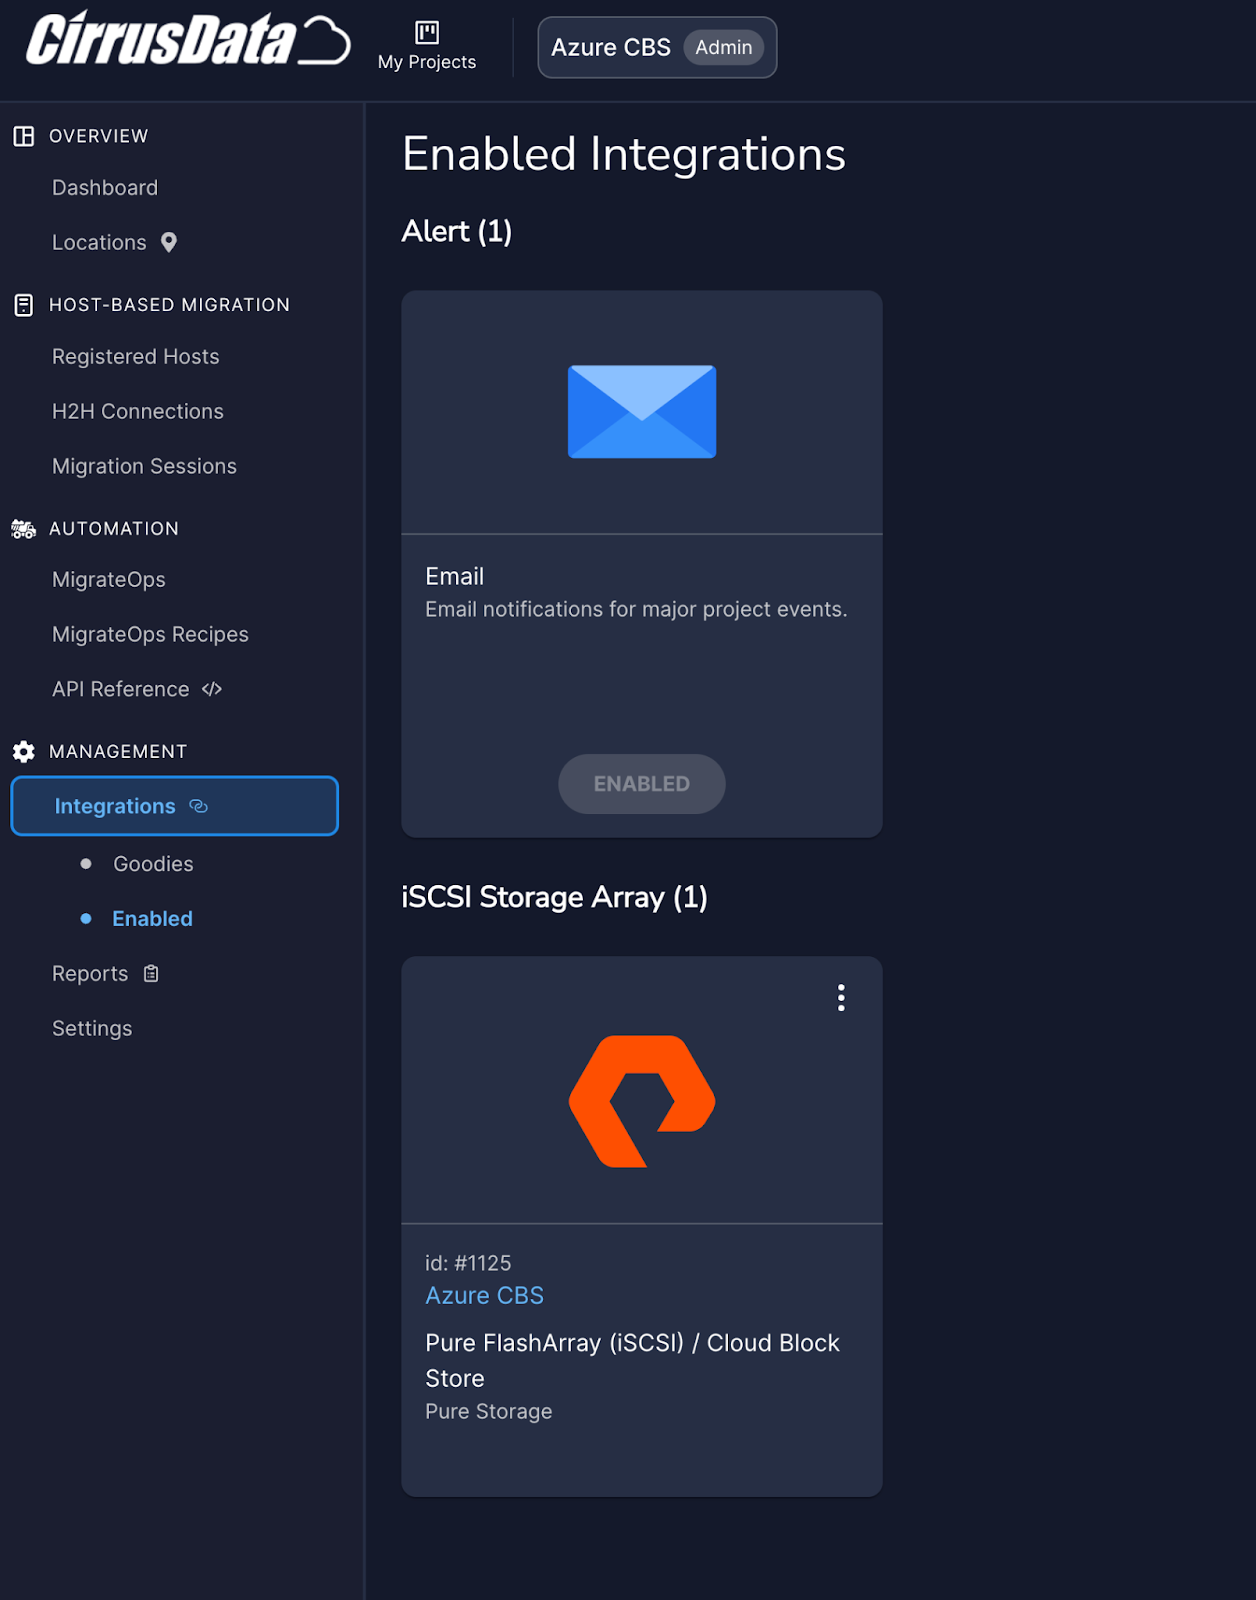
Figure 5: Review added integrations in the Enabled Integrations section.
Once both source (VM with managed disk) and target (Pure Cloud Block Store) are configured within Cirrus Migrate Cloud, we are ready to configure the migration session.
Migration Session
You can initiate a migration session from two places. The first option is going to the Registered Hosts section, selecting a host (the one you want to migrate data from), and then clicking on the MIGRATE HOST VOLUMES button. The other option is by going to the Migration Sessions section. Here, you can review previous sessions, or create a new one by clicking on the NEW MIGRATION SESSION button. When using this approach, in the next step, you have to select the source host. After that, both described approaches are the same and you land on the following page.
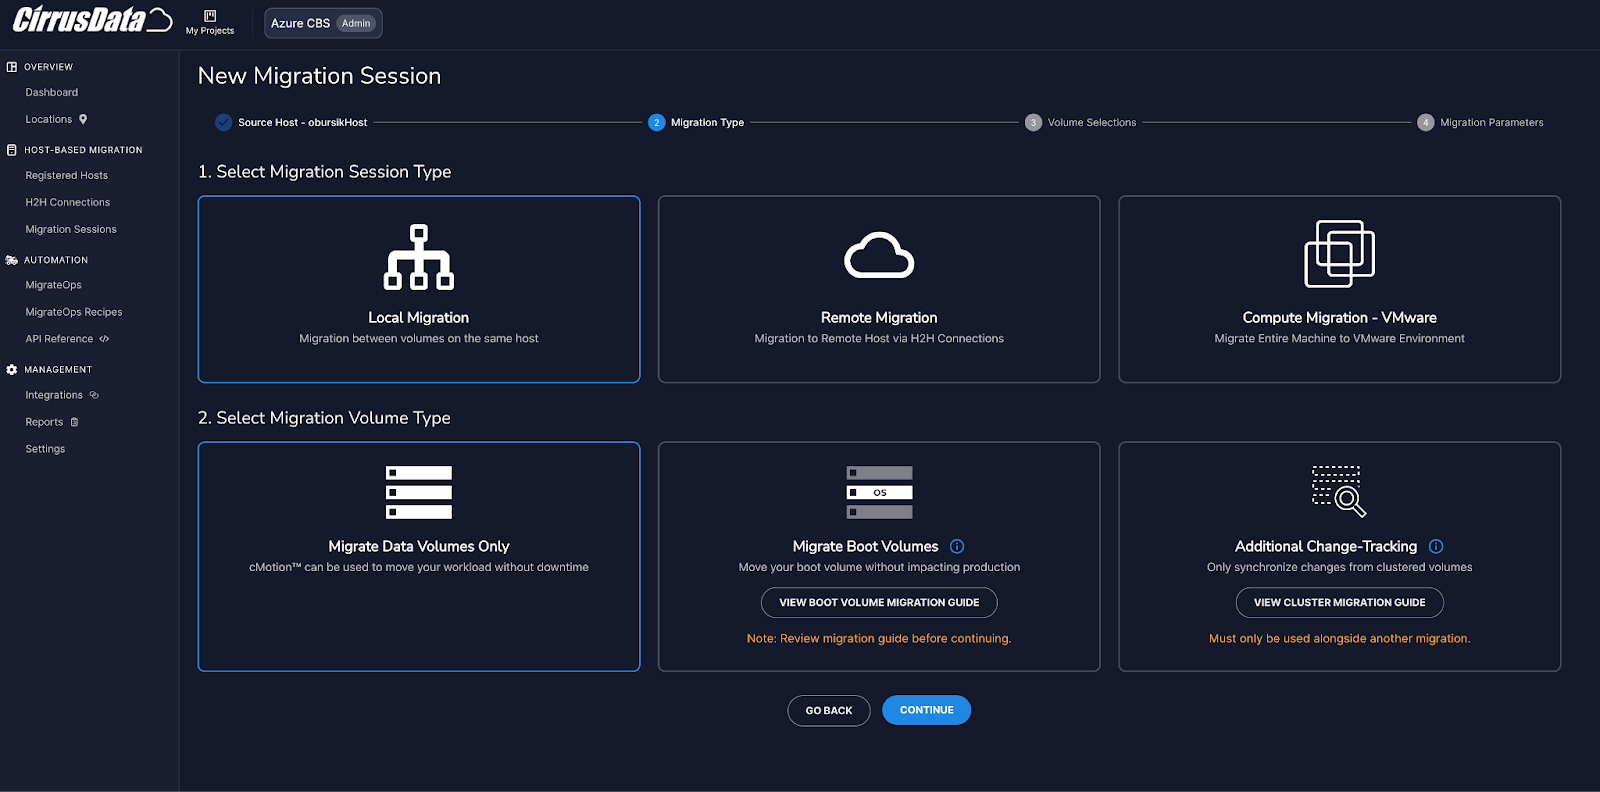
Figure 6: Select Local Migration and Migrate Data Volumes Only for this use case.
In our case, we are doing a local migration, replacing the Azure managed disk with a Pure Cloud Block Store volume. Cirrus Migration Cloud gives us multiple options, some of which will be discussed in later installments of this blog series. After making the selection, we pick the drive to migrate data from. In our case, it is a small, 4GB managed disk. Cirrus Migrate Cloud performs automatic discovery of eligible drives and displays them on this screen:
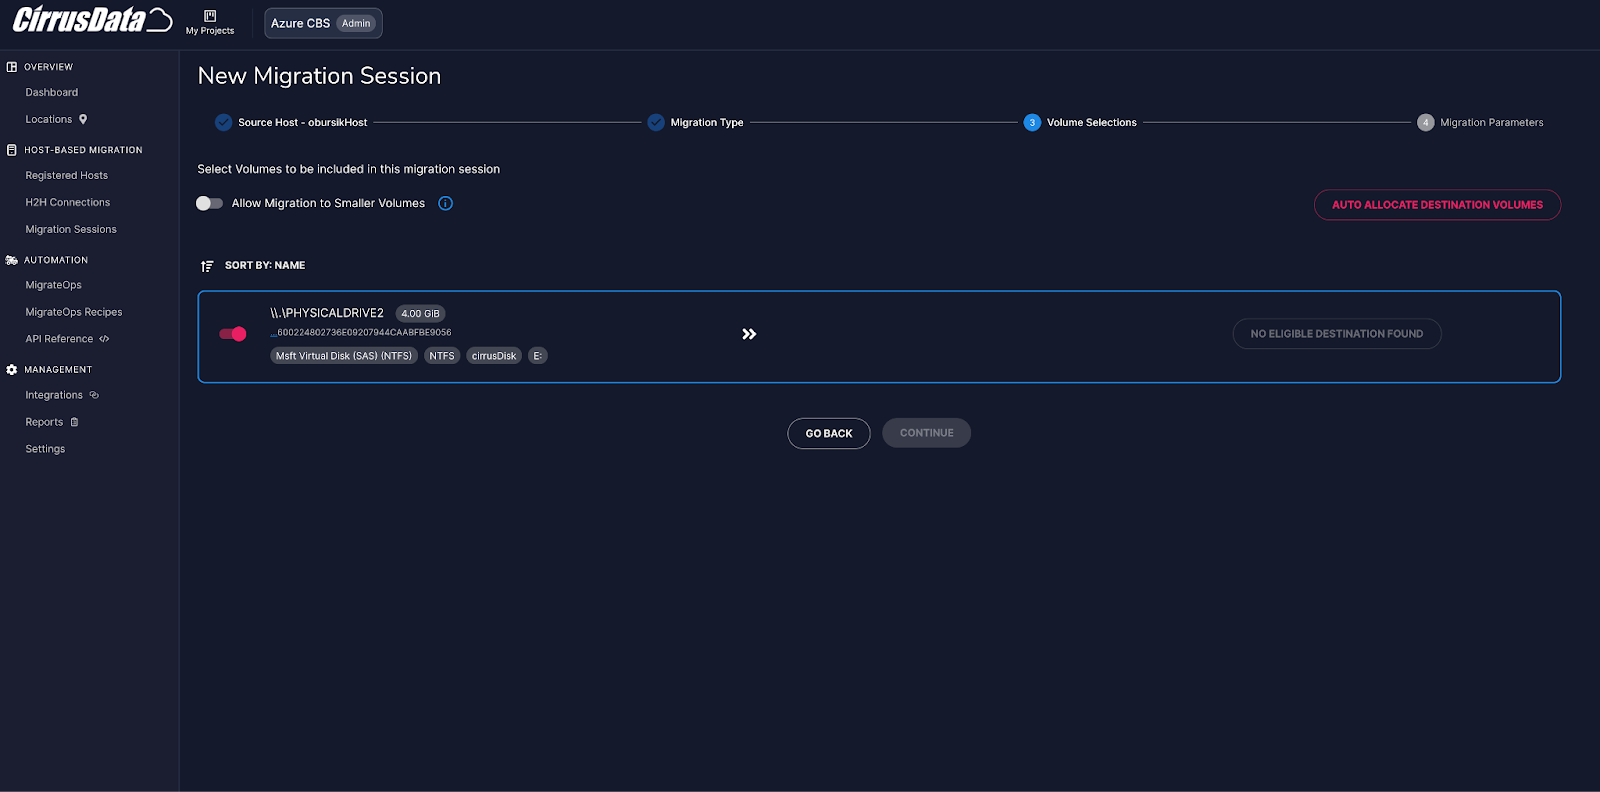
Figure 7: Cirrus Migrate Cloud automatically detects drives that can be migrated.
When available, the tool would also display eligible destinations for the new migration session. Since in our case the Pure Cloud Block Store array was so far only integrated to Cirrus Migration Cloud and not configured in any way, there are no eligible destinations found. To make life easier, however, CMC provides the option to automatically allocate destination volumes. This process includes automatic creation of host and volume entities within the target Pure Cloud Block Store and establishing iSCSI sessions between the host and the array.
Click on AUTO ALLOCATE DESTINATION VOLUMES next, and select the previously created integration to the Pure Cloud Block Store array when prompted. After that, the following screen should appear, offering two ways of configuring the host.
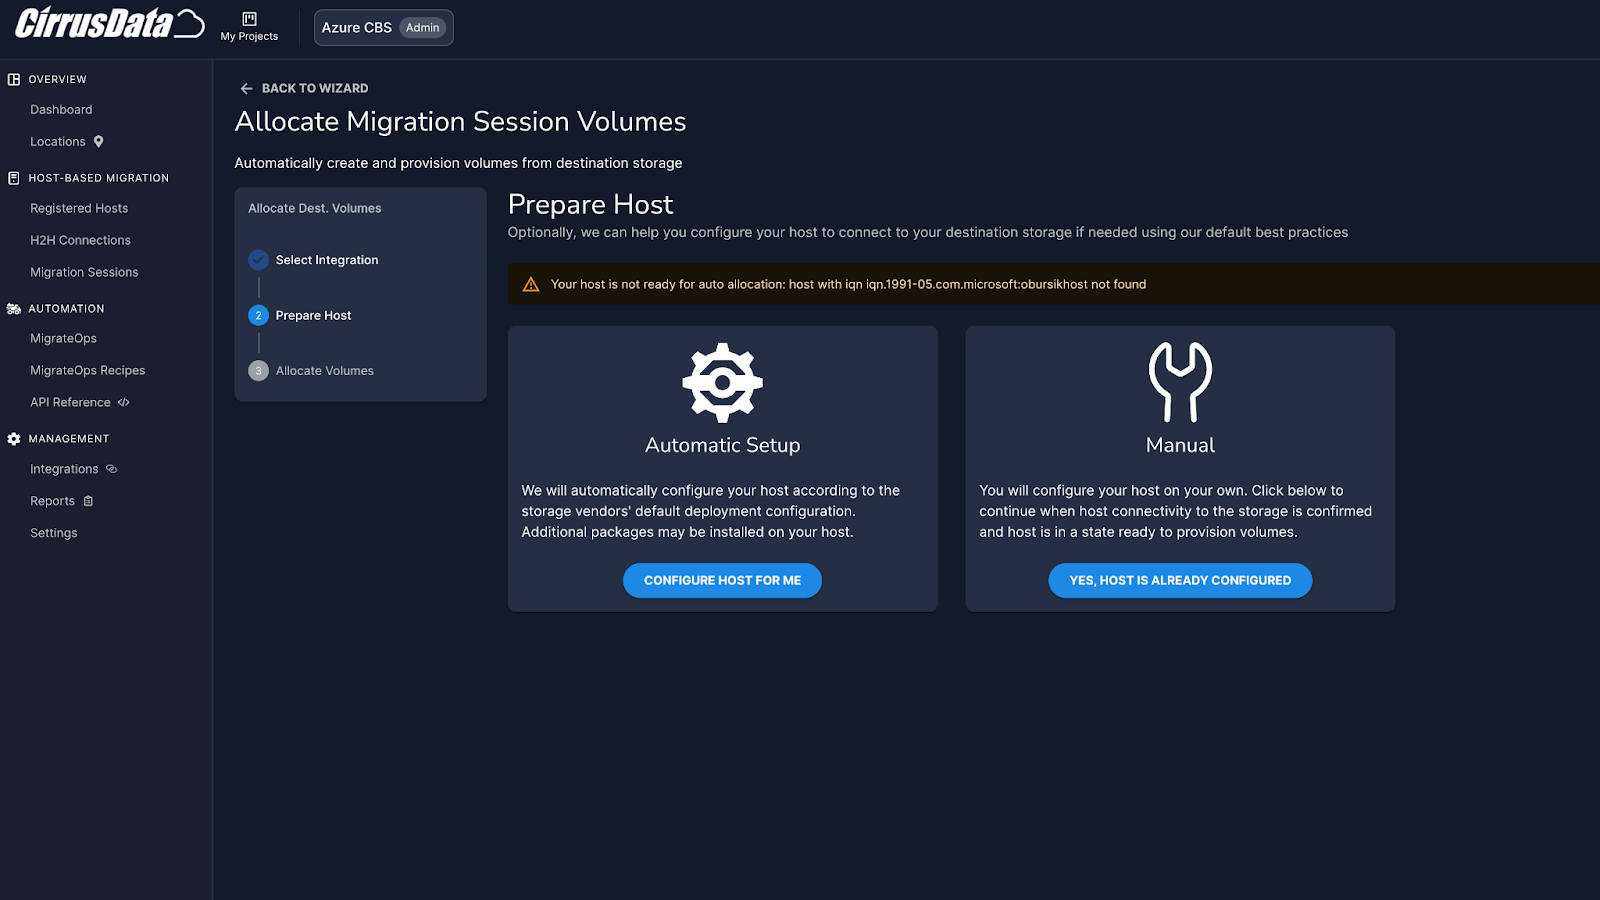
Figure 8: Host can be configured automatically by Cirrus Migrate Cloud or individually/manually by the user.
We are selecting the CONFIGURE HOST FOR ME option, where the system automatically, via the previously installed agent, prepares the host for Pure Cloud Block Store, creating a host entity on the array and establishing connection from the host side. By default, CMC will create two iSCSI sessions between the host and each of the two Pure Cloud Block Store controllers (four sessions in total). In production situations, we recommend conducting thorough testing to establish the best number of sessions for your specific workload.
Once the automatic setup is complete, you can review the results on the array and host respectively:
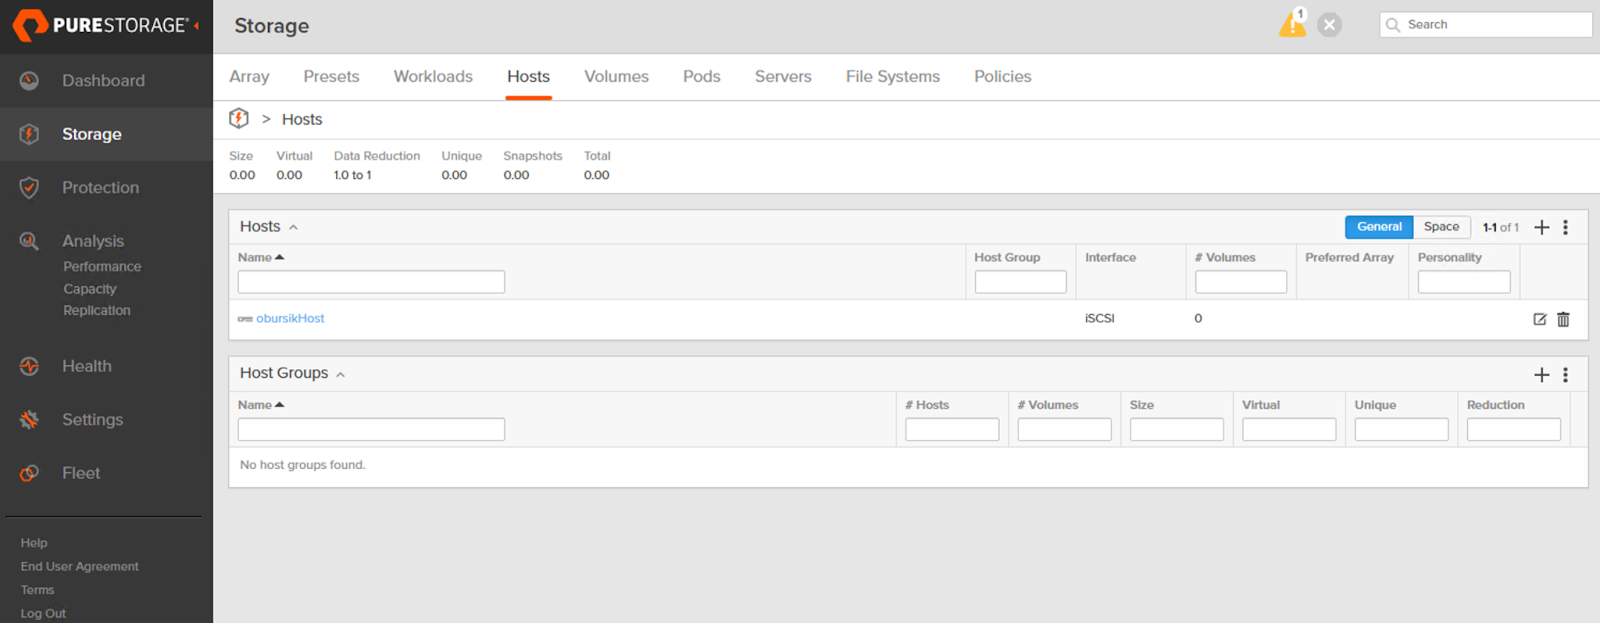
Figure 9: Review the host is configured in the Storage menu of Pure Cloud Block Store GUI.
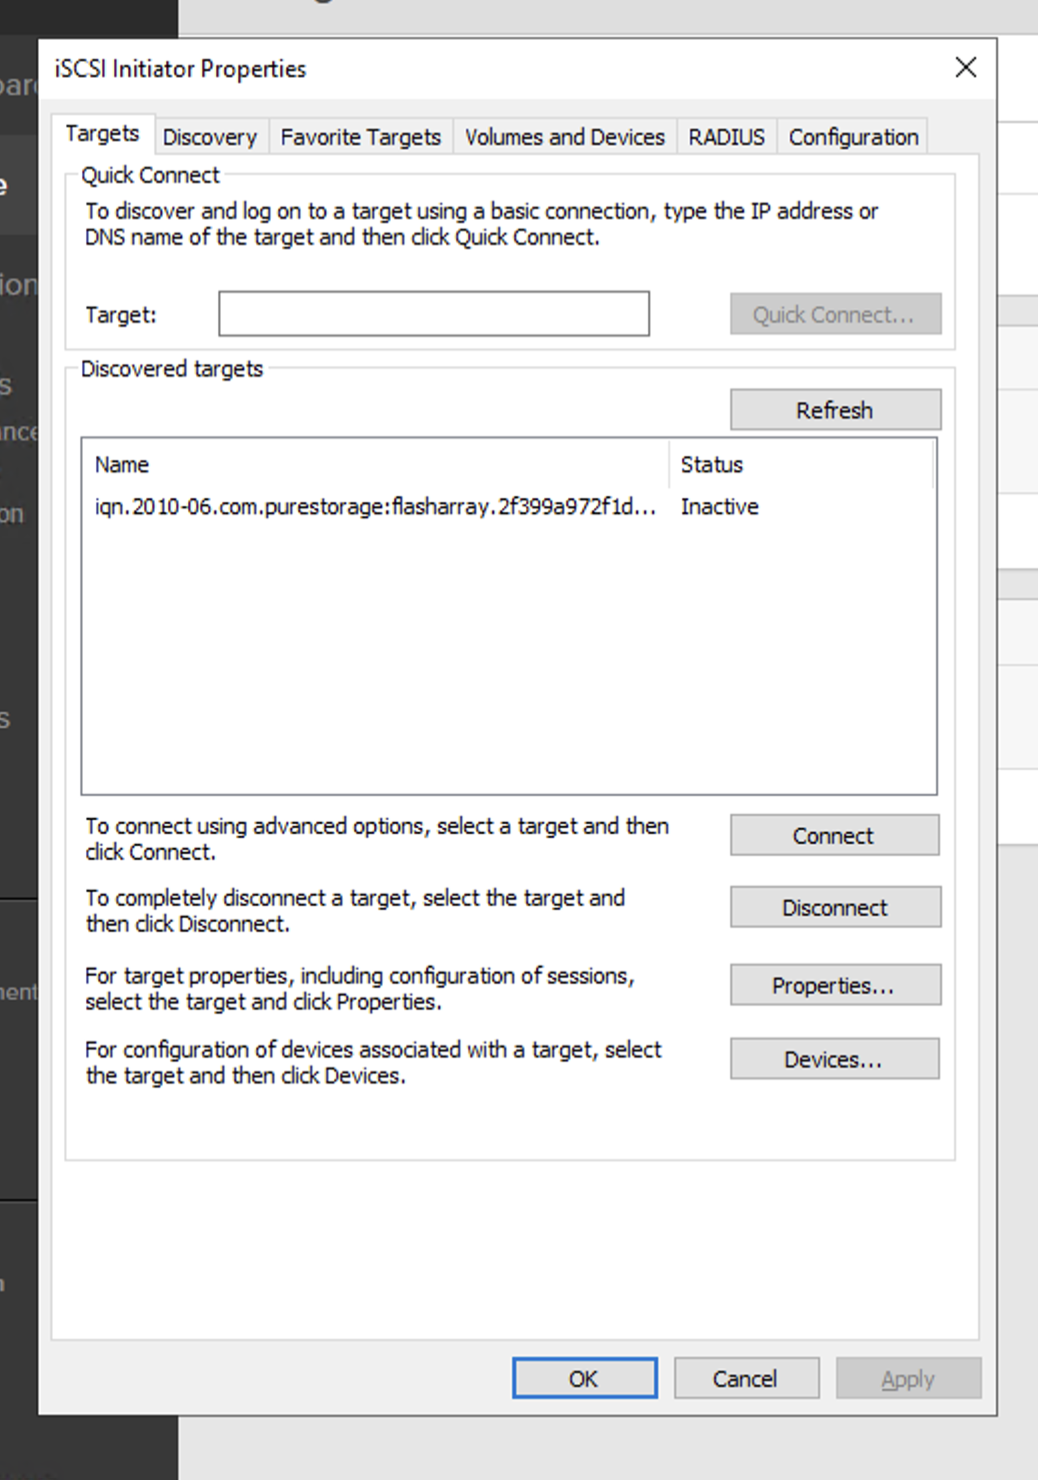
Figure 10: iSCSI session is also automatically configured.
The next step within the CMC console is allocation of the target volume on the Pure Cloud Block Store array. Here, we are able to configure the size of the new volume. For easier recognition of old and new volumes later on, we are configuring a larger volume than our source managed disk (8GB volume vs. 4GB managed disk).
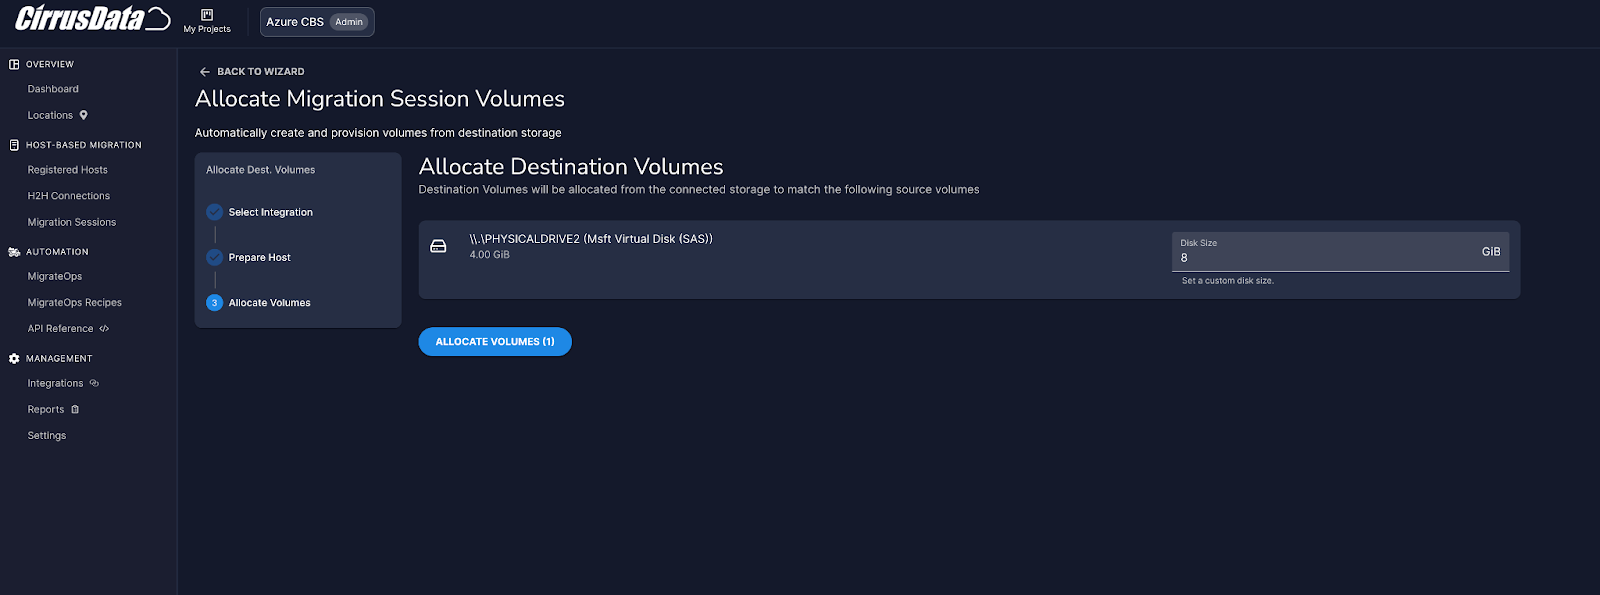
Figure 11: New volume is allocated from CMC interface.
Once the operation completes, we can review within our Pure Cloud Block Store array if there is a volume allocated and connected to our host:
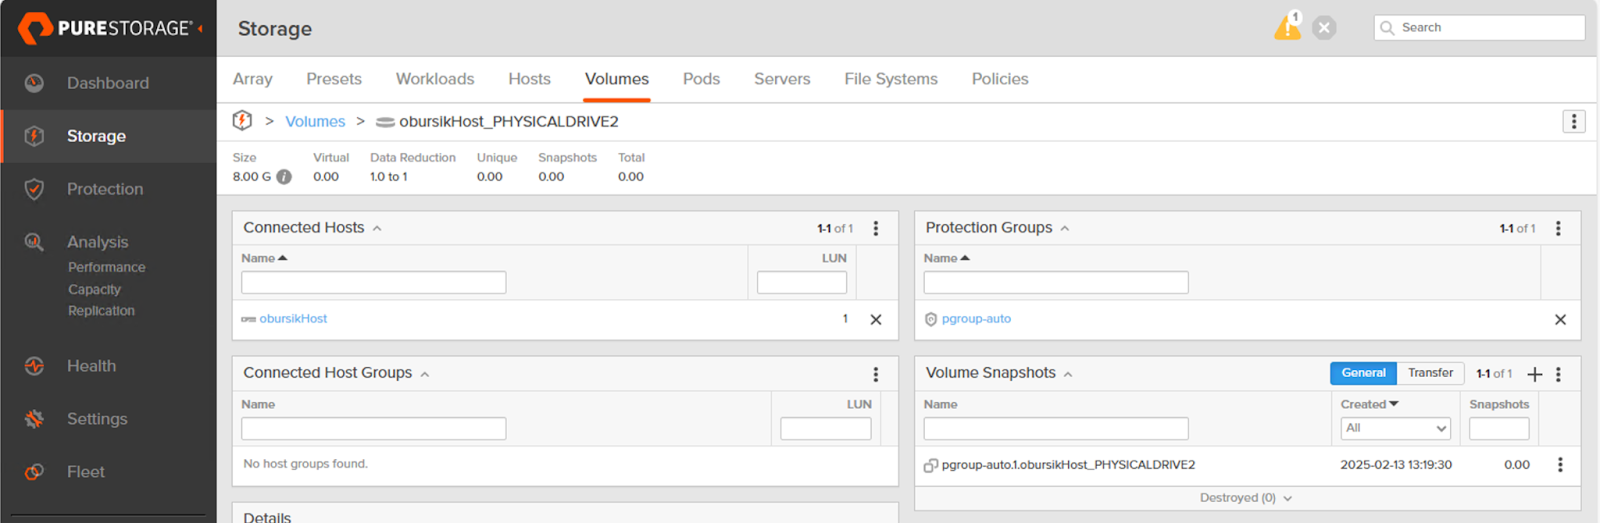
Figure 12: Review the new volume in the Storage menu of Pure Cloud Block Store GUI.
If we go back to the Cirrus Cloud Migrate console, we will see that the previous message with “Unavailable destination” is now automatically replaced by the newly created and allocated volume on the Pure Cloud Block Store array, allowing us to continue with the Migration Session wizard.
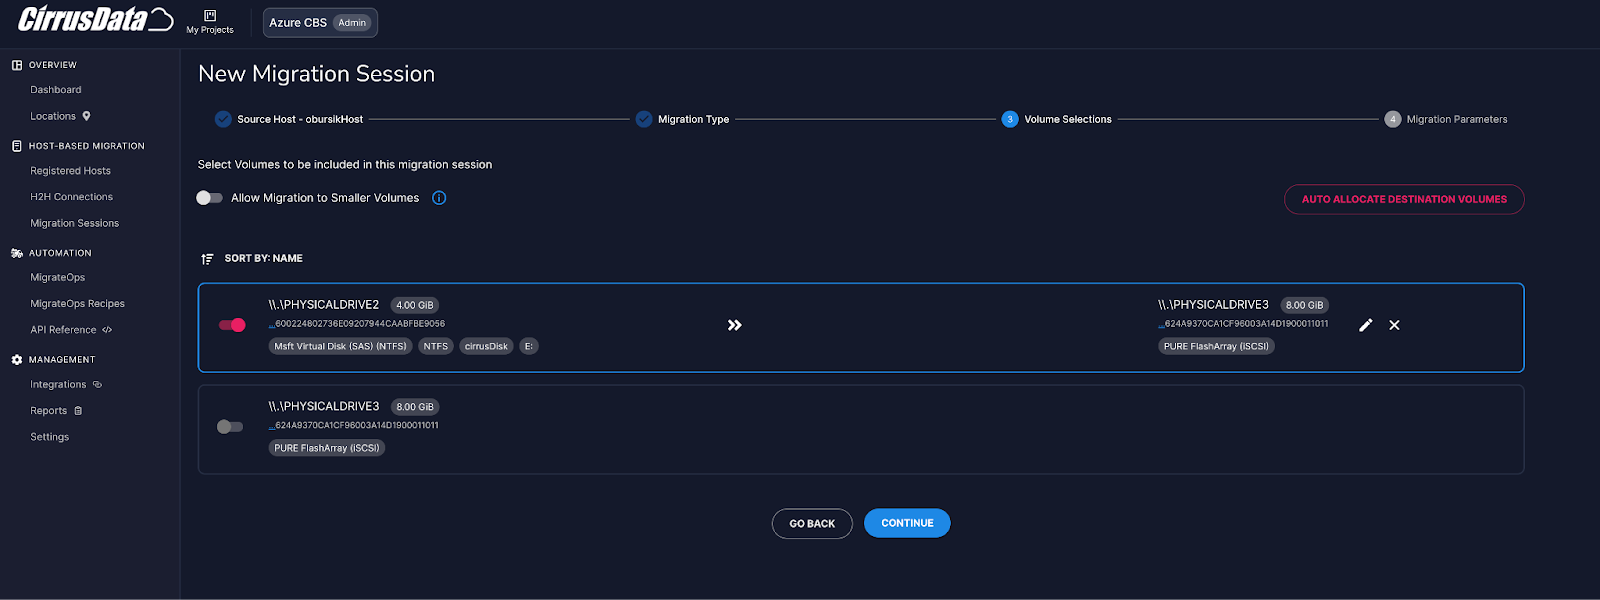
Figure 13: Both source and target disks are now available and the migration can proceed.
The final step includes naming the session and selecting several other options. As we are doing a simple demo migration, we will leave everything in default, apart from the auto re-sync interval which we set to 10 minutes (but can be left default when trying out this use case).
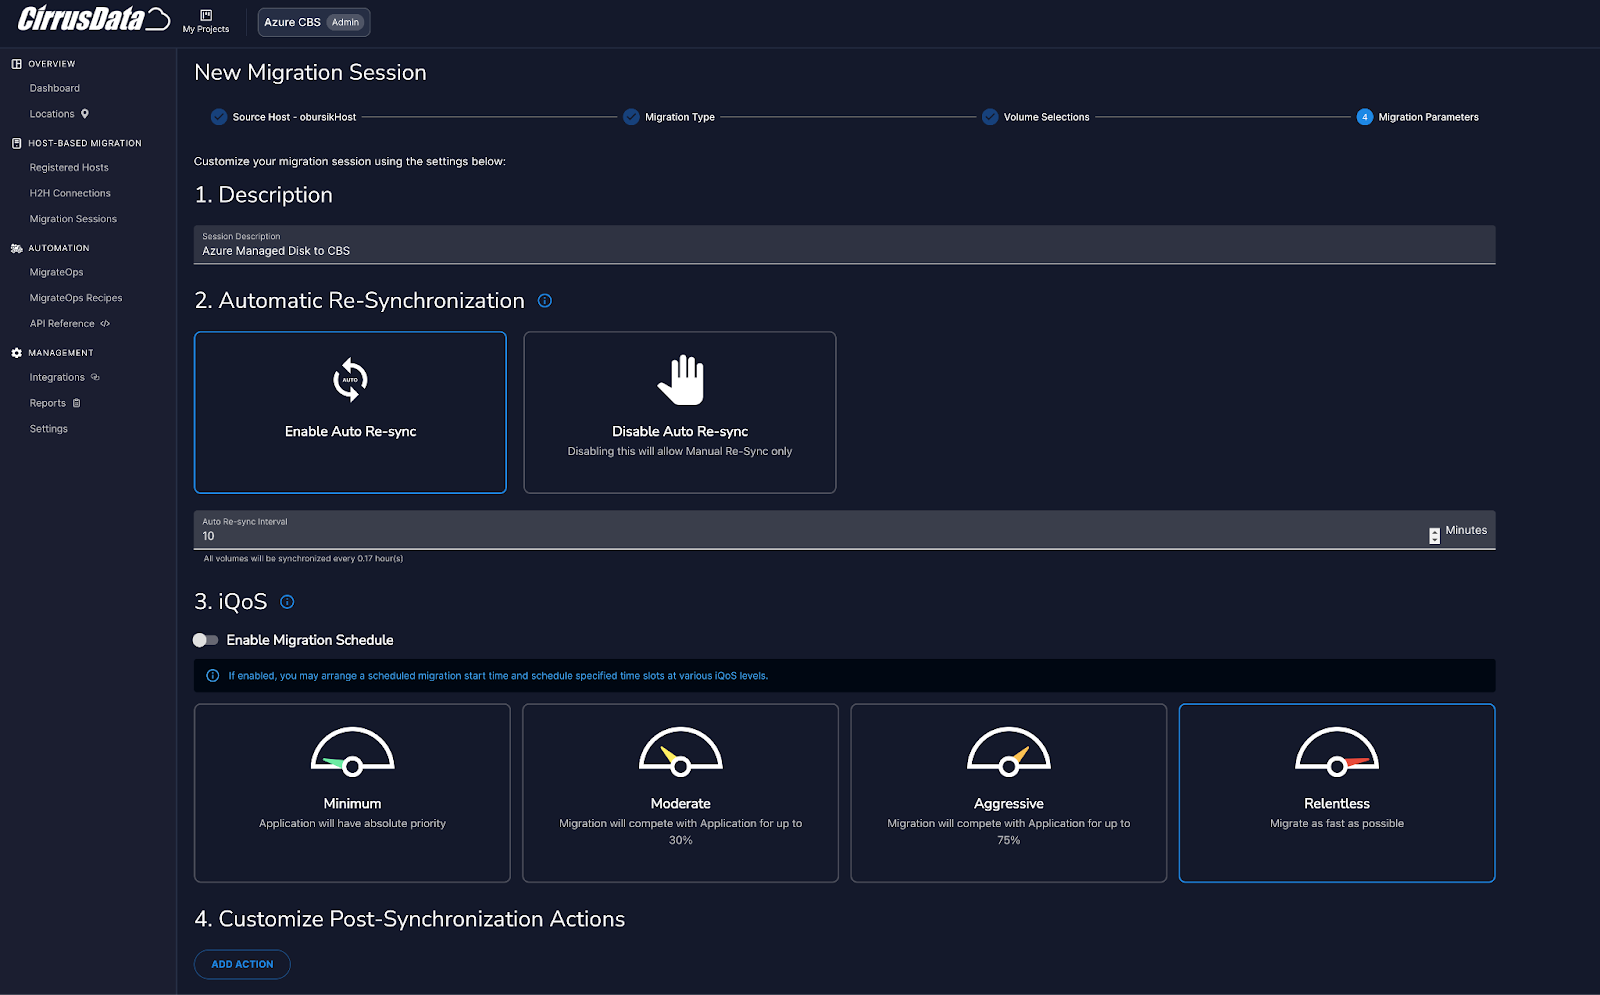
Figure 14: Select options best fitting your use case; we are keeping default choices.
Finally, we can click the CREATE SESSION button at the bottom of the screen. This will start the process of initial data synchronization between the managed disk and the Pure Cloud Block Store volume. Since our source disk does not serve any application, we left the default option of “Relentless” migration, and the process will migrate as fast as possible. In production settings, you might want to prioritize the application and migrate in the background to not affect day-to-day operations. During the data migration, we can observe a lot of information on the progress, including migration and transfer rates, synchronization progress, changes tracking, etc.
Should more data be added and/or changed on the source system after the initial synchronization, re-synchronization may be triggered either manually or it will happen automatically after the set amount of time (as we set during migration session configuration). You will see the Tracking Changes percentage get lower first, and then get back to 100%.
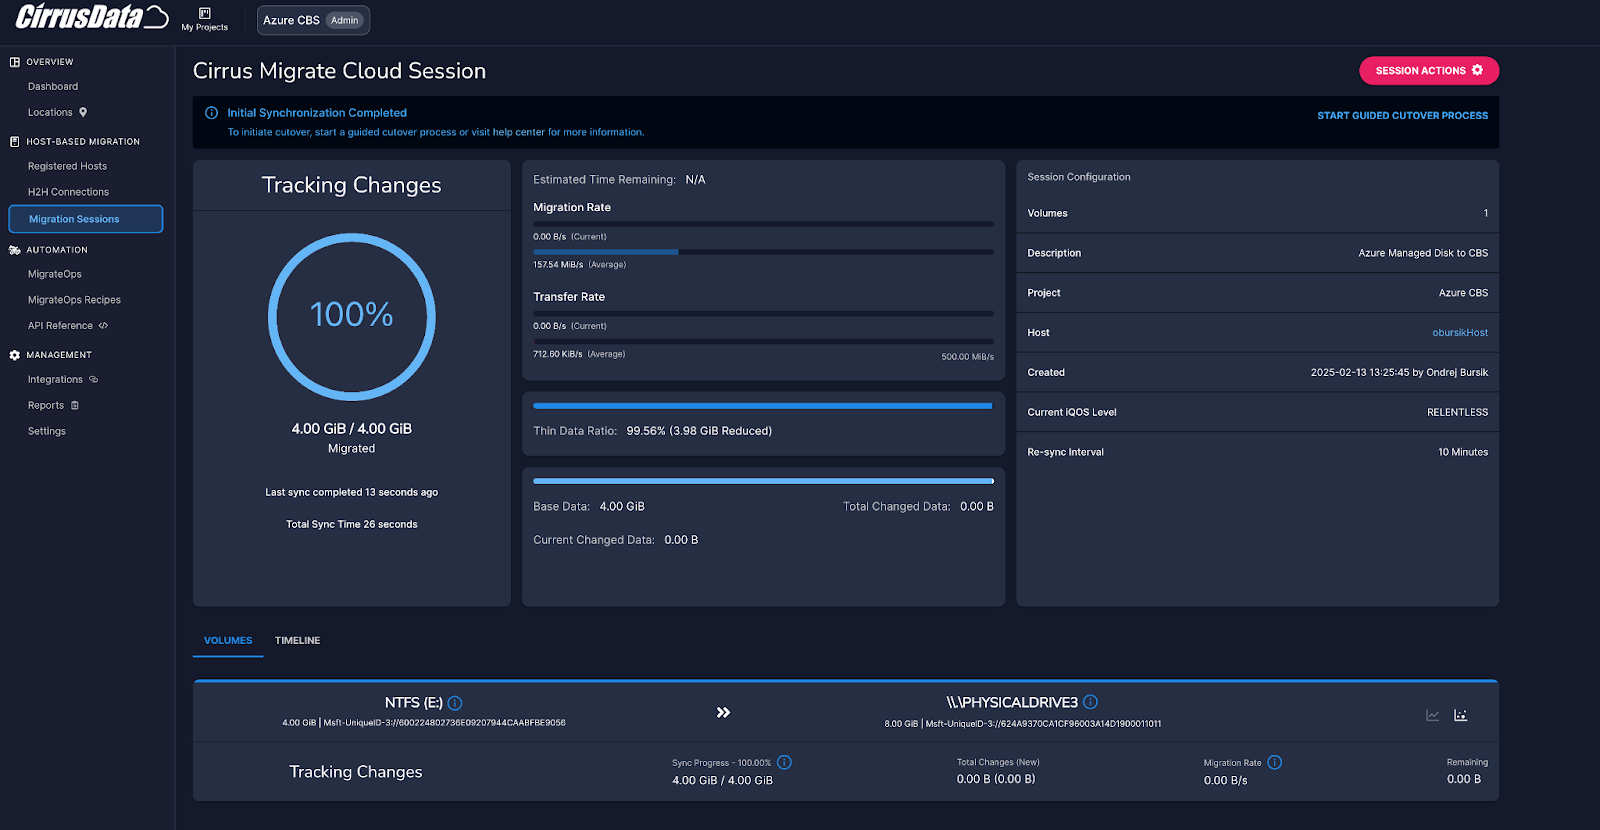
Figure 15: Once all changes are made, the Start Guided Cutover Process button will appear.
Before moving to the cutover process, we can open the Disk Management on our host VM machine and confirm there is a new disk, 8GB in size, for now unallocated.
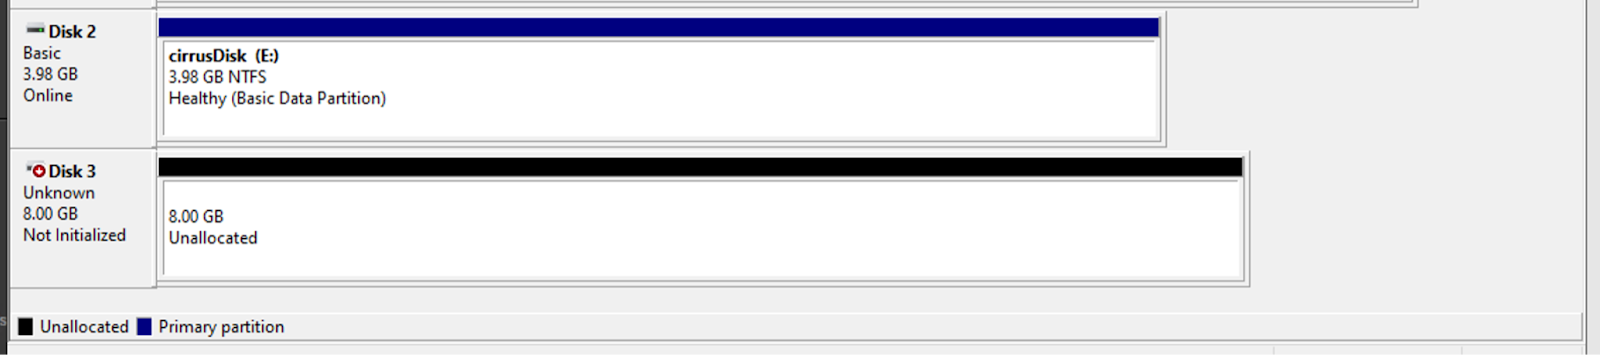
Figure 16: Review the newly created disk on the host.
Cutover
The Cirrus Migrate Cloud (CMC) guided cutover process is designed to ensure a seamless transition of data and workloads from source environments to target environments. It can be triggered by clicking on the START GUIDED CUTOVER PROCESS.
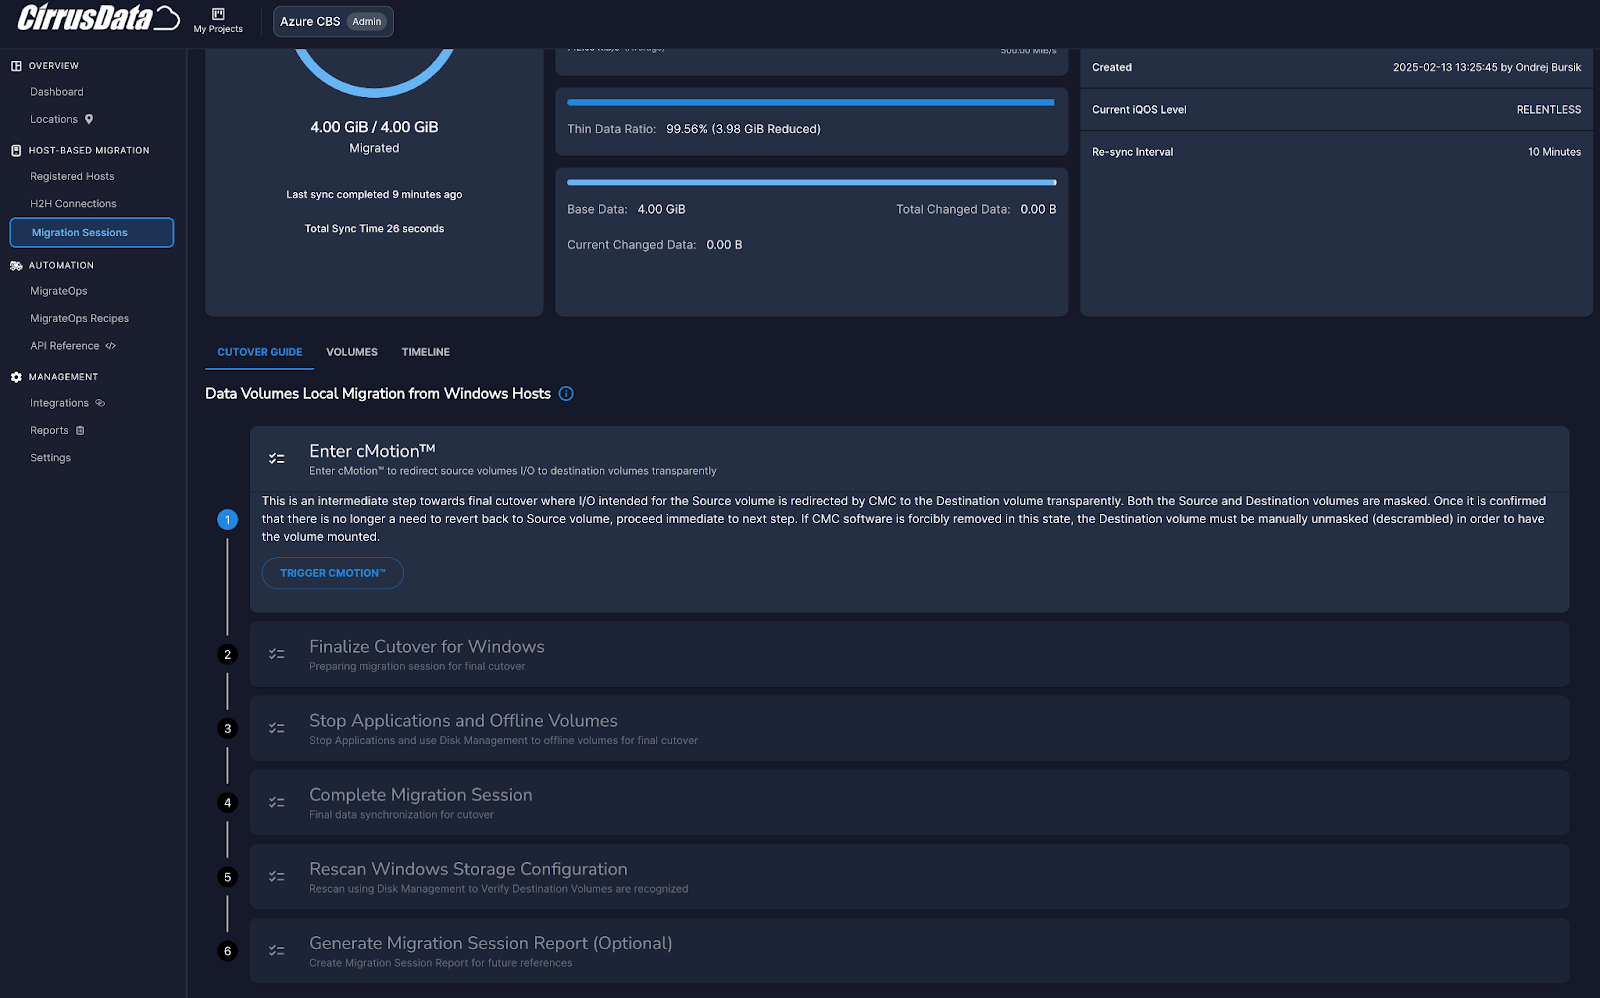
Figure 17: The cutover process starts by entering cMotion.
The guided cutover process in Cirrus Migrate Cloud leverages the cMotion technology. This uses patented mechanics to redirect I/O operations dynamically, ensuring that there is no “delta” during the final cutover phase. This means that applications can continue running with minimal impact until the final switch, which can be automated to occur in seconds if needed. cMotion allows for flexible back-and-forth switching between source and target.
Here are the key steps involved in the guided cutover phase. Being truly guided, in each step, you will find detailed information on what is happening/going to happen and what should be done outside of the CMC console. Therefore, the information below is not a step-by-step guide but rather a description of the main concepts.
- Final synchronization: Before initiating the cutover, CMC performs a final synchronization to capture any changes made to the source data since the last sync. This ensures that the target environment is fully up to date and ready for the switch.
- Initiating cMotion: CMC uses cMotion to redirect I/O operations from the source storage to the destination storage without disrupting production. This step involves triggering cMotion through the CMC portal, which seamlessly swings the workload over from the original source disk to the new destination.
- Redirecting I/O operations: During this phase, cMotion ensures that all I/O traffic is redirected to the target environment. This process can be monitored using tools like iostat to verify that I/O operations are now being performed on the destination disk.
- Final cutover: Once the workload is successfully redirected, administrators can perform the final cutover. This involves locking in the changes and disabling the source disk to ensure that all future I/O operations occur on the target environment.
- Rescan and validation: We are guided to rescan the storage (in our case via the Windows storage management tool). At this point, we should see the new disk attached to our VM. Afterwards, we can validate that the application is functioning correctly in the target environment. This includes verifying data integrity and ensuring that all services are operational.
There are two optional steps following the validation:
- Generate migration session report: A PDF format report containing details and progress of the migration session can be generated and distributed.
- Cleanup: Any remaining components related to the migration (e.g., CMC agents) can be removed from both source and target environments.
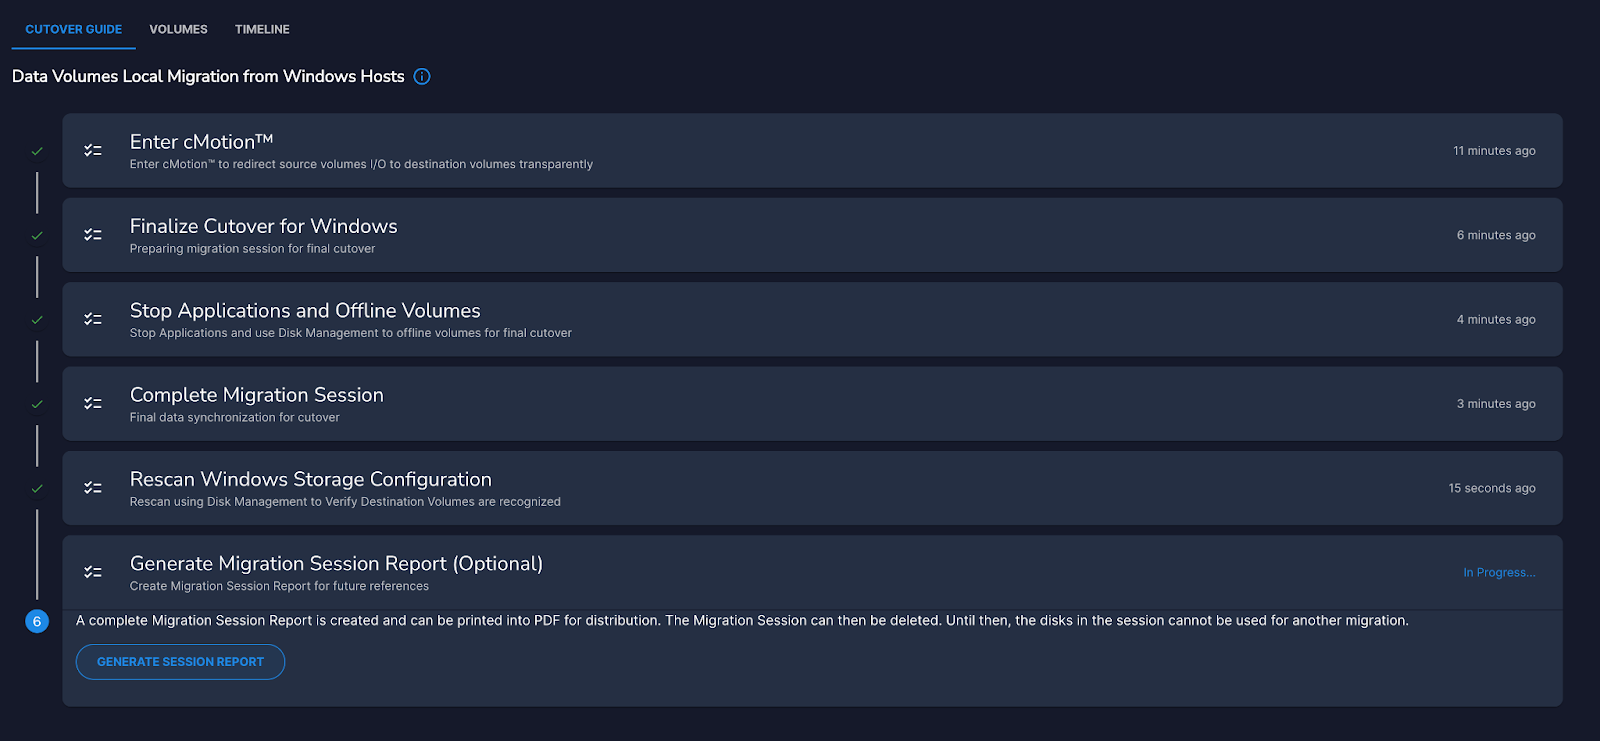
Figure 18: Once complete, a report with summary and details of the migration can be generated.
The very last step in our specific case is extending the volume within the VM, as we migrated a 4GB managed disk into an 8GB Pure Cloud Block Store volume. Once this is done, the process is complete, and the VM will have a disk with the same data and same drive letter, all with minimum downtime.
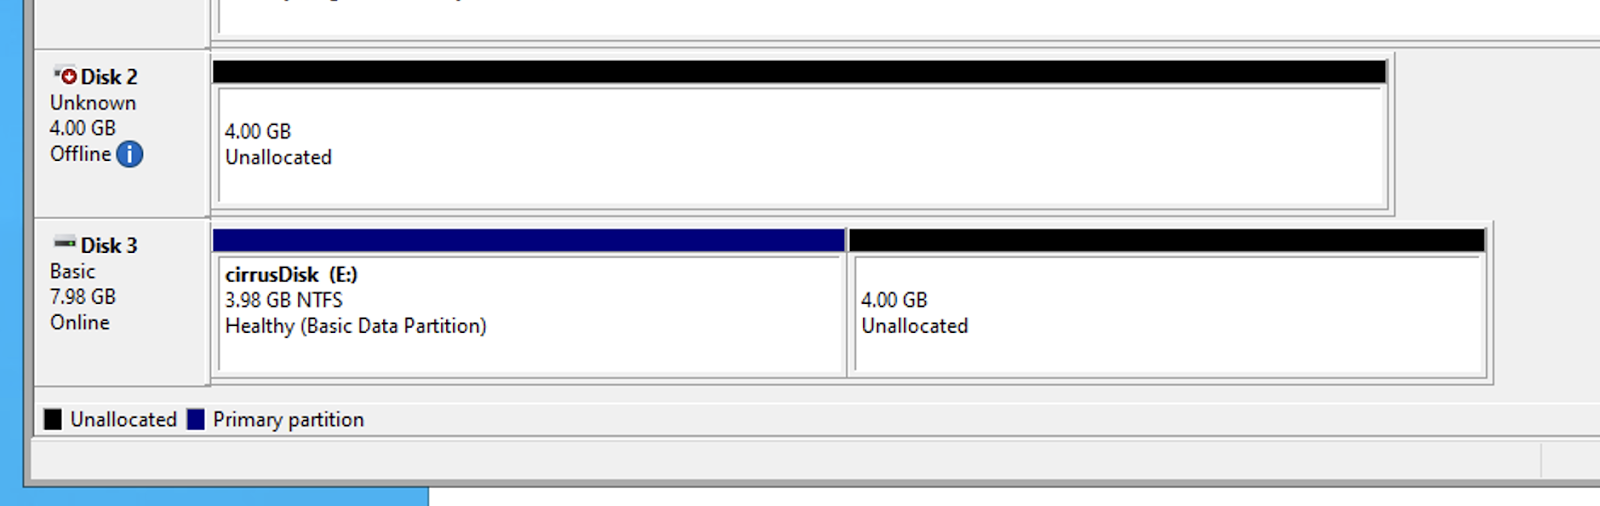
Figure 19: Review newly migrated disk on the VM.
Host-to-host Connection
In some cases, it might be useful to combine the data migration from the managed disk (or other source) to the Pure Cloud Block Store volume attached to a different VM. For that (as well as other use cases), we will create a host-to-host (H2H) connection between the two VMs.
Before establishing the H2H connection, first register the second host. The same method as with the first host can be applied. Once the second host is registered, you will see it and be able to manage it in the Registered Hosts section of the Cirrus Migrate Cloud interface.

Figure 20: Both registered hosts will be visible in the Registered Hosts section of the Cirrus Migrate Cloud console.
With both hosts registered, go to the H2H Connection section, and click CREATE NEW CONNECTION. A new window opens, where you can select the direction of the connection (in our case it is Host to Host2), enter the target host IP address (Connection Address), select options relevant for you, and click CONNECT. The connection protocol is based on HTTP/2 and uses port 4996; do make sure the network is set in a way to allow communication between hosts.
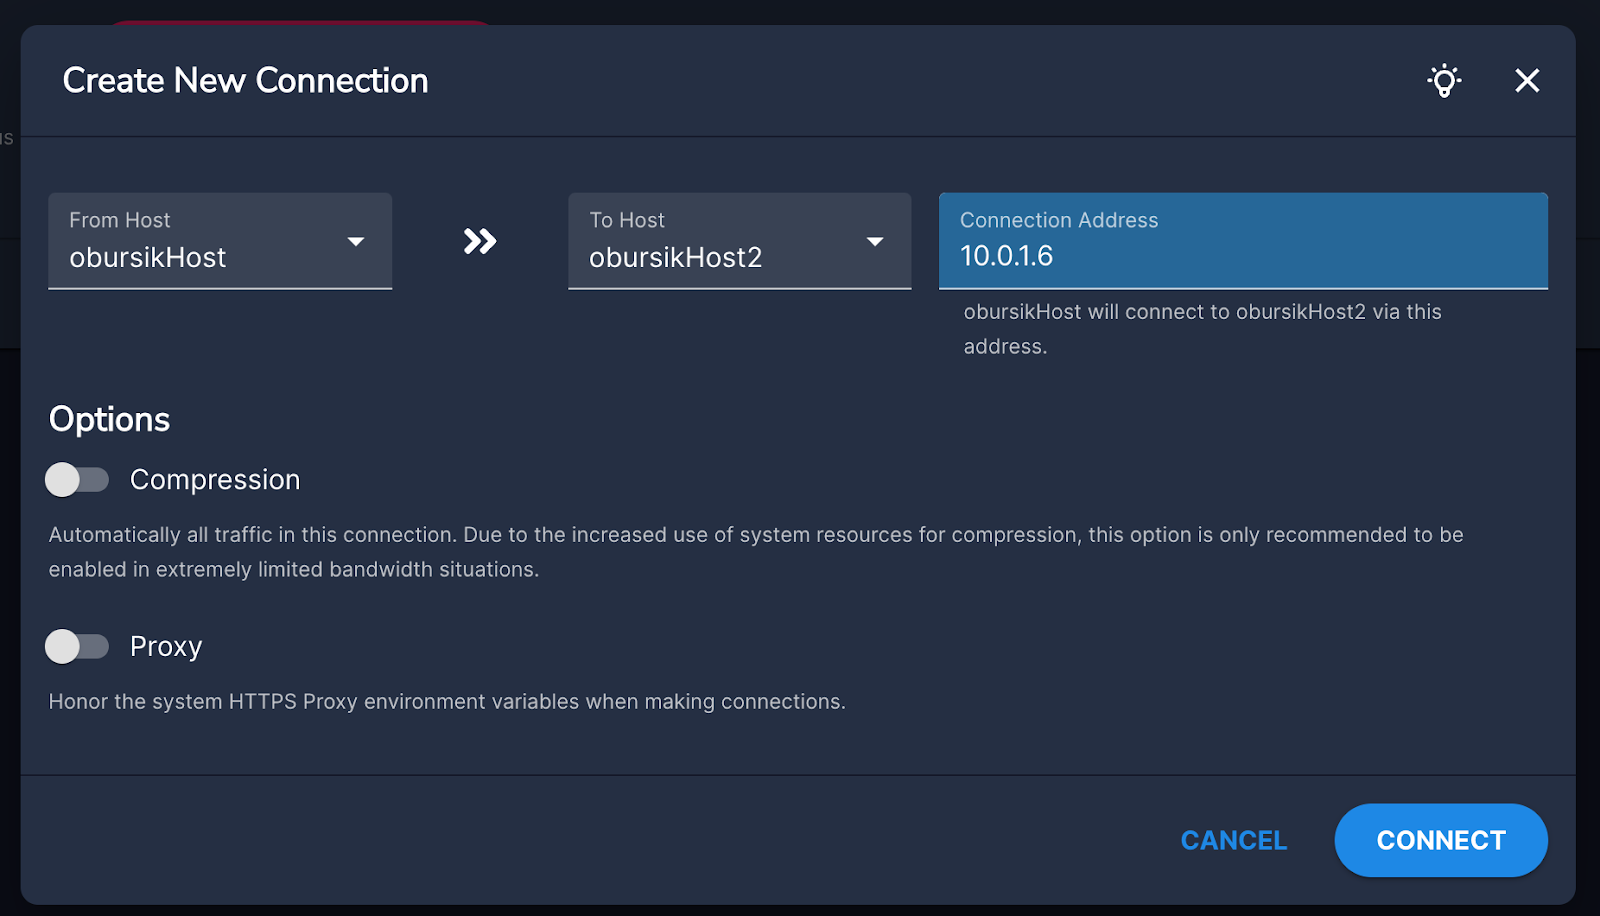
Figure 21: Connection can be established from both ends.
Once the connection is established, it can be used during creation of a new migration session with the Remote Migration option selected.
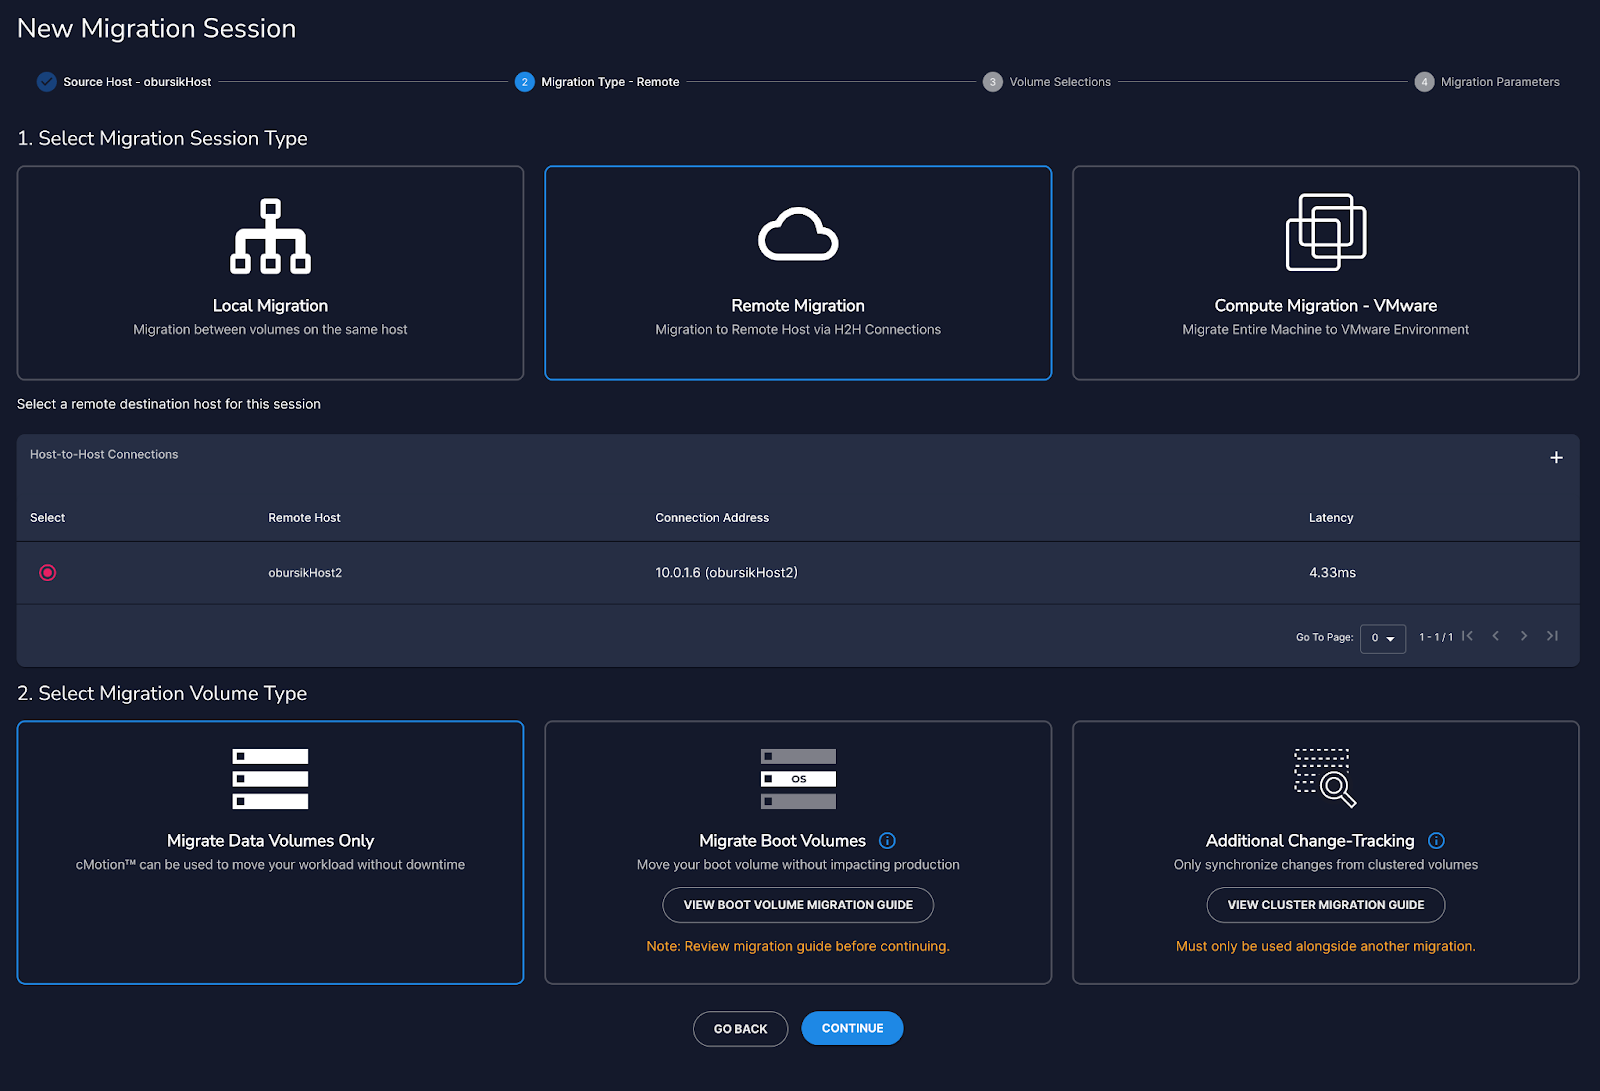
Figure 22: Select Remote Migration and the newly created host-to-host connection.
The rest of the migration process is the same as described in the first use case and can therefore be replicated. Once done, data is migrated from the original VM to a new VM and stored on the underlying Pure Cloud Block Store volume.

Modern Hybrid Cloud Solutions
Seamless Cloud Mobility
Unify cloud and on-premises infrastructure with a modern data platform.
Optimize Your Cloud Spend
Reduce your cloud storage costs by up to 50% with Pure Cloud Block Store.