Summary
This blog provides an overview of the Pure Storage SMI-S Provider, now updated with the latest Purity software enhancements, support for Windows Server 2019/2022, and alternative management tools like the REST API and PowerShell SDK for improved storage integration and automation.
This specification was created by the Storage Networking Industry Association (SNIA) to provide a unified interface for multiple storage vendors within a network. With the introduction of SMI-S support, FlashArray administrators can manage the array via an SMI-S client over HTTPS. A great example of an SMI-S client is Windows Server 2012 R2, and we will be discussing this in more detail later. Functionality provided by the SMI-S provider supports in the areas of inventory, configuration, provisioning, capacity, and alerting. Keeping with our message of simplicity, the SMI-S provider is embedded within Purity vs using a Proxy which requires more complex management. An administrator has just two services to enable as shown below, these are disabled by default.
- Service Location Protocol (port 427) — This protocol is used by SMI-S clients as a directory service to identify resources.
- SMI-S Provider (HTTPS, port 5989) — FlashArray administrators use the SMI-S provider to manage the array through an SMI-S client.
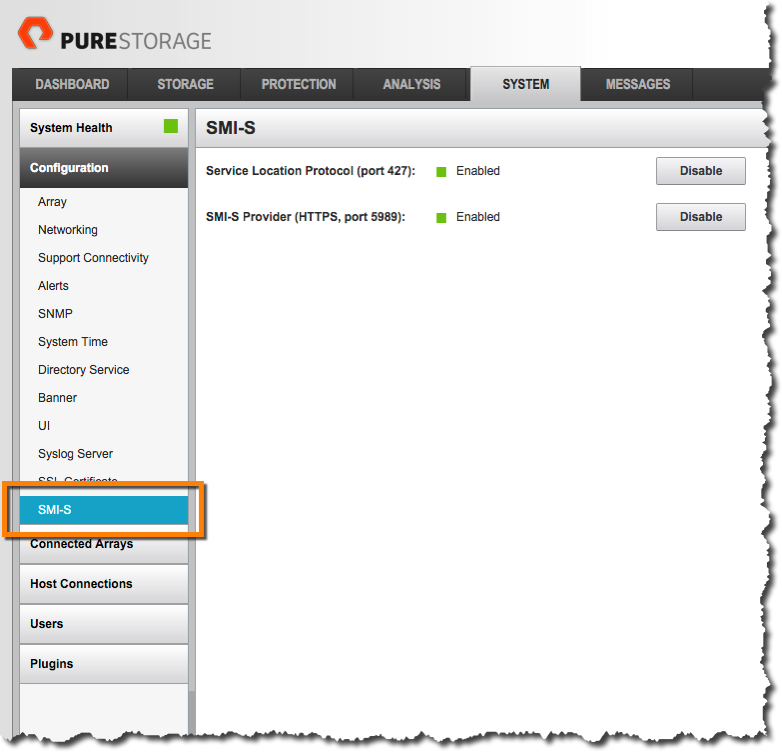
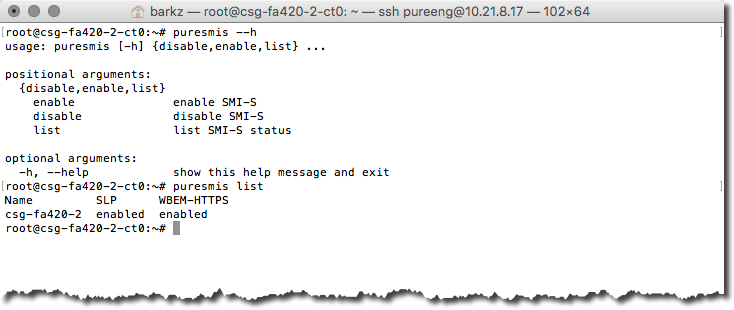
The SMI-S provider is optional and must be enabled before its first use. The services can be enabled through the Web Management interface or via the Purity Command Line Interface (CLI) using the puresmis commands. Below is an example of using the puresmis command, this shows that the Service Location Protocol enabled and the SMI-S Provider enabled shown as WBEM-HTTPS.
Now that the SMI-S services have been enabled let’s take a look at how an SMI-S client can manage the Pure Storage FlashArray. The SMI-S client we will use is Windows Server 2012 R2. To enable Windows Server as an SMI-S client there is a specific feature called Windows Standards-Based Storage Management that needs to be installed using either the Server Manager or via Windows PowerShell with Add-WindowsFeature WindowsStorageManagement.

Once this feature is added to the instance of Windows Server, using the SMI-S Provider is very straightforward. The first task is to register the SMI-S Provider. The PowerShell to register the provider is below. The Get-Credential will provide a prompt and in my case I am just using the standard pureuser account and password.
|
1 2 |
$Creds = Get–Credential Register–SmisProvider –ConnectionUri https://10.21.8.17:5989 -Credential $Creds |

Now that we have the SMI-S Provider registered there are a few cmdlets we can run to check that we have access to the FlashArray. Using Get-StorageProvider will show that the FlashArray registered is from the Manufacturer PureStorage and it is of Type SMI-S. The Get-StorageSubSystem will retrieve details about the FlashArray’s HealthStatus, OperationalStatus and FriendlyName
|
1 2 |
Get–StorageProvider Get–StorageSubSystem |

Provider is registered and now we can update the cache of the PureStorage provider and associated child objects from the FlashArray. A very important detail to point out is that if you have multiple storage vendors within your environment and use the DiscoveryLevel = Full and do not set a specific vendor this will access all storage providers which can be an expensive operation.
|
1 |
Update–StorageProviderCache –Name 10.21.8.17 –DiscoveryLevel Full –Manufacturer PureStorage |

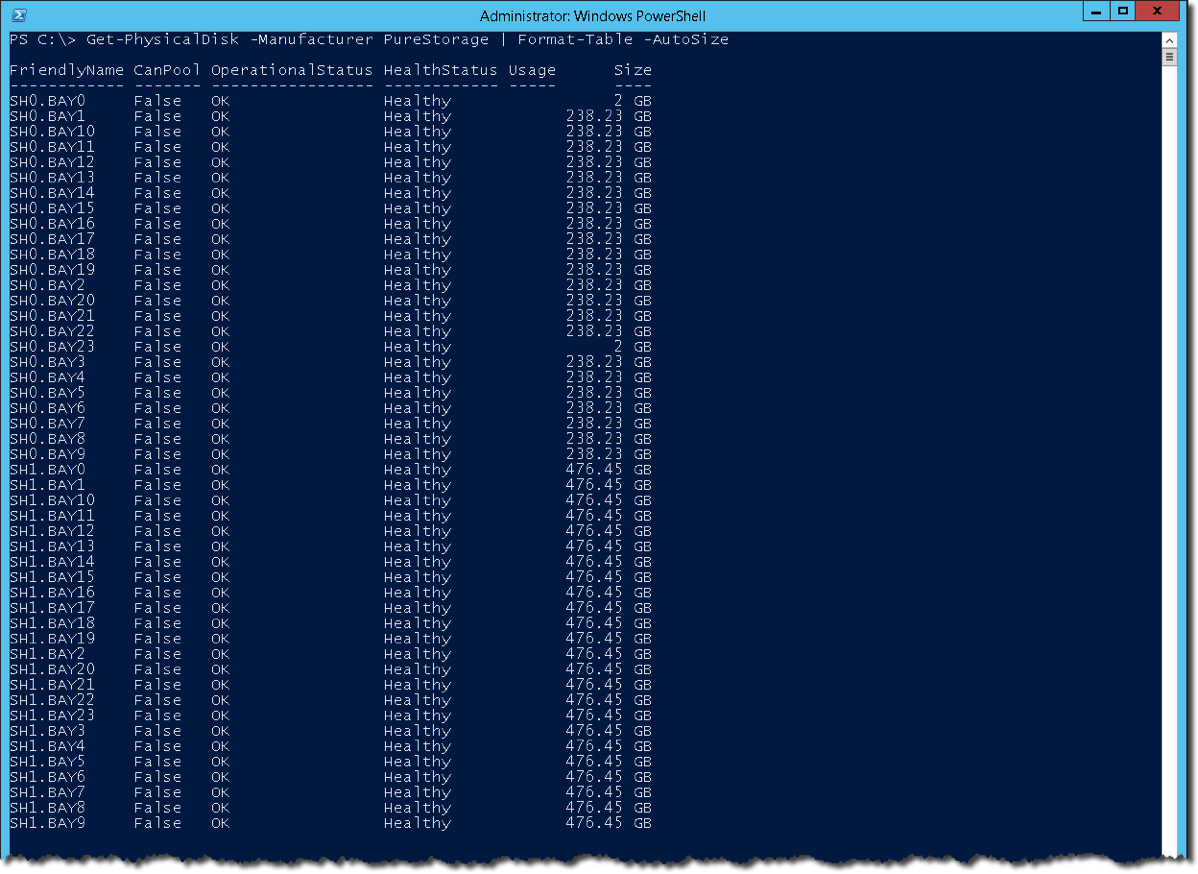
Now there are other tasks that can be performed such as viewing the physical disks specific to a storage vendor. In the below example the display shows all of the drive bays and the details.
|
1 |
Get–PhysicalDisk –Manufacturer PureStorage | Format–Table –Autosize |
The last example to show is how to provision a new volume. The name of the volume is SMIS-VOL and will be 2 TB in size. Along with showing how to create a new volume the Web Management interface shows that the volume has been created and ready for use.
|
1 |
New–StorageSubsystemVirtualDisk –StorageSubSystemFriendlyName csg–fa420–2 –FriendlyName SMIS–VOL –Size 2TB |

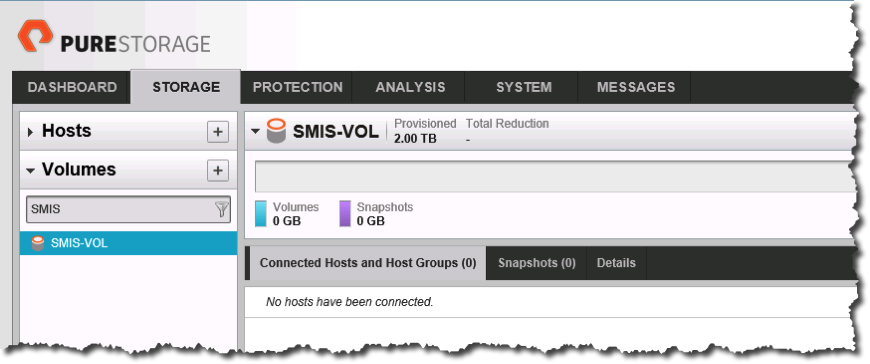
The final step is to unregister the SMI-S Provider.
|
1 |
Unregister–SmisProvider –ConnectionUri https://10.21.8.17 |

Below is a video demonstration showing all of the above operations.
The details discussed in this article are by no means an exhaustive list of operations that can be performed. With the multiple ways of managing our FlashArray combining the use of the SMI-S Provider and the PowerShell SDK offer a lot of different options for automation.
Updated Information:
To align with current best practices and technologies, consider the following updates:
1. Enhanced SMI-S Provider Capabilities:
- Purity Software Updates:
- Pure Storage has released significant updates to its Purity software, enhancing the SMI-S provider’s capabilities. These updates improve performance, scalability, and support for advanced storage management features. Administrators are encouraged to upgrade to the latest Purity version to leverage these enhancements.
- Integration with Modern Management Tools:
- Beyond traditional SMI-S clients, Pure Storage now offers integration with advanced management platforms like Pure1®, providing comprehensive monitoring, analytics, and management capabilities across storage environments.
2. Updated Client Platforms:
- Windows Server 2019 and 2022:
- For environments utilizing Windows Server, it’s advisable to transition to Windows Server 2019 or 2022. These versions include the Windows Standards-Based Storage Management feature, compatible with the Pure Storage SMI-S provider. The installation process remains similar, using the
Install-WindowsFeaturecmdlet:powershellCopyEditInstall-WindowsFeature -Name FS-SM-StorageMgmt - Registering the SMI-S Provider:
- After installing the feature, register the SMI-S provider using updated PowerShell cmdlets:powershellCopyEdit
$Creds = Get-Credential Register-SmisProvider -ConnectionUri https://<FlashArray_IP>:5989 -Credential $Creds - Replace
<FlashArray_IP>with the management IP address of your FlashArray.
- After installing the feature, register the SMI-S provider using updated PowerShell cmdlets:powershellCopyEdit
- For environments utilizing Windows Server, it’s advisable to transition to Windows Server 2019 or 2022. These versions include the Windows Standards-Based Storage Management feature, compatible with the Pure Storage SMI-S provider. The installation process remains similar, using the
3. Alternative Management Interfaces:
- REST API and PowerShell SDK:
- While SMI-S provides a standardized management interface, Pure Storage also offers a robust REST API and a dedicated PowerShell SDK. These tools provide more direct and flexible management capabilities, supporting automation and integration with modern DevOps workflows.
Conclusion:
While the SMI-S provider remains a valuable tool for integrating Pure Storage FlashArray systems into heterogeneous storage environments, administrators should consider leveraging the latest Purity software updates, modern client platforms, and alternative management interfaces to optimize their storage management practices.
SMI-S References
Storage Management Technical Specification, Part 4 Block Devices Version 1.6.1, Revision 5 — https://www.snia.org/sites/default/files/SMI-Sv1.6.1r5_Block.book_.pdf
Storage Networking Industry Association (SNIA) — https://www.snia.org/
Storage Management Initiative Specification (SMI-S) Releases — https://www.snia.org/tech_activities/standards/curr_standards/smi
SMI-S Conformance Testing Program Official Results — https://www.snia.org/ctp/conformingproviders/pure.html#SMIS1.6
Pure Storage SMI-S Provider Guide
Storage Management Technical Specification, Part 3 Common Profiles Version 1.6.1, Revision 5 — https://www.snia.org/sites/default/files/SMI-Sv1.6.1r5_CommonProfiles.book_.pdf


