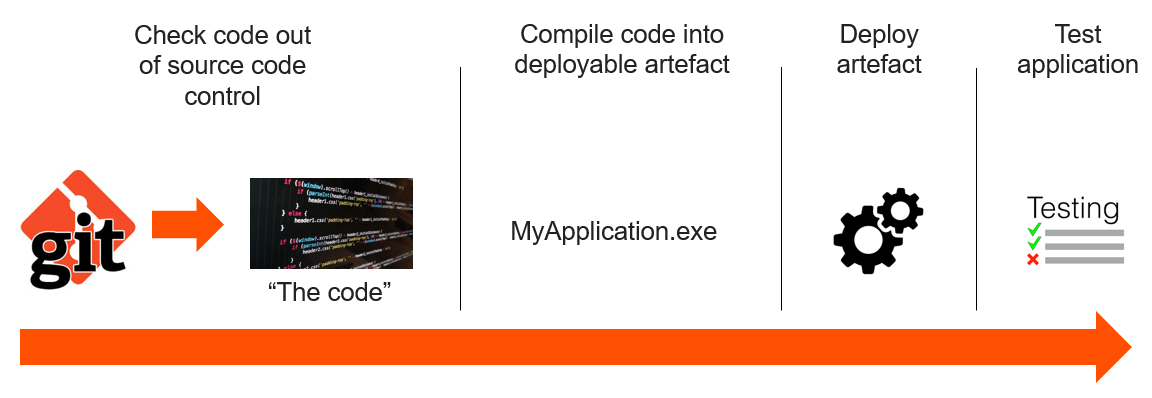
Here, we will be talking about leveraging FlashArray. Previously in this blog post I outlined what continuous integration was and how FlashArray’s snapshot capability can be integrated into a continuous integration build pipeline. This post will build upon this example by covering a full walk-through using a code sample publicly available from code.purestorage.com. To recap, this is what a basic build pipeline typically looks like:
“As Code” is the New Normal
Of the many recent trends in information technology, there has been a shift towards provisioning compute , network and storage resources via infrastructure specified as code. Many of the popular continuous integration build engines have followed this trend by allowing build pipelines to be specified as code, including:
- Travis CI support for build definitions specified in yaml
- Jenkins 2.0 support for build definitions specified in Groovy script
- Visual Studio Team Service 2018 and Team Foundation Server support build definitions specified in yaml
One of the primary drivers behind specifying build pipelines as code is that this allows build pipelines to be stored under source code control with the actual application code itself. This post will focus on Jenkins 2.0 and Team Foundation Server 2018.
Jenkins 2.0
Jenkins originated from a build engine called Hudson developed at Sun Microsystems by Kohsuke Kawaguchi. When Sun Micro systems was acquired by Oracle, a new fork of the Hudson code base was created and Jenkins was born. Jenkins is underpinned by a rich ecosystem of third party plugins, it is incredibly portable by virtue of the fact that it runs on Java, it is free and there is a commercially supported distribution of Jenkins provided by CloudBees. Jenkins 2.0 introduced “Pipeline as code”, this was originally in the “Jenkins script” dialect, later on in February 2017 the declarative pipeline syntax was released. The declarative syntax is opinionated by nature and whilst it does not give end users the same flexibility and power as Jenkins script, it does not come with the same Groovy script learning curve as Jenkins script. Jenkins pipeline as code comes with some particularly powerful features:
- Multibranch build pipelines
By specifying the pipeline code in a Jenkinsfile at the root of the source code repository, the build engine will create a build pipeline for each branch of code. - Shared Libraries
The ability to encapsulate code used across pipelines in shared libraries in order to promote build pipeline code reuse. - Docker pipeline
This allows containers to be manipulated directly in the pipeline code without making call outs to external scripts, shells or other scripting languages, all made possible by extensions to the Jenkins Groovy script DSL (domain specific language).
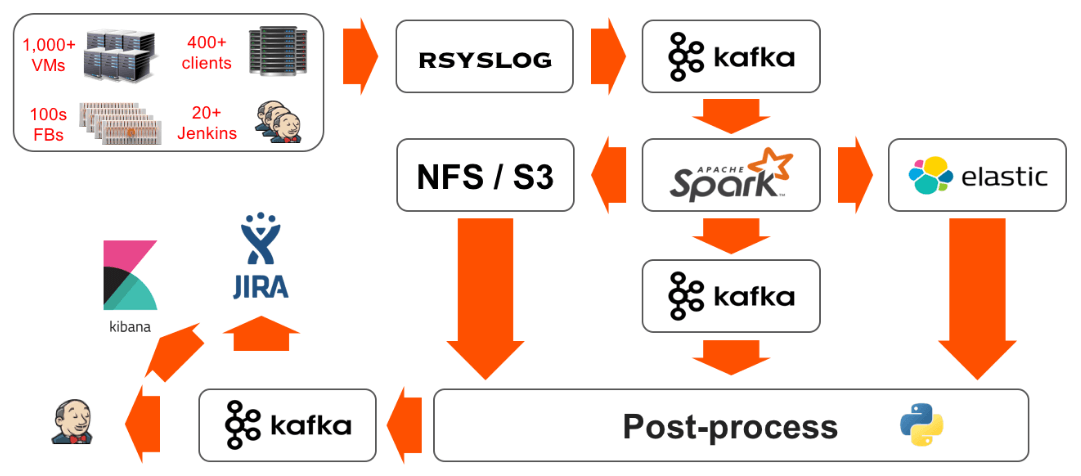
The Pure Storage engineering team use Jenkins as per this blog post on build pipelines and streaming data analytics:
The Twelve Factor App And Testing Using Production Realistic Data
Heroku, founded in 2007 and now owned by Salesforce.com was a pioneer in the cloud platform-as-a-service space. “The Twelve Factor App” concept developed by Heroku, lays out twelve principles which should be followed when developing cloud native applications. Factor Ten states that production and development environment should be as closely aligned as possible. What if, as part of the build pipeline, the test or staging environment could be refreshed from production? In this age of regulation around Personally Identifiable Data and GDPR, we may also want to encrypt or obfuscate some of the data by adding the appropriate actions required to do this into the build pipeline itself.
Creating An Actual Build Pipeline
Now that we have covered why build-pipeline-as-code is popular and why test environments should mirror their production counterparts as closely as possible, lets create a build pipeline that achieves both of these goals using the following steps:
- check a visual studio SQL Server data tools (SSDT) project out from source code control (‘git checkout’ stage).
- compile the code into an entity known as a DACPAC (‘Build Dacpac from SQLProj’ stage).
- refresh a test database from production (‘Refresh test from production’ stage).
- deploy the DACPAC to the test database (‘Deploy Dacpac to SQL Server’ stage).
The pipeline code is stored in the Jenkinsfile.simple at the root of this GitHub repository. Refreshing the test database will be facilitated by the Refresh-Dev-PsFunc PowerShell function which can be found on GitHub here.
|
1 2 3 4 5 6 7 8 9 10 11 12 13 14 15 16 17 18 19 20 21 22 23 24 25 26 27 28 29 30 31 32 33 34 35 36 37 38 39 40 41 42 43 44 |
properties([ parameters([ string(name: ‘database’ , defaultValue: ‘SsdtDevOpsDemo’) ,string(name: ‘sourceinstance’ , defaultValue: ‘WIN2016-A\\DevOpsPrd’) ,string(name: ‘destinationinstance’ , defaultValue: ‘WIN2016-A\\DevOpsTst’) ,string(name: ‘pfaendpoint’ , defaultValue: ‘10.123.456.78’) ]) ]) def PowerShell(psCmd) { bat “powershell.exe -NonInteractive -ExecutionPolicy Bypass -Command \”\$ErrorActionPreference=’Stop’;$psCmd;EXIT \$global:LastExitCode\”” } node { stage(‘git checkout’){ timeout(time:1, unit:‘MINUTES’) { git ‘file:///C:/Projects/Jenkins-Fa-Snapshot-Ci-Pipeline’ } } stage(‘Build Dacpac from SQLProj’) { timeout(time:5, unit:‘MINUTES’) { bat “\”${tool name: ‘Default’, type: ‘msbuild’}\” /p:Configuration=Release” stash includes: ‘Jenkins-Fa-Snapshot-Ci-Pipeline\\bin\\Release\\Jenkins-Fa-Snapshot-Ci-Pipeline.dacpac’, name: ‘theDacpac’ } } stage(‘Refresh test from production’) { timeout(time:5, unit:‘MINUTES’) { withCredentials([[$class: ‘UsernamePasswordMultiBinding’, credentialsId: ‘FA-Snapshot-CI-Array’, usernameVariable: ‘USERNAME’ , passwordVariable: ‘PASSWORD’]]) { PowerShell(“Refresh-Dev-PsFunc -Database ${params.database} \ -SourceSqlInstance ${params.sourceinstance} \ -DestSqlInstance ${params.destinationinstance} \ -PfaEndpoint ${params.pfaendpoint} \ -PfaUser ${USERNAME} \ -PfaPassword ${PASSWORD}”) } } } stage(‘Deploy Dacpac to SQL Server’) { timeout(time:2, unit:‘MINUTES’) { unstash ‘theDacpac’ def ConnString = “server=${params.destinationinstance};database=${params.database}” bat “\”C:\\Program Files (x86)\\Microsoft SQL Server\\140\\DAC\\bin\\sqlpackage.exe\” /Action:Publish /SourceFile:\”Jenkins-Fa-Snapshot-Ci-Pipeline\\bin\\Release\\Jenkins-Fa-Snapshot-Ci-Pipeline.dacpac\” /TargetConnectionString:\”${ConnString}\”” } } } |
Jenkins 2.0 Example Pre-Requisites
- Jenkins 2.0
Assuming that Jenkins is installed on Windows, the service account that Jenkins runs under will require permissions to perform a checkpoint on the source database and offline/offline the target database. Executing the powershell module will require privileges to online and offline the windows logical disk that the target database resides on. - Visual Studio 2017
Community edition will suffice, this needs to be installed for “Data storage and processing” workloads - ‘Source’ SQL Server database with all data files and the transaction log residing on the same volume
- ‘Destination’ SQL Server database with all data files and the transaction log residing on the same volume
- GIT for Windows
- PowerShell Get module
- Pure Storage PowerShell SDK module
- dbatools.io PowerShell module
- Pure Storage refresh dev SQL Server database from ‘Production’ PowerShell function
Steps For Setting-Up The Build Pipeline
- Download and install GIT.
- Download and install Visual Studio 2017 community edition, ensure that this is installed for “Data storage and processing”.
- Download and install Jenkins, for the purposes of expediency, accept the default plugin suggestions.
- Whilst logged into Jenkins, go to Manage Jenkins -> Manage Plugins and install the plugin for msbuild, after this has installed you will need to restart Jenkins.
- Go to Manage Jenkins -> Global Tool Configuration -> Add Msbuild and then enter the path to the msbuild executable (installed as part of visual studio), this should be: C:\Program Files (x86)\Microsoft Visual Studio\2017\Community\MSBuild\15.0\Bin\msbuild.exe, when configured correctly, this is what the msbuild installation should look like under global tools:

- Install the PowerShell get module, followed by the PureStorage PowerShell and dbatools modules from the PowerShell gallery:
1234Save–Module –Name PureStoragePowerShellSDK –Path C:\scripts\PowerShellSave–Module –Name dbatools –Path C:\scripts\PowerShellInstall–Module –Name PureStoragePowerShellSDKInstall–Module–Name dbatools
Note: Install-Module needs to be run from within a session with administrator privileges. - Download the Refresh-Dev-PsFunc powershell function script from this GitHub repository, in this example the Refresh-Dev-PsFunc.ps1 script will be placed in C:\scripts\PowerShell\autoload.
- Check whether or not a PowerShell profile has been created by running the following command from within a PowerShell session:
1Test–Path $profile - If the Test-Path command returns false, execute New-Item command below in order to create a PowerShell profile.Note:there are a total of six different PowerShell profiles, if the build fails because it cannot find the Refresh-Dev-PsFunc function, the most likely reason is that the function is in the wrong profile, i.e. not the one associated with the windows account running the Jenkins service.
1New–Item –path $profile –type file –force - Open the $profile for editing via the following command:
1notepad $profile - Add the following lines to the file and then save it:
12345Import–Module –Name C:\scripts\PowerShell\dbatoolsImport–Module –Name C:\scripts\PowerShell\PureStoragePowerShellSDK$psdir=“C:\scripts\PowerShell\autoload”Get–ChildItem “${psdir}\*.ps1” | %{.$_}Write–Host “Custom scripts loaded” - The Windows account that the Jenkins service runs under will require access to both the source and destination databases, by default Jenkins will use the built in account “NT AUTHORITY\SYSTEM”. Whilst the use of this account is not recommended for production purposes, to try this exercise out as a proof of concept, this account can be used. In this case this account can be given sysadmin rights to the instance that the source and destination databases reside on as follows:
1EXEC sp_addsrvrolemember ‘NT AUTHORITY\SYSTEM’, ‘sysadmin’;
Note: For production purposes, the creation of a service account is recommended; an account with a password that does not expire and which does not require a change when the first logon attempt is made using it. - Obtain something to build ! This is where we will obtain a SQL Server data tools project which our build pipeline will build into a dacpac and deploy:
12345678910111213141516171819C:\mkdir ProjectsC:\>cd ProjectsC:\Projects>git clone https://github.com/PureStorage-OpenConnect/Jenkins-Fa-Snapshot-Ci-PipelineCloning into ‘Jenkins-Fa-Snapshot-Ci-Pipeline’...remote: Counting objects: 33, done.remote: Compressing objects: 100% (27/27), done.remote: Total 33 (delta 6), reused 29 (delta 5), pack–reused 0Unpacking objects: 100% (33/33), done.C:\Projects>cd J*C:\Projects\Jenkins–Fa–Snapshot–Ci–Pipeline>git remote rm origin - At the top level of the Jenkins console (https://localhost:8080 by default) go to new item -> give the item a name (Jenkins FA Snapshot CI Pipeline – for example) -> pipeline and then hit Ok.
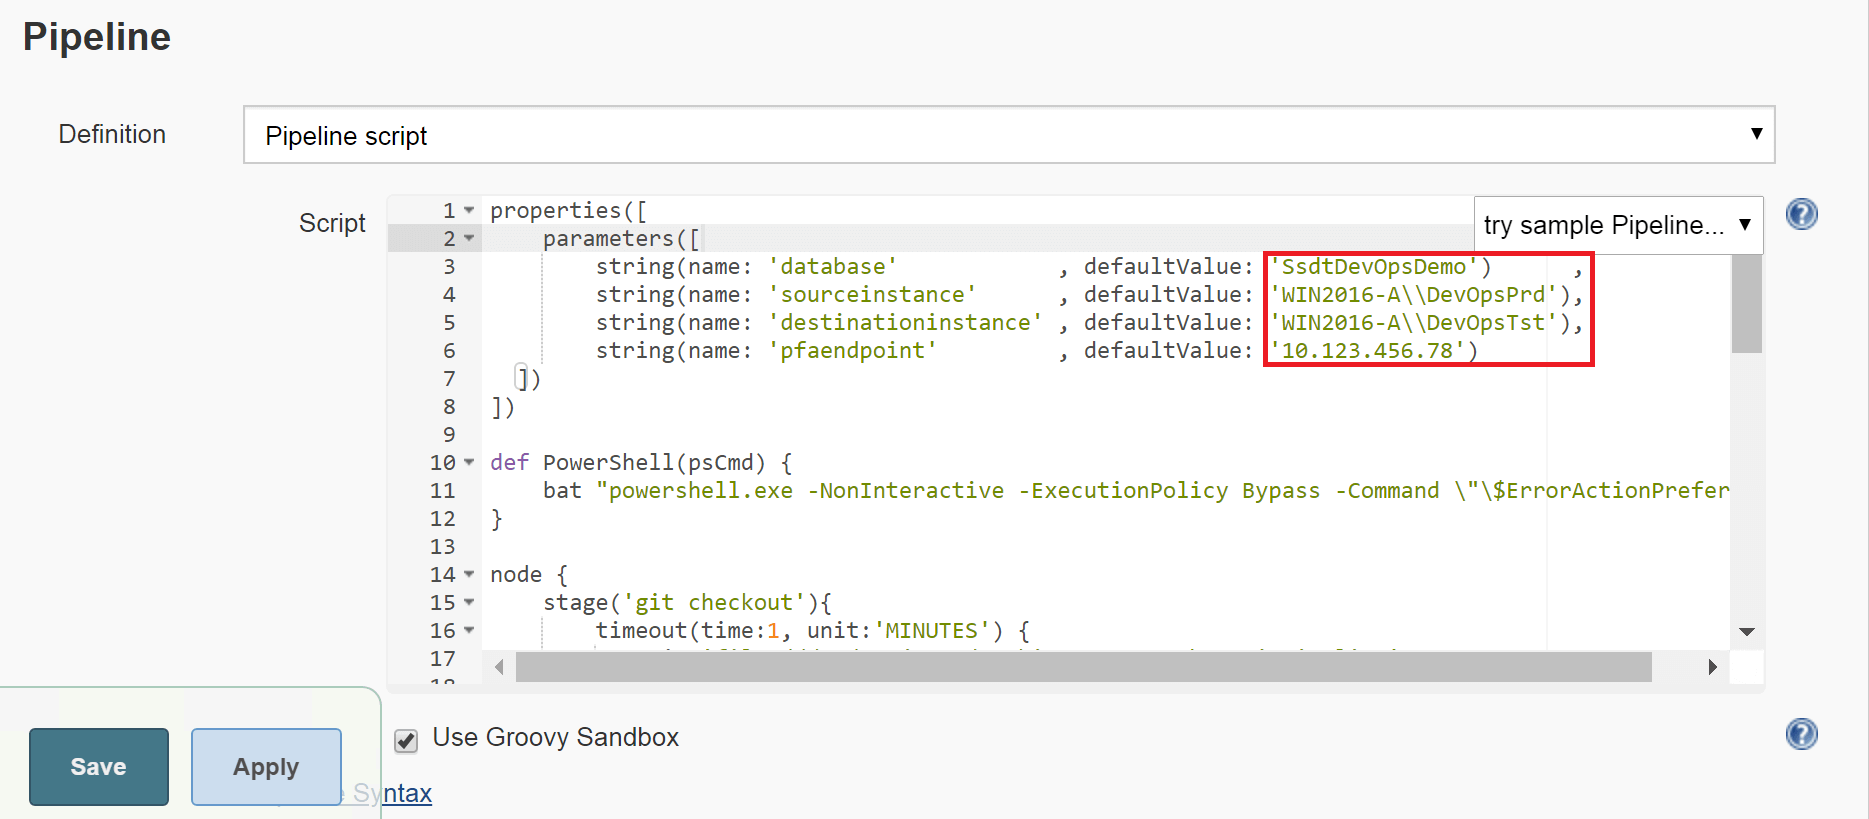
- Take the contents of the file from this link and paste this into the script box in the pipeline section, as highlighted by the red rectangle below:

- Hit Apply and then Save.
- At the top level of the Jenkins console, go to credentials -> system -> global credentials (unrestricted) and hit the adding some credentials link?.
- Select “Username with password” as the ‘Kind’ and provide the username and password for an account that can access the array, for the purposes of this exercise the ID must be ‘FA-Snapshot-CI-Array’:

- Let’s now perform a build ! The very first time we perform a build the icon to do this will be displayed with the text “Build now”, after the initial build this will change to “Build with parameters”:

- For the initial build to succeed the default parameters in the script, i.e. database, sourceinstance, destinationinstance and pfaendpoint need to be changed to values that reflect a database on the source and destination instances, real source and destination instances. Finally, use an array end point that exists:
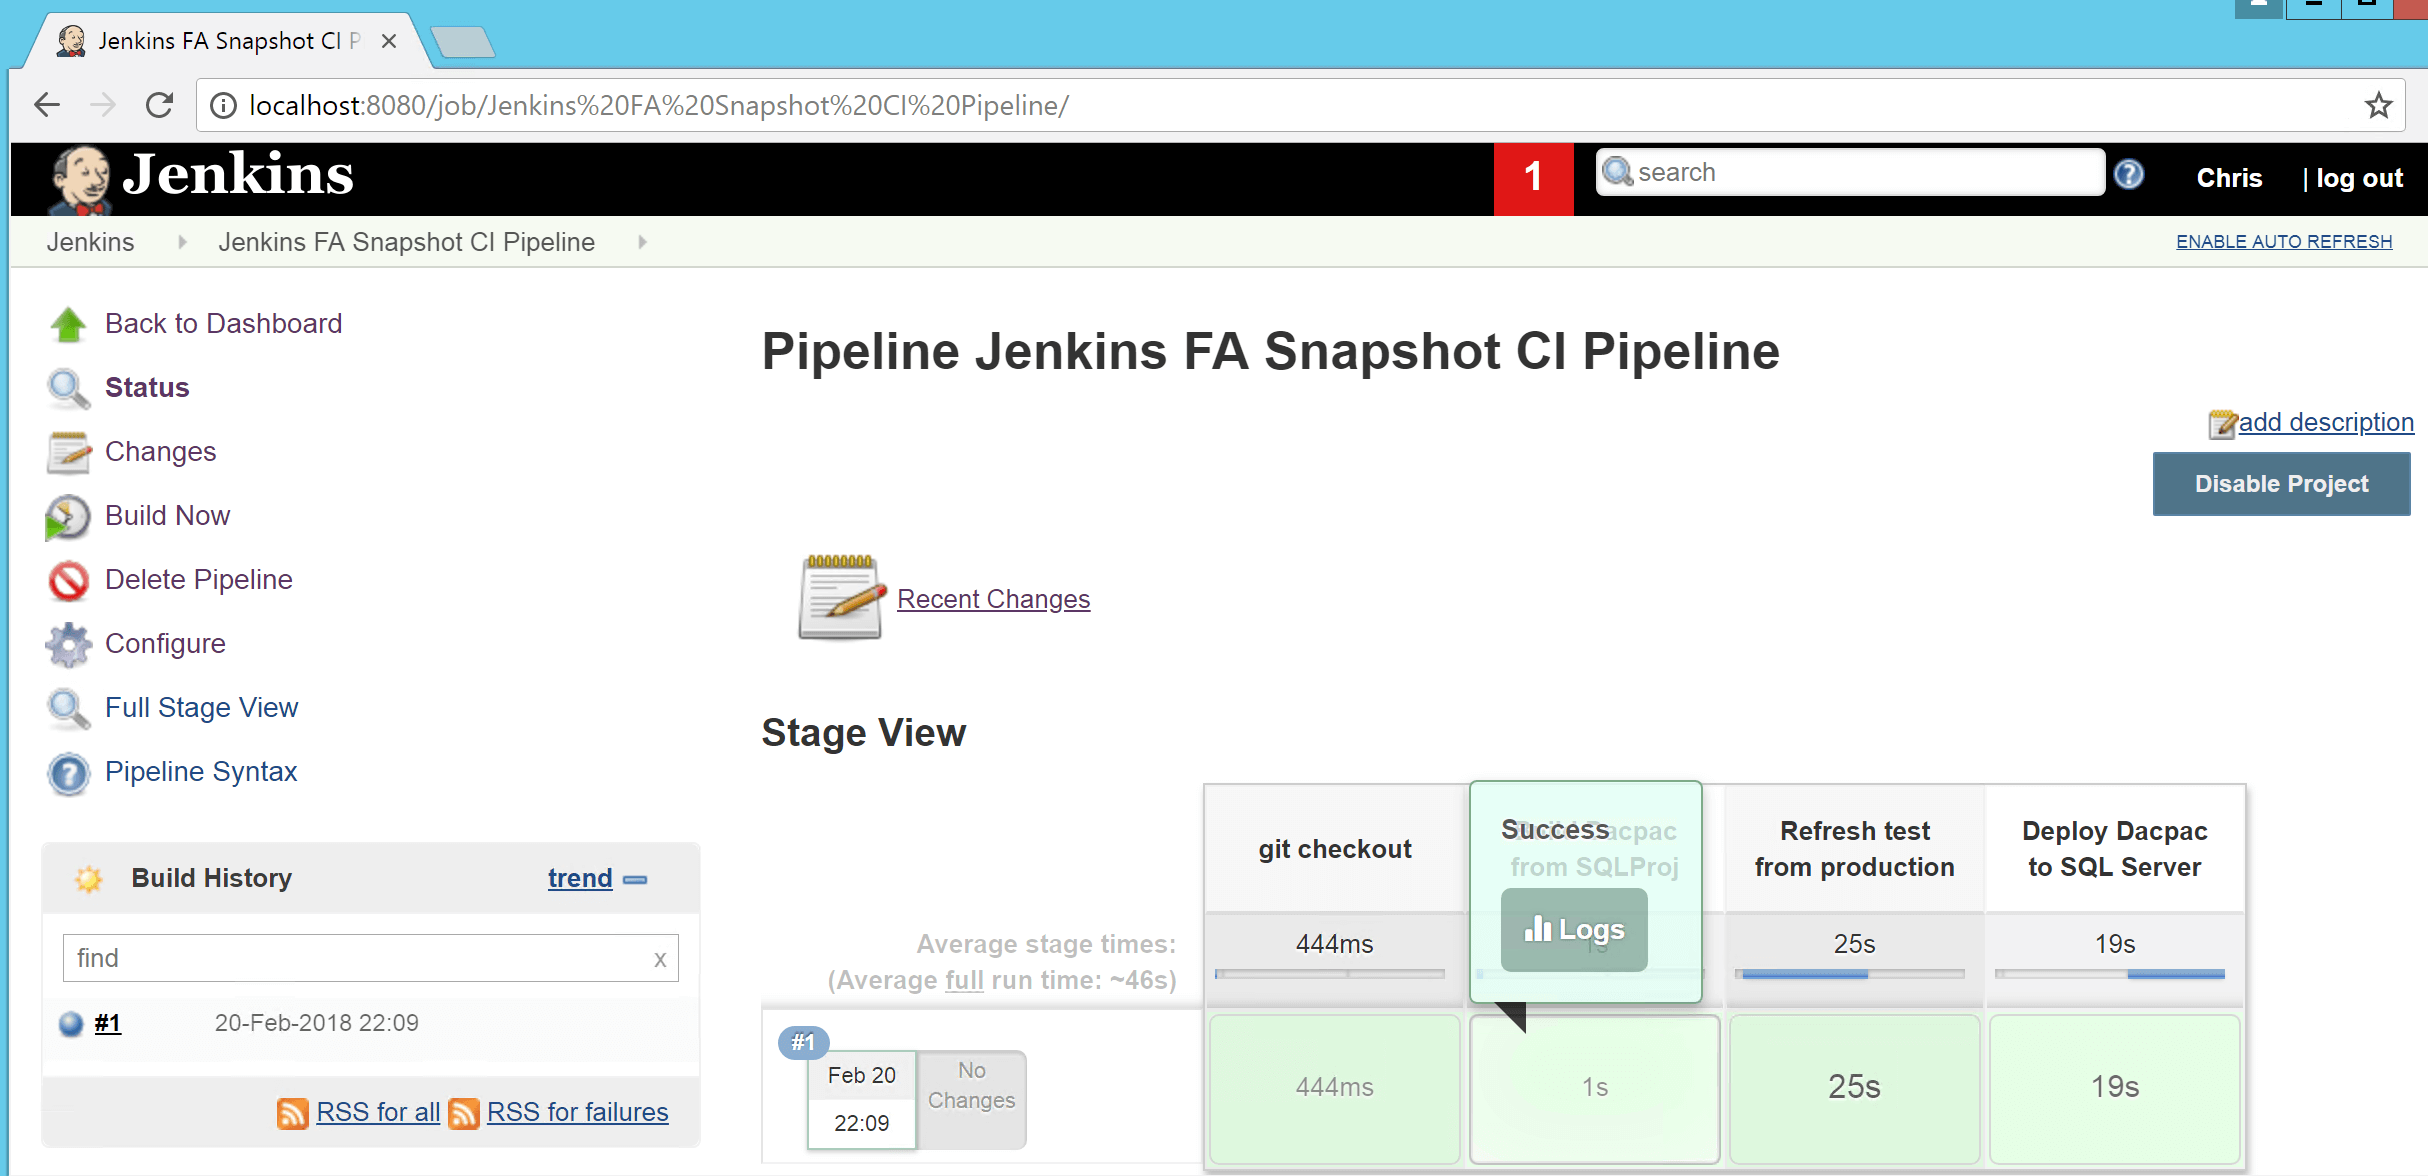
- Once the build has completed successfully, the stage view for the build should look like this:
Et voila ! our walk through for creating a build pipeline which leverages the FlashArray REST API via PowerShell to refresh a test database from production prior to deploying an artefact to it is complete. If there is a requirement to repeat this process for a second build pipeline, only the steps from 12 onward need to be followed.
- Once the build has completed successfully, the stage view for the build should look like this:


