This article originally appeared on Medium.com. It has been republished with permission from the author.
Snapshots are a key part of a production analytics platform; not just for hardware failures and human mistakes, but also test/dev environments necessitate a high performance snapshot restore capability. In the Elastic Cloud Enterprise edition, configuring a snapshot repository for each deployment with automated snapshot schedules is easy. With the snapshot repository on FlashBlade, the all-flash performance enables production recoveries and dev/test workflows.
This post describes how to install Elastic Cloud Enterprise (ECE) and configure a snapshot repository on FlashBlade S3 and then demonstrates a high-performance snapshot and restore.
Tested with: Elastic Cloud Enterprise 2.2.2 and ElasticSearch version 6.8.0 and 7.1.0. Requires at least Purity//FB 2.3.4.
Related reading: A Guide to ElasticSearch Snapshots
Setup FlashBlade S3
On the FlashBlade, first create a service account, user, and access keys in order to enable ElasticSearch to connect using S3. The example below uses the CLI, though the REST API and GUI could also be used.
|
1 |
pureuser@irp210–c01–ch1–fm2> </code><code>pureobjaccount create elastic |
|
1 |
pureuser@irp210–c01–ch1–fm2> </code><code>pureobjuser create elastic/elastic–user |
|
1 |
pureuser@irp210–c01–ch1–fm2> </code><code>pureobjuser access–key create —user elastic/elastic–user |
Save the access and secret keys returned in a secure location as they will be necessary when configuring the ElasticSearch snapshot repository.
Finally, create the bucket, elastic-snapshots, to be used for snapshot storage:
|
1 |
pureuser@irp210–c01–ch1–fm2> </code><code>purebucket create —account elastic elastic–snapshots |
Name Account Used Created Time Remaining
|
1 |
elastic–snapshots default 0.00 2019–01–09 05:42:06 PST – |
Configure Elastic Cloud Enterprise Repository
Install Elastic Cloud Enterprise by following the standard installation instructions.
Once installed, login to the management interface and add an S3 repository for snapshots. A single repository can be share by multiple Elastic deployments (i.e., clusters).
After logging in to the ECE GUI, click “Platform” → “Repositories” → “Add Repository.”
Start by filling in some of the fields to create an S3 repository, the access/secret keys and bucket created previously (elastic-snapshots), but do not yet click “save.” Leave the “region” field blank. In order to configure a non-AWS S3 repository, we need to use the “advanced” mode to enter JSON configuration manually.
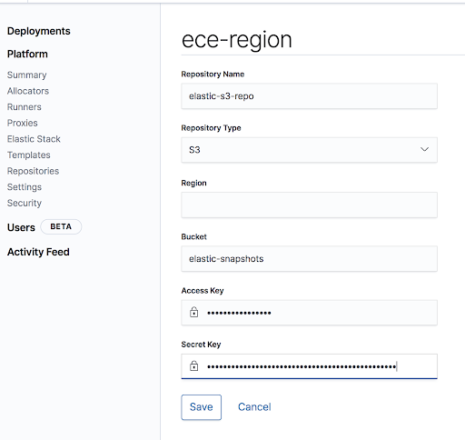
Once filled in, change the “Repository Type” to “Advanced” to add additional properties in order to connect to the FlashBlade. Add “endpoint” where the value is a Data VIP on the FlashBlade and “protocol” set to “http.” It is also possible to import an SSL certificate to the FlashBlade and therefore use HTTPS.
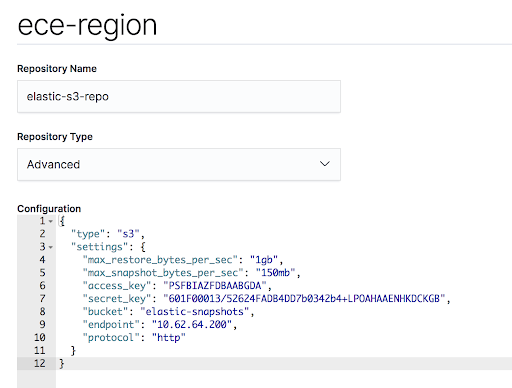
It is also highly recommended to add max_restore_bytes_per_sec and max_snapshot_bytes_per_sec because the default values are only “40mb.”
In my case, the final configuration looks as follows:
{
“type”: “s3”,
“settings”: {
“max_restore_bytes_per_sec”: “1gb”,
“max_snapshot_bytes_per_sec”: “150mb”,
“access_key”: “XXXXX”,
“secret_key”: “YYYYY”,
“bucket”: “elastic-snapshots”,
“endpoint”: “1.2.3.4”,
“protocol”: “http”
}
}
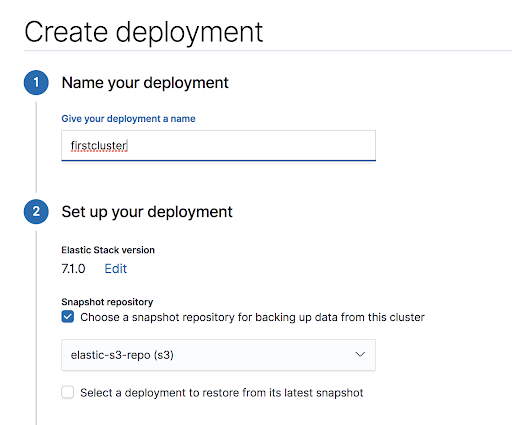
Now that the snapshot repository is configured, we can create a new deployment selecting the box for “Choose a snapshot repository…”
For each deployment, you can then tune the snapshot scheduling and retention. The following configuration is under the “cluster name” → ElasticSearch → Snapshot tab on the left side of the ECE UI.
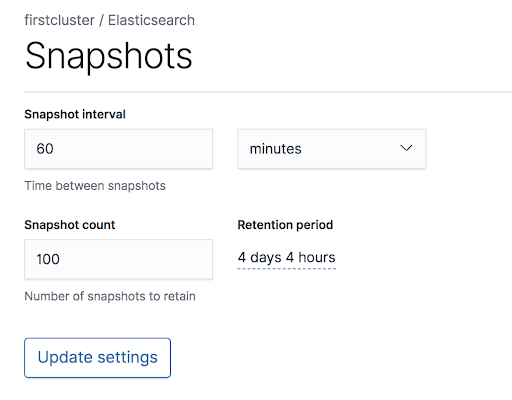
Recommended Tuning for Snapshots:
By default, the read and write speeds for snapshots are limited to only 40MB/s. In order to keep up with moderate ingest rates and restore quickly, this setting should be changed per repository.
The previous configuration included the following lines:
“max_restore_bytes_per_sec”: “1gb”,
“max_snapshot_bytes_per_sec”: “150mb”,
These numbers control the speeds per Elastic node. In this case, I have chosen a smaller number for the snapshot speed than for restores in order to lessen the impact on ingestion while a snapshot is being taken. Feel free to experiment with these numbers.
When creating each deployment, I also recommend adding the following custom setting to “user setting overrides” to dedicate more threads to snapshot functions:
thread_pool.snapshot.max: 8
Note that the rate limiting settings apply per repository whereas the thread_pool setting is per deployment.
Much more information about how the snapshot module works can be found on the official Elastic documentation.
How to Clone a Deployment
While restores due to outages and errors are infrequent but critical, snapshots can also be leveraged in a day-to-day workflow of cloning a deployment. This cloned deployment is a key part of a test/dev plan so that experiments can be done on a test environment instead of the production one.
In order to clone a deployment, create a new deployment and select “restore from latest snapshot” of the target cluster. The creation of the new cluster will now also involve a “restore” operation to populate the indices.
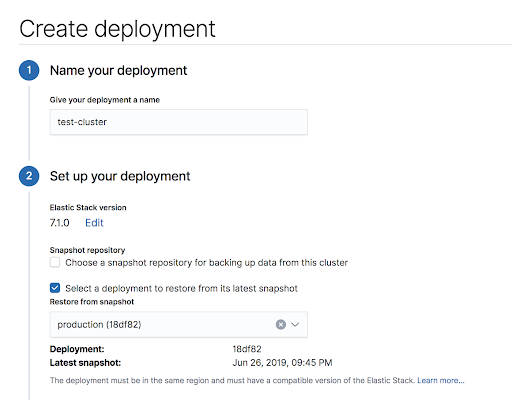
Create a clone deployment based off a different cluster’s snapshot.
Adding deployment cloning to common workflows emphasizes the need to be able to restore from snapshots with high performance. If the cloned deployment takes hours to setup due to the restore speed, it becomes much less valuable.
Tips: Interacting with an ElasticSearch Cluster
Once a deployment in ECE has been configured, checking the health and status of the deployment and indices can be done easily with curl or through the API Console window in the ECE UI.
Personally, I prefer curl because it can be scripted. Setting two environment variables simplifies the command lines when using curl to interact with ElasticSearch:
export ELASTICPASS=XXXXX
export ELASTICHOST=YYYYY
Both values need to be obtained through the ECE GUI when the deployment is created.
The following is a list of useful general ElasticSearch commands as well as snapshot-specific ones.
Basic cluster health checks:
curl -u elastic:$ELASTICPASS $ELASTICHOST/_cat/health?v
curl -u elastic:$ELASTICPASS $ELASTICHOST/_cat/nodes?v
curl -u elastic:$ELASTICPASS $ELASTICHOST/_cat/shards?v
View indices:
curl -u elastic:$ELASTICPASS $ELASTICHOST/_cat/indices?v
Delete an index (caution!), useful for testing a snapshot restore:
curl -u elastic:$ELASTICPASS -XDELETE $ELASTICHOST/$INDEX
Look at snapshot repository info:
curl -u elastic:$ELASTICPASS $ELASTICHOST/_snapshot?pretty
Which should list the snapshot repository json configuration.
Manually take a snapshot, using the repository ‘found-snapshots’ and giving the snapshot a name ‘joshua_1’
curl -XPUT -u elastic:$ELASTICPASS $ELASTICHOST/_snapshot/found-snapshots/joshua_1?wait_for_completion=true
See info about a snapshot, including which indices are included:
curl -u elastic:$ELASTICPASS $ELASTICHOST/_snapshot/found-snapshots/joshua_1?pretty
Snapshot Performance Testing
To add snapshot workflows into a production ElasticSearch environment, we first want to validate the performance can 1) keep up with ingest rates and 2) provide sufficient restore performance to saturate the node’s ability to absorb the index writes. Ideally, these performance requirements are met with sufficient headroom so that the FlashBlade can be used for many other things.
To test snapshot and restore performance, I configured a 21-node cluster in ECE with storage for each node on local SSDs (more later on why that may not be the best storage choice). Each node has 40 cores and 128GB of RAM and connects to a snapshot repository on FlashBlade via S3.
The maximum expected performance of the FlashBlade is 15GB/s reads and 4.5GB/s writes. Given the limitations of the local storage, we expect only to be able to restore, i.e. read from the FlashBlade, as fast as the local SSDs can absorb and write the data.
Index Creation Using ESRally
First, in order to test snapshot and restore performance, I created indices using the esrally benchmarking tool and the NYC taxi trip dataset. This following script counts the number of data nodes in the cluster and sets the shard count to four times the number of nodes before running the tool.
#!/bin/bash
# Assumes environment variables ELASTICPASS and ELASTICHOST have
# been exported.
TARGET=$ELASTICHOST
NODES=$(curl -u elastic:$ELASTICPASS $ELASTICHOST/_cat/nodes | grep di | wc -l)
echo “Racing against $TARGET with $NODES nodes”
SHARDS=$(( $NODES * 4 ))
esrally — track=nyc_taxis \
— target-hosts=$TARGET \
— client-options=”basic_auth_user:’elastic’,basic_auth_password:’$ELASTICPASS’” \
— track-params=”refresh_interval:-1,number_of_shards:$SHARDS” \
— pipeline=benchmark-only \
— challenge=append-no-conflicts-index-only
The track_params allow me to increase the number of shards, which allows ElasticSearch more parallelism in indexing to speed up the data ingest. Similarly, refresh_interval=-1 results in larger batches of documents being written and more efficient IO. Though there is much to explore in improving ingest performance, I will leave that for another time and focus here on snapshot and restore of the resulting index.
Snapshot Performance Test
In the snapshot repository, each shard is stored separately and can be restored in parallel. The original indexing occurs without snapshot enabled in order to demonstrate the peak snapshot performance. We see a maximum write rate of 3.2GB/s to the FlashBlade. In normal operation, the snapshots occur periodically and capture deltas.
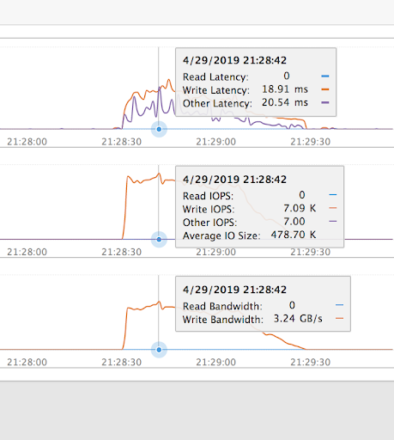
For example, if the snapshot schedule for a deployment results in one snapshot every 30 minutes, then this performance means that the snapshots could theoretically keep up with an ingest of ~5TB of new data per hour. More realistically, this means the snapshot system can be used for other purposes with plenty of headroom and does not have to be a dedicated appliance. But if snapshots need to support higher ingest rates, simply add more blades to the FlashBlade to scale-out the write performance.
Shard replicas were not configured for this test as writing to the local SSDs during a restore is already the bottleneck and adding replica shards will double the load on the local drives during a restore.
Restore Performance Test
To test restore performance, I force deleted one of my indices and performed a restore from the most recent snapshot. The screenshot from the FlashBlade shows the read IO during the restore hit approximately 2.3GB/s.
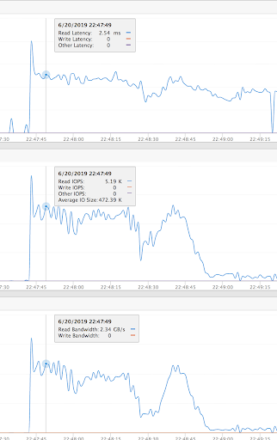
Restore performance was limited by the write throughput of the ElasticSearch nodes not the FlashBlade. Based on FIO testing of the local SSDs, the measured best case write performance was 125MB/s per drive. With these local drives on 21 nodes, in the best case we could only restore at 2.6GB/s. In general, even with many more local SSDs, the bottleneck for restore will be the ability to absorb the new data, freeing the FlashBlade for additional data hub use cases.
The smallest FlashBlade can restore at 7GB/s and performance increases linearly as the system grows. Perhaps then it’s time to also consider using a storage medium for the primary shard storage with higher write speeds. We could instead use an NFS mount on FlashBlade and take advantage of the write performance of a scale-out all-flash storage platform.
Summary
Elastic Cloud Enterprise makes configuring and using a snapshot repository simple. By combining the ease-of-use of snapshot policies with a high-performance object store like FlashBlade, the snapshot module can keep up with high ingest rates as well as provide speedy restores and clones. Together, this makes the snapshot a useful part of an ElasticSearch workflow.

Written By:
Elastic Powered FlashBlade
Learn about Pure’s partnership with Elastic and how it leads to a high-powered FlashBlade!


